Yoast WordPress SEO Plugin How to Use
A beginner-friendly guide to configuring Yoast SEO, optimizing posts, managing meta data, and checking your WordPress SEO settings.

The Yoast WordPress SEO plugin helps you improve how your pages and posts appear in search engines, but it can feel overwhelming the first time you open its settings. Between focus keyphrases, SEO titles, meta descriptions, schema, breadcrumbs, and XML sitemaps, beginners often are not sure which options actually matter.
In this guide, you will learn how to use Yoast SEO from installation to post optimization. You will configure the essential settings, optimize individual posts, review readability suggestions, and avoid common mistakes that can hurt your rankings.
If you are still learning the basics of search optimization, start with this broader guide to what WordPress SEO means before adjusting advanced plugin settings.
Prerequisites
Before you begin, make sure your WordPress site is ready for SEO changes. Yoast can help you optimize content, but it works best when your site is already accessible, indexable, and using clean WordPress settings.
- Administrator access to your WordPress dashboard.
- A published or draft page you want to optimize.
- A clear target keyword or phrase for the page.
- Permalinks enabled under Settings > Permalinks.
- A recent backup before making major SEO configuration changes.
Step 1: Install and Activate Yoast SEO
The first step is installing the plugin from your WordPress dashboard. This adds Yoast SEO panels to your posts, pages, taxonomies, and site-level SEO settings.
- Log in to your WordPress admin dashboard.
- Go to Plugins > Add New Plugin.
- Search for Yoast SEO.
- Click Install Now.
- Click Activate after installation finishes.
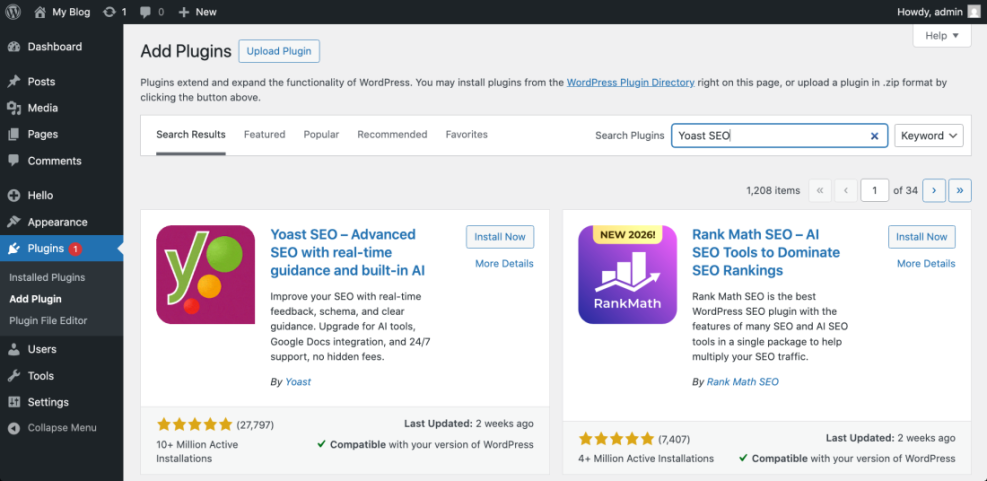
Checkpoint: You should see a new Yoast SEO menu item in the left sidebar of your WordPress dashboard.
Troubleshooting: If you cannot install plugins, your user role may not be Administrator, or your host may restrict plugin installation. Ask the site owner for admin access or check whether you are using a managed WordPress plan with plugin limits.
Step 2: Run the First-Time Configuration
Yoast SEO includes an onboarding configuration flow that helps you set basic site information. This matters because search engines use your site name, organization details, logo, and content settings to understand your website.
- Go to Yoast SEO > General.
- Open the First-time configuration section if it appears.
- Follow the prompts to enter your site name, organization or person details, and logo.
- Save your changes at the end of the setup flow.
If you want a dedicated setup walkthrough, you can also review this Yoast SEO setup guide alongside the steps in this article.
Checkpoint: Yoast should show that the basic configuration is complete, and your site details should be stored in the plugin settings.
Troubleshooting: If the setup wizard does not appear, check Yoast SEO > Settings. Newer versions of Yoast may show settings in a redesigned interface instead of a separate wizard.
Step 3: Configure Search Appearance Settings
Search appearance settings control how your pages, posts, categories, tags, and archives can appear in search results. This is one of the most important areas because incorrect settings can cause duplicate, thin, or unwanted pages to be indexed.
- Go to Yoast SEO > Settings.
- Open the section for Content types.
- Make sure important content types like posts and pages are set to appear in search results.
- Review title templates and meta description templates.
- Open taxonomy settings and decide whether categories and tags should appear in search results.
Checkpoint: Your main posts and pages should be indexable, while low-value archives should be reviewed carefully.
Troubleshooting: If a page is not appearing in Google, check whether Yoast has set it to noindex, then confirm the page is not blocked by your robots.txt file or WordPress reading settings.
Step 4: Check the Yoast XML Sitemap
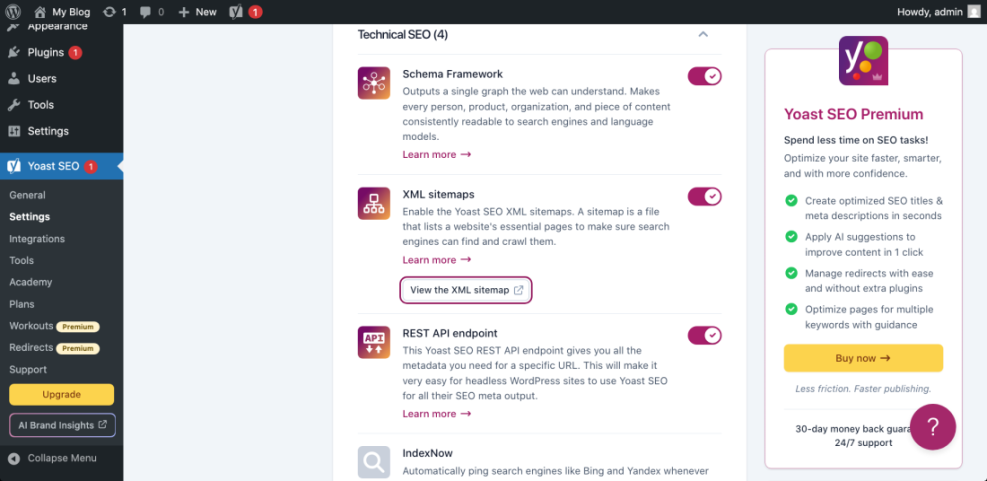
Yoast SEO automatically creates an XML sitemap that helps search engines discover your important URLs. This is especially useful for blogs, service sites, and growing websites with many pages.
- Go to Yoast SEO > Settings.
- Find the XML sitemaps option.
- Make sure XML sitemaps are enabled.
- Click the sitemap link if Yoast provides one.
- Review the sitemap index to confirm posts, pages, and other important content types are included.
For a deeper walkthrough, see this guide on how to create a sitemap in WordPress.
Checkpoint: Your sitemap should load in the browser and display a sitemap index or a list of sitemap files.
Troubleshooting: If the sitemap shows a 404 error, go to Settings > Permalinks and click Save Changes without changing anything. This refreshes rewrite rules and often fixes sitemap URL issues.
Step 5: Optimize a Post with Yoast SEO
The Yoast SEO panel appears inside the WordPress editor for posts and pages. This is where you set the focus keyphrase, SEO title, slug, meta description, and social preview for each piece of content.
- Open a post or page in the WordPress editor.
- Scroll to the Yoast SEO panel or open the Yoast sidebar.
- Enter your Focus keyphrase.
- Review the SEO analysis suggestions.
- Edit the SEO title, slug, and meta description.
- Update the post when you are satisfied with the preview.

Checkpoint: The Yoast preview should show a clear title, readable URL slug, and compelling meta description that matches the page topic.
Troubleshooting: If Yoast says your keyword is missing from the title or description, add it naturally. Do not force the phrase into every sentence just to turn the analysis light green.
Step 6: Write Better SEO Titles and Meta Descriptions
SEO titles and meta descriptions influence how your page appears in search results. They do not replace helpful content, but they can improve relevance and click-through rate when written clearly.
- SEO title: Include the main keyword and a clear benefit.
- Slug: Keep it short, lowercase, and readable.
- Meta description: Summarize the page and give users a reason to click.
- Search intent: Match the wording to what the searcher wants to accomplish.
For more detail on this part of on-page optimization, follow this tutorial on how to add a meta description in WordPress.
Checkpoint: Your SEO title should not be vague, and your meta description should explain the page in one concise, useful sentence.
Troubleshooting: If Google shows a different description in search results, that is normal. Google may rewrite snippets based on the search query, page content, and user intent.
Step 7: Use the Readability Analysis Wisely
Yoast includes a readability analysis that checks sentence length, paragraph length, transition words, passive voice, headings, and text structure. These checks are helpful, but they should support your writing rather than control it completely.
- Open the Readability analysis in the Yoast panel.
- Review any red or orange suggestions.
- Shorten long paragraphs where possible.
- Add descriptive headings to break up the content.
- Improve transitions between sections when the article feels abrupt.
Checkpoint: The page should be easy to scan, with short paragraphs, helpful headings, and a logical flow.
Troubleshooting: If Yoast flags technical terms or necessary long phrases, use your judgment. Some topics require precise language that cannot always be simplified.
Step 8: Review Schema and Social Settings
Yoast SEO can output structured data that helps search engines understand your content type, organization details, breadcrumbs, and page relationships. It also lets you customize how posts look when shared on social platforms.
- Open the post or page you want to optimize.
- Find the Yoast SEO schema or advanced settings section.
- Confirm the page type and article type make sense for the content.
- Open the social preview settings if available.
- Add a custom social title, description, and image when needed.
Checkpoint: Your page should have appropriate schema settings and a share preview that looks professional.
Troubleshooting: If social platforms show an old image or title, clear your WordPress cache and use the platform’s sharing debugger to refresh the preview.
Step 9: Avoid Common Yoast SEO Mistakes
Yoast is powerful, but incorrect use can create SEO problems. Most issues happen when site owners over-optimize, change index settings without checking results, or treat plugin scores as ranking guarantees.
- Do not use the same focus keyphrase for every page.
- Do not stuff keywords into headings or descriptions.
- Do not noindex important pages by accident.
- Do not ignore the actual search intent behind the keyword.
- Do not install multiple SEO plugins that control the same metadata.
Checkpoint: Each important page should target a specific topic, have unique metadata, and remain indexable unless you intentionally want it excluded.
Troubleshooting: If titles or meta descriptions look duplicated, review Yoast templates and individual page overrides. Also check whether another SEO plugin or theme setting is outputting duplicate meta tags.
You Are Ready to Use Yoast SEO with Confidence
Yoast WordPress SEO is most useful when you treat it as a workflow tool, not a magic ranking button. Start with the basic configuration, confirm your sitemap, optimize each post with a clear focus keyphrase, and write metadata that helps real searchers understand your content.
As your site grows, revisit your search appearance settings, update old posts, and watch for duplicate or thin pages. A clean Yoast setup combined with helpful content gives your WordPress site a stronger SEO foundation.
Further Reading
- Best WordPress SEO Plugins and Tools
- How to Do On-Page SEO in WordPress
- Internal Linking for WordPress Beginners
- How to Add SEO Keywords to a WordPress Website
Frequently Asked Questions
Is Yoast SEO enough to rank my WordPress site?
Yoast SEO helps you configure technical SEO basics and optimize on-page elements, but it does not guarantee rankings. You still need helpful content, good site performance, internal links, backlinks, and a strong understanding of search intent.
Why is Yoast showing a red or orange SEO score?
A red or orange score usually means Yoast found missing or weak optimization signals, such as no focus keyphrase in the title, a short meta description, or limited internal links. Review each suggestion, but only apply changes that improve the page for readers.
Why is my Yoast sitemap not loading?
First, go to Settings > Permalinks and click Save Changes to refresh rewrite rules. Then clear your cache and check whether another sitemap plugin or SEO plugin is conflicting with Yoast.
Should I follow every Yoast recommendation?
No. Yoast recommendations are useful guidelines, but they are not absolute rules. Follow suggestions that improve clarity, structure, and relevance, but do not make your writing awkward just to get a green score.
Is it safe to change Yoast index settings on a live site?
Be careful when changing index settings because a wrong noindex setting can remove important pages from search results over time. Review each content type, document what you changed, and check important pages after saving.