Why is My WordPress Site So Slow
A practical troubleshooting guide to find what is slowing down your WordPress site and fix the biggest performance bottlenecks first.
A slow WordPress site can frustrate visitors, reduce conversions, and make your content feel less trustworthy. The cause is rarely one single thing; it is usually a mix of hosting limits, heavy plugins, unoptimized images, render-blocking scripts, database clutter, and weak caching.
In this guide, you will learn how to diagnose the most common WordPress speed problems and fix them in a practical order. Instead of guessing, you will test your site, isolate the biggest bottlenecks, and apply fixes that usually create the fastest visible improvement.
If you want a broader optimization workflow after this diagnosis, review this WordPress speed optimization step-by-step guide after you identify the main cause of the slowdown.
Step 1: Test Your Site Before Making Changes
Before installing another plugin or changing hosting settings, run a baseline speed test. This helps you separate real performance problems from temporary browser, internet, or device issues.
Use tools such as PageSpeed Insights, GTmetrix, WebPageTest, or your host’s performance dashboard. Test your homepage, one blog post, one category page, and one high-value landing page because different templates can have different problems.
- Open a speed testing tool in a private browser window.
- Test your most important page first.
- Record the mobile score, Largest Contentful Paint, Total Blocking Time, Cumulative Layout Shift, page size, and number of requests.
- Repeat the test after clearing your cache to confirm the result is consistent.
Checkpoint: You should have a clear list of the slowest pages and the metrics causing the biggest issue.
Step 2: Check Whether Your Hosting Is the Bottleneck
Hosting is one of the most common reasons a WordPress site feels slow, especially on cheap shared servers. If the server takes too long to respond, caching and image compression can help, but they will not fully solve the problem.
Look at Time to First Byte, server response time, PHP workers, memory limits, CPU usage, and database performance in your hosting panel. If your site slows down during traffic spikes, plugin updates, backups, or WooCommerce activity, your hosting plan may not have enough resources.
- Shared hosting overload: Your site competes with many other sites on the same server.
- Low PHP memory: WordPress, plugins, and themes may struggle to process requests.
- Old PHP version: Outdated PHP can reduce performance and increase security risk.
- Distant server location: Visitors far from the server may experience higher latency.
Checkpoint: Your hosting dashboard should show stable CPU, memory, and server response times during normal traffic.
If your host is consistently the issue, compare your current setup with a guide like how to choose the right WordPress hosting before upgrading.
Step 3: Audit Plugins and Theme Features
Every plugin can add PHP processing, database queries, CSS files, JavaScript files, tracking scripts, or admin background tasks. A site with too many overlapping plugins often becomes slow even on decent hosting.
Start by reviewing plugins that affect page builders, sliders, popups, analytics, security scanning, backups, social sharing, related posts, ads, and WooCommerce features. These plugins can be useful, but they should not duplicate the same job.
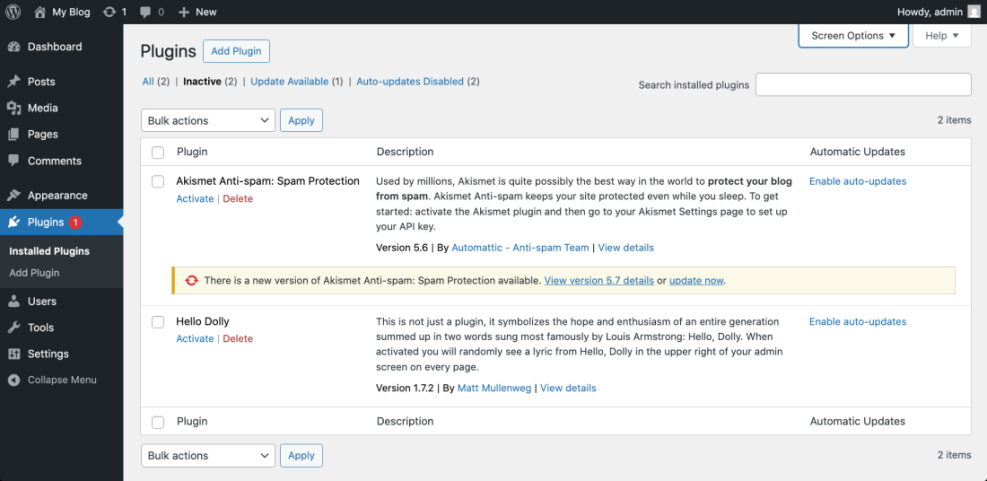
- Go to WordPress Admin > Plugins > Installed Plugins.
- Deactivate plugins you no longer use.
- Replace overlapping plugins with one well-maintained tool.
- Test the site after each major change.
- Check whether the front end loads fewer scripts and requests.
Checkpoint: Your plugin list should contain only tools that serve a clear purpose, are actively maintained, and do not duplicate another plugin’s functionality.
Step 4: Set Up Caching Correctly
Caching speeds up WordPress by serving saved versions of pages instead of rebuilding each page from scratch on every visit. Without caching, WordPress must repeatedly process PHP, query the database, load theme files, and assemble the page.
At minimum, most WordPress sites should use page caching, browser caching, CSS and JavaScript optimization, and a cache purge process that works when content changes. A caching plugin can help, but bad settings can also break layouts, forms, carts, or logged-in user pages.
- Install one caching solution only, not multiple plugins that do the same job.
- Enable page caching for public pages.
- Enable browser caching for static files.
- Minify CSS and JavaScript carefully.
- Test forms, menus, sliders, checkout pages, and logged-in pages after enabling optimization settings.
Checkpoint: Repeat your speed test and confirm that page load time, server response time, and total requests improved without breaking the site layout.
For a full setup process, follow this complete WordPress caching setup guide.
Step 5: Optimize Images and Media Files
Large images are one of the easiest ways to slow down a WordPress site. A single oversized hero image can damage mobile performance, increase Largest Contentful Paint, and make pages feel heavy before visitors even scroll.
Resize images before uploading, compress them, use modern formats when supported, and avoid uploading full-resolution camera files directly into the Media Library. Also review background images, sliders, featured images, logos, and icons.
- Use the correct dimensions for the area where the image appears.
- Compress images before or during upload.
- Use lazy loading for below-the-fold images.
- Avoid large autoplay videos in hero sections.
- Replace image-heavy sliders with simpler layouts when speed matters.
Checkpoint: Your page size should decrease, and the largest visible image should load faster on mobile.
Step 6: Clean the Database and Background Tasks
WordPress stores posts, pages, revisions, comments, plugin settings, transients, WooCommerce data, and scheduled tasks in the database. Over time, old data can make the admin area slower and increase the work required to generate pages.
Common database issues include excessive post revisions, expired transients, spam comments, orphaned plugin tables, and heavy scheduled tasks. Use a trusted database optimization plugin or your host’s tools, but always create a backup first.
- Create a full backup of your site files and database.
- Review post revisions, spam comments, trashed content, and expired transients.
- Clean only the items you understand.
- Check your site after cleanup.
- Remove abandoned plugin tables only if you are sure the plugin is no longer needed.
Checkpoint: The admin dashboard, post editor, and front-end pages should feel more responsive after cleanup.
Step 7: Reduce Heavy Scripts, Fonts, and Third-Party Tools
Third-party scripts often slow down WordPress because they load from outside your server. Analytics, ads, chat widgets, social embeds, tracking pixels, video embeds, map embeds, and marketing popups can all delay rendering.
Review every script that loads on your pages and ask whether it is required on every URL. A contact form script may only be needed on the contact page. A checkout tracking script may only be needed on store pages.
- Remove unused tracking pixels.
- Load chat widgets only on pages where they help conversions.
- Limit font families, font weights, and external font requests.
- Replace heavy embeds with clickable thumbnails when possible.
- Delay non-critical JavaScript only after testing important interactions.
Checkpoint: Your waterfall report should show fewer third-party requests and less JavaScript blocking the page.
Step 8: Fix Core Web Vitals Problems
Core Web Vitals help you understand how users experience loading speed, interactivity, and visual stability. A WordPress site may appear fine visually but still fail because the main content loads late, scripts block interaction, or layout elements shift.
Focus on the three practical areas: make the largest visible content load sooner, reduce heavy JavaScript, and reserve space for images, ads, banners, and embeds. These improvements usually help both user experience and SEO performance.
- Largest Contentful Paint: Optimize the hero image, server response time, caching, and critical CSS.
- Interaction to Next Paint: Reduce heavy JavaScript and unnecessary plugins.
- Cumulative Layout Shift: Set image dimensions and reserve space for dynamic elements.
Checkpoint: Your mobile performance report should show better loading, interactivity, and layout stability after repeated testing.
Step 9: Monitor Performance After Each Fix
Speed optimization is not a one-time task. New plugins, theme updates, tracking scripts, ads, images, and content changes can slowly make your site heavy again.
Create a simple monthly speed audit routine. Test your key pages, review plugin changes, check hosting resource usage, and compare results against your baseline numbers.
- Run a monthly speed test on your homepage and top pages.
- Check recent plugin, theme, and WordPress core updates.
- Review new media uploads for oversized files.
- Look for new third-party scripts added by marketing tools.
- Document changes that improved or hurt performance.
Checkpoint: You should be able to identify when performance changed and what update, plugin, image, or script likely caused it.
Your Slow WordPress Site Can Usually Be Fixed Systematically
A slow WordPress site is usually caused by a combination of hosting limits, plugin overhead, missing caching, large media files, bloated scripts, and database clutter. The best approach is to test first, fix the biggest bottleneck, and retest before moving to the next change.
Start with your baseline speed test, then work through hosting, plugins, caching, images, database cleanup, scripts, and Core Web Vitals. When you follow a structured workflow, you avoid random changes and make your site faster without breaking important features.
Further Reading
- Beginner Guide to WordPress Speed and Core Web Vitals
- Image Optimization Checklist for WordPress Websites
- Best WordPress Caching Plugins
- Monthly Speed Audit for WordPress