WordPress Security Audit Checklist to Find and Fix Vulnerabilities
A practical step-by-step checklist to inspect your WordPress site, find weak points, and fix common security risks before attackers exploit them.
A WordPress security audit helps you find weak passwords, outdated plugins, exposed admin areas, bad file permissions, missing backups, and other vulnerabilities before they turn into a real incident. It is not just for hacked websites; it is a routine maintenance task every site owner should perform on a schedule.
In this checklist, you will inspect your WordPress installation from the outside in: backups, updates, user accounts, plugins, themes, file permissions, malware indicators, login protection, database hygiene, and server-level risks. You will also learn what to fix immediately and what to monitor over time.
If you are new to the bigger picture of protecting a site, start with this WordPress security overview so the audit steps below make more sense in context.
Prerequisites
Before you begin, make sure you have access to the areas needed to inspect and repair the site safely. A security audit often touches the WordPress dashboard, hosting control panel, files, database, and DNS settings.
- Administrator access to the WordPress dashboard.
- Hosting account access, such as cPanel, Plesk, managed hosting dashboard, or cloud panel.
- FTP, SFTP, SSH, or File Manager access.
- Access to DNS, CDN, and firewall settings if your site uses them.
- A recent full-site backup, including files and database.
Step 1: Confirm You Have a Clean Backup
A security audit should always begin with backups because fixes can affect files, plugins, themes, redirects, and database records. A backup also protects you if you discover malware and need to roll back to a known clean version.
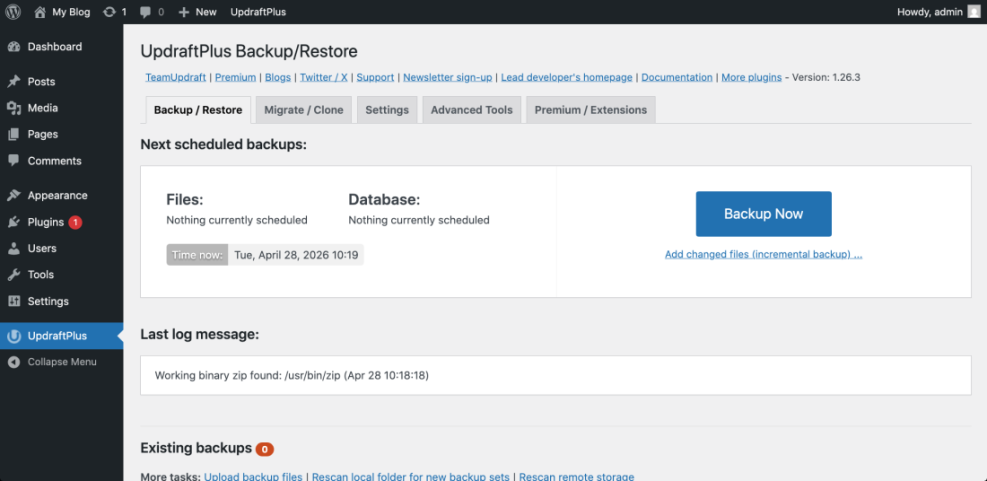
Go to your backup plugin, hosting backup panel, or managed WordPress dashboard and confirm that the latest backup includes both website files and the database. If you do not already have a repeatable backup process, follow this guide on how to back up a WordPress site before continuing.
- Open your WordPress admin dashboard.
- Go to the backup plugin screen, or open your hosting backup tool.
- Check the date of the latest backup.
- Confirm that the backup includes files, database, uploads, plugins, and themes.
- Download a copy or confirm the backup is stored off-site.
Checkpoint: You should have a recent backup from before the audit, plus confidence that you can restore it if needed.
Troubleshooting: If the backup fails, check storage limits, PHP memory limits, cron issues, and server timeout errors. Large sites may need incremental backups instead of one large archive.
Step 2: Audit WordPress Core, Plugin, and Theme Updates
Outdated software is one of the most common WordPress security risks. Your audit should identify anything that is not current, especially abandoned plugins, unsupported themes, and old WordPress core versions.
- In WordPress admin, go to Dashboard > Updates.
- Review available updates for WordPress core, plugins, themes, and translations.
- Update low-risk plugins first on a staging site if available.
- Check each plugin’s changelog for security fixes.
- Remove plugins and themes that are inactive, abandoned, or no longer needed.
Checkpoint: WordPress core, active plugins, and active themes should be updated, and unused extensions should be deleted rather than left disabled.
Troubleshooting: If an update breaks the site, restore from backup or roll back the affected plugin on staging first. Then check PHP compatibility, plugin conflicts, and theme overrides before trying again.
Step 3: Review User Accounts and Permissions
User accounts are a major security surface because attackers often target weak passwords, old administrator accounts, and unnecessary privileges. Your goal is to ensure every account has the minimum access required.
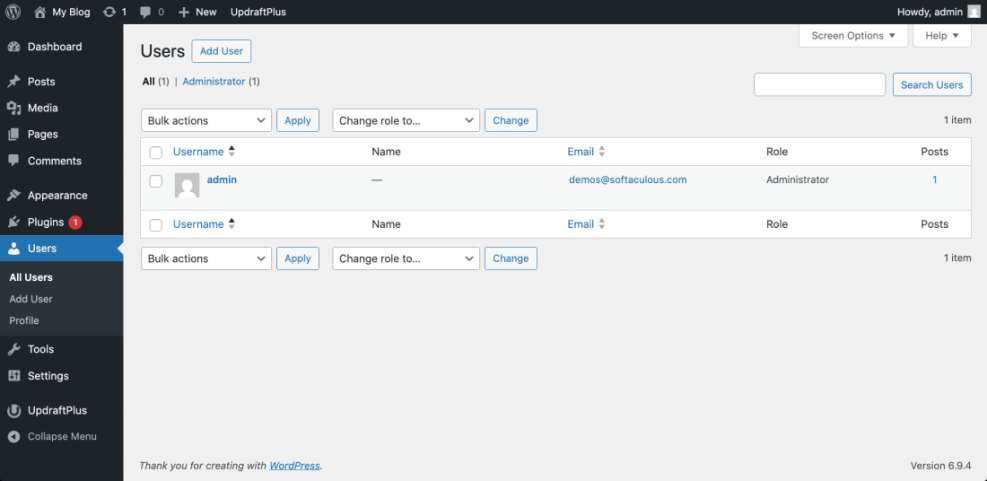
- Go to Users > All Users in the WordPress dashboard.
- Sort users by role and review all Administrator and Editor accounts first.
- Remove users who no longer need access.
- Downgrade accounts that do not require admin privileges.
- Require strong passwords for all users with publishing, shop, or admin access.
- Enable two-factor authentication for administrators and other high-risk accounts.
Checkpoint: Only trusted users should have Administrator access, and every active user should have a clear business reason to remain on the site.
Troubleshooting: If you find an unknown administrator, do not simply delete it and move on. First export a list of users, check recent activity logs if available, change all administrator passwords, and inspect the site for other signs of compromise.
Step 4: Strengthen Login and Admin Area Security
The WordPress login page is a frequent target for brute-force attacks, credential stuffing, and automated bots. A good audit checks whether your login flow has enough friction to stop common attacks without locking out legitimate users.
- Go to your security plugin settings or hosting security panel.
- Enable login attempt limiting.
- Enable two-factor authentication for administrators.
- Review CAPTCHA or bot protection settings if spam login attempts are common.
- Check whether XML-RPC is needed; disable or restrict it if your site does not use it.
- Protect the admin area with firewall rules or server restrictions when appropriate.
Checkpoint: Repeated failed login attempts should trigger lockouts, admin users should use two-factor authentication, and unnecessary remote login methods should be restricted.
Troubleshooting: If users report being locked out, reduce overly aggressive lockout rules, whitelist trusted IP addresses carefully, and confirm the site is not blocking normal login cookies or REST API requests needed by legitimate plugins.
Step 5: Inspect Plugins and Themes for Vulnerabilities
Plugins and themes extend WordPress, but they also add third-party code to your site. Your audit should identify abandoned tools, duplicate functionality, risky permissions, and plugins with known vulnerabilities.
- Go to Plugins > Installed Plugins.
- Delete inactive plugins you do not plan to use.
- Check when each active plugin was last updated.
- Review whether multiple plugins perform the same job.
- Replace abandoned plugins with maintained alternatives.
- Go to Appearance > Themes and delete unused themes except a default fallback theme if your workflow requires one.
For security-specific tools, compare your current setup against this guide to the best WordPress security plugins so you can avoid overlapping features and choose a tool that fits your risk level.
Checkpoint: Your plugin list should be lean, actively maintained, and free of tools that duplicate security, caching, forms, redirects, or SEO features unnecessarily.
Troubleshooting: If you cannot remove a plugin because it powers critical features, check whether the developer provides security updates. If not, plan a replacement on staging before removing it from the live site.
Step 6: Check File Permissions and Sensitive Files
Incorrect file permissions can expose configuration files, allow unauthorized changes, or make malware easier to place on your server. This step helps you confirm that WordPress files are not more writable than necessary.
Use your hosting File Manager, SFTP client, or SSH terminal to inspect permissions. On many Linux hosting environments, directories commonly use 755 and files commonly use 644, but your host may recommend different settings based on the server configuration.
Run these commands in an SSH terminal from your WordPress root directory if you are comfortable using the command line:
find . -type d -exec chmod 755 {} \;
find . -type f -exec chmod 644 {} \;
Also confirm that sensitive files such as wp-config.php, .htaccess, backups, database exports, and log files are not publicly accessible from the browser.
Checkpoint: Files should not be broadly writable, sensitive configuration files should not be exposed, and old backup archives should not sit inside public directories.
Troubleshooting: If changing permissions causes errors, contact your host before forcing new values. Some managed hosts use custom permission models that differ from standard shared hosting setups.
777. It may temporarily fix a write error, but it can create a serious security weakness. Step 7: Scan for Malware, Backdoors, and Suspicious Changes
A security audit should include both automated scans and manual review. Scanners can detect known malware patterns, while manual inspection helps you catch strange admin users, hidden redirects, unfamiliar files, and unexpected code changes.
- Run a scan with your security plugin or hosting malware scanner.
- Check recently modified files in
wp-content, especially plugin, theme, and uploads folders. - Look for suspicious PHP files inside
wp-content/uploads. - Review
wp-config.php,.htaccess, theme files, and must-use plugins. - Search for unknown redirects, injected scripts, and unfamiliar admin notices.
Checkpoint: Your scanner should report no critical malware findings, and manual review should not reveal unexpected PHP files, hidden admin users, or suspicious redirects.
Troubleshooting: If a scanner finds malware, do not only delete the flagged file. Find the entry point, patch the vulnerable plugin or theme, rotate passwords, check user accounts, and rescan after cleanup.
Step 8: Review the Database for Spam, Unknown Users, and Suspicious Options
The WordPress database stores users, settings, posts, plugin options, redirects, and sometimes injected content. A database review can uncover spam administrator accounts, malicious scripts in posts, and suspicious site URL changes.
- Open phpMyAdmin, Adminer, WP-CLI, or your host’s database tool.
- Check the
wp_userstable for unfamiliar accounts. - Review
wp_usermetafor unexpected administrator capabilities. - Inspect
wp_optionsfor suspicioussiteurl,home, or autoloaded options. - Search posts and pages for injected scripts, spam links, and hidden iframes.
You can run this WP-CLI command in an SSH terminal to list administrator accounts:
wp user list --role=administratorCheckpoint: Administrator users should be recognizable, site URLs should be correct, and content should not contain hidden scripts or spam links.
Troubleshooting: If you find database-level compromise, export a copy before editing. Then remove the malicious data, rotate all passwords, update salts in wp-config.php, and rescan the full site.
Step 9: Audit Hosting, PHP, SSL, and Server Configuration
WordPress security is not only about the dashboard. Hosting configuration, PHP version, SSL, database access, and server rules can all affect how easy your site is to attack or recover.
- Confirm your site uses HTTPS and redirects HTTP traffic to HTTPS.
- Check that your PHP version is supported by your host and compatible with your site.
- Disable directory browsing if it is enabled.
- Confirm server error logs do not expose sensitive paths publicly.
- Review database user permissions and avoid using overly broad privileges when possible.
- Check whether your host provides a web application firewall, malware scanning, and account isolation.
Checkpoint: Your site should load securely over HTTPS, use a supported PHP version, prevent directory browsing, and avoid exposing sensitive server information.
Troubleshooting: If HTTPS redirects cause loops, check whether SSL is also managed by a CDN, proxy, or load balancer. Mixed SSL settings between WordPress, hosting, and CDN layers commonly cause redirect problems.
Step 10: Set Up Ongoing Monitoring and an Audit Schedule
A one-time audit is helpful, but WordPress security changes as plugins update, users come and go, and new vulnerabilities are discovered. Monitoring helps you catch problems early instead of discovering them after traffic drops or visitors report warnings.
- Enable uptime monitoring.
- Turn on security email alerts for file changes, lockouts, and malware scans.
- Review admin users monthly.
- Check plugin and theme updates weekly.
- Run a full security audit quarterly.
- Document every major change in a maintenance log.
Checkpoint: You should have alerts for major issues, a recurring review schedule, and a documented process for backups, updates, scans, and user reviews.
Turn Your Audit Into a Safer WordPress Site
A WordPress audit gives you a clear picture of what is safe, what is risky, and what needs immediate attention. By checking backups, updates, users, login protection, plugins, themes, files, malware, database records, and hosting settings, you reduce the most common attack paths.
The most important next step is to turn this checklist into a routine. Schedule recurring audits, document fixes, and treat security as part of normal WordPress maintenance rather than an emergency task after something goes wrong.
Further Reading
- How to Secure a WordPress Website
- How to Protect Your WordPress Admin Area Using htaccess
- Beginner WordPress Security Best Practices Guide
- WordPress Backup Plugins
- How to Check If WordPress Plugins Are Up to Date