Step by Step Guide to Two Factor Authentication
How to Secure Your WordPress Login with Two Factor Authentication Codes

Every day, bots and attackers try to guess WordPress passwords using brute force or leaked credentials. If your admin password is ever stolen, an attacker can log in as you, install malware, and take over your entire site.
Two Factor Authentication (2FA) adds a powerful extra layer of protection. Even if someone knows your username and password, they still need a one-time code from your phone, email, or another device before they can log in.
In this step by step guide, you’ll learn exactly how to enable Two Factor Authentication on your WordPress site, using a plugin-based setup that works with the Classic Editor and the Jannah theme. If you’re just starting with hardening your site, you may also want to review our WordPress security overview once you’re done here.
Prerequisites
Before you turn on Two Factor Authentication, make sure you have access to everything you need so you don’t accidentally lock yourself out of WordPress.
- A self-hosted WordPress.org site where you can log in as an Administrator.
- The correct WordPress login URL and credentials (username and password).
- A smartphone or device that can run an authenticator app (Google Authenticator, Authy, 1Password, etc.) or receive email/SMS codes, depending on the plugin you choose.
- Access to your hosting control panel or FTP, in case you need to disable a problematic plugin.
- A recent backup of your WordPress site (files and database).
Step 1: Understand How Two Factor Authentication Works
Two Factor Authentication is based on the idea of using something you know plus something you have. In WordPress, this usually means your password is the first factor and a time-based one-time code from your phone or email is the second factor.
When you enable 2FA, the login flow changes slightly. After entering your username and password on the WordPress login screen, you’ll be asked for a second code generated by an app, sent to your email, or delivered via SMS, depending on your configuration.
- Authenticator app (TOTP): An app like Google Authenticator or Authy generates a new 6-digit code every 30 seconds.
- Email or SMS codes: A one-time code is sent to your email address or phone number when you log in.
- Backup codes: A set of printable codes you can use if you lose access to your main device.
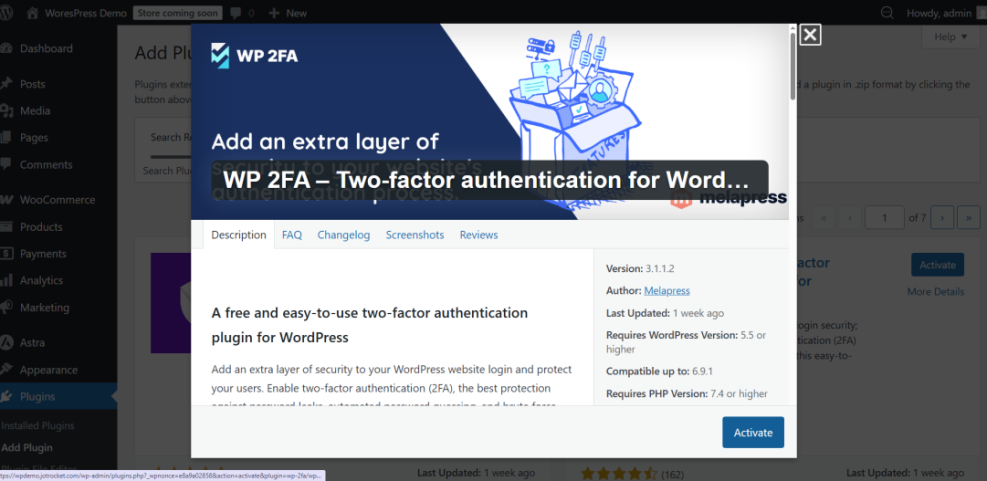
Step 2: Install a Two Factor Authentication Plugin
WordPress does not ship with Two Factor Authentication enabled by default, so you’ll add this feature using a security or dedicated 2FA plugin. The exact screens may vary slightly between plugins, but the overall process is the same.
- Log in to your WordPress Admin area as an Administrator.
- In the left-hand menu, go to Plugins → Add New.
- In the search box, type two factor authentication or the name of your preferred 2FA or security plugin.
- Review the plugin details: check ratings, active installs, last updated date, and compatibility with your WordPress version.
- Click Install Now on the plugin you trust, then click Activate once the installation completes.
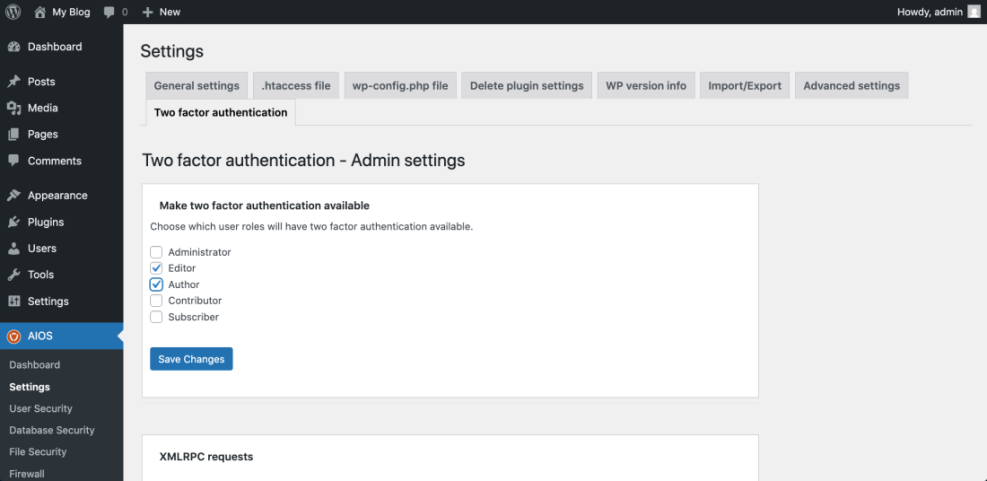
Step 3: Configure Global Two Factor Authentication Settings
After activating your plugin, you’ll typically see a new menu item such as Security or Two-Factor in the WordPress admin sidebar. Some plugins add their settings under Settings or Users.
- Navigate to the plugin’s 2FA settings page (for example, Security → Two Factor or similar).
- Select the authentication methods you want to allow site-wide (e.g., Authenticator app, Email, Backup codes).
- Decide whether 2FA will be optional or required for specific roles (Administrators, Editors, Authors, etc.).
- Set a grace period if the plugin offers one (for example, give users seven days to enable 2FA before it becomes mandatory).
- Review lockout and recovery options, such as backup login links or emergency codes stored in a safe place.
- Click Save Changes or equivalent to apply your settings.
Because security changes can affect access to your site, it is smart to have a solid backup plan in place. For a structured approach, review your existing backup routine against the recommendations in a dedicated WordPress backup strategy so you’re ready if something goes wrong.
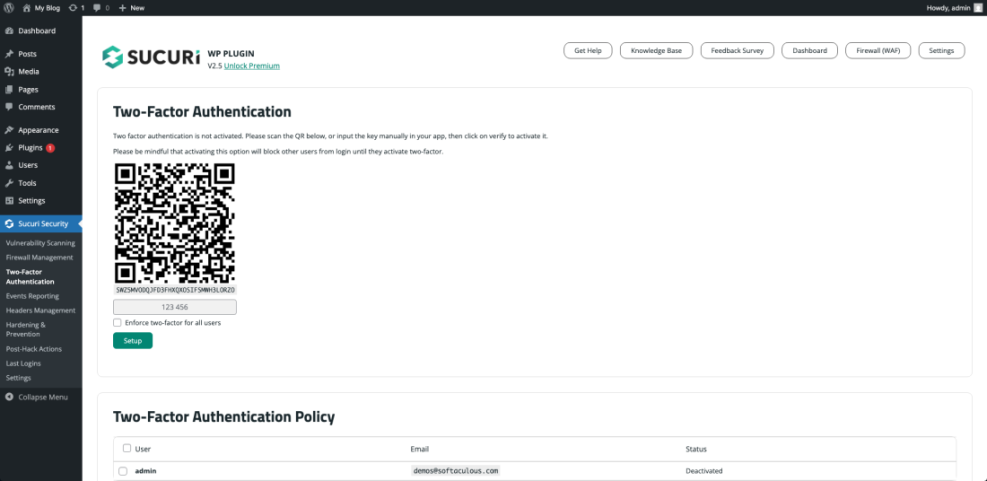
Step 4: Enable Two Factor Authentication for Your User Account
Once the global 2FA settings are configured, you need to enable and test 2FA on your own Administrator account. This is where you connect your authenticator app or email address to WordPress.
- In the WordPress admin menu, go to Users → Profile (or Users → Your Profile, depending on your setup).
- Scroll down until you see the Two Factor Authentication or similar section added by the plugin.
- Click to enable your preferred method, such as Time-based One-Time Password (TOTP) via an authenticator app.
- If using an authenticator app, open the app on your phone and tap the option to add a new account, then scan the QR code shown in your WordPress profile.
- Enter the 6-digit code generated by your app into the confirmation field in WordPress and click Verify or Activate.
- Generate and securely store any backup codes the plugin provides. Print them or save them in a secure password manager, not in your email inbox.
- Scroll to the bottom of the page and click Update Profile or Save Changes.
Step 5: Roll Out Two Factor Authentication to Other Users
With your own account secured, it’s time to roll 2FA out to the rest of your team. Focus first on any users who can install plugins, edit themes, or publish content, since their accounts carry the greatest risk.
- From your WordPress admin, go to Users → All Users.
- Identify users with elevated roles such as Administrator, Editor, and Shop Manager (for WooCommerce sites).
- Depending on your plugin, either:
- Enable a setting that requires 2FA for those roles, or
- Edit each user profile and turn on 2FA individually, then ask them to complete the setup with their own device.
- Send a short internal guide or email explaining what 2FA is, why it’s required, and how to install an authenticator app.
- Set a clear deadline for when 2FA becomes mandatory, and remind users to generate and safely store their backup codes.
Step 6: Test and Troubleshoot Your Two Factor Login
Before you consider the job done, thoroughly test your new 2FA setup to make sure you can log in reliably and that lockout recovery options work as expected.
- Open a new private or incognito browser window.
- Go to your WordPress login URL and enter your username and password as usual.
- Confirm that you see a second step asking for a code from your authenticator app, email, or SMS.
- Enter a valid code from your chosen method and verify that you are successfully logged in to the WordPress Dashboard.
- Log out and try again with an incorrect code to make sure the plugin denies access properly.
- Test a backup login method, such as using one of your stored backup codes, to confirm that recovery works.
If you or another user gets locked out because of a lost phone or misconfigured plugin, you can usually regain access by temporarily disabling the 2FA plugin via your hosting control panel or FTP, then logging in and fixing the settings. Consult your host’s documentation for the safest way to rename or deactivate problem plugins.
Lock Down Your WordPress Login with Two Factor Authentication
When enabled correctly, Two Factor Authentication drastically reduces the chances of an attacker logging into your WordPress site, even if they manage to obtain your password. It adds a small step to each login but closes a huge security gap.
By installing a reputable 2FA plugin, connecting your authenticator app, rolling the feature out to key user roles, and testing recovery paths, you’ve taken a professional step toward hardening your site. Combine 2FA with regular updates, backups, and other best practices, and your WordPress login will be significantly more resilient against real-world attacks.
Further Reading
- How to Secure Your WordPress Website
- Beginner WordPress Security Best Practices Guide
- WordPress Disaster Recovery Walkthrough
- Choosing the Best WordPress Backup Plugins