How to Configure Lscache WordPress
A practical step-by-step guide to setting up LiteSpeed Cache for faster WordPress performance, safer optimization, and better Core Web Vitals.
LiteSpeed Cache, often shortened to LSCache, is one of the most powerful performance plugins for WordPress sites running on LiteSpeed Web Server, OpenLiteSpeed, or compatible hosting environments. The challenge is that the plugin includes many tabs, and turning on every optimization at once can break layouts, scripts, forms, carts, or page builders.
In this tutorial, you will configure Lscache WordPress settings in a safe order: first page caching, then cache rules, then CSS and JavaScript optimization, then images, CDN, database cleanup, and testing. If you are still learning the basics of WordPress performance, start with this beginner guide to WordPress speed optimization before applying advanced settings.
By the end, you should have a faster site, fewer unnecessary server requests, and a repeatable testing process that helps you avoid common LSCache mistakes.
Prerequisites
Before you change LSCache settings, make sure your site is ready for caching. Caching changes how visitors receive pages, so you need a safe rollback plan and a way to confirm that important pages still work.
- Administrator access to your WordPress dashboard.
- The LiteSpeed Cache plugin installed and activated.
- A full website backup before changing performance settings.
- Access to your hosting control panel if you need to confirm LiteSpeed, OpenLiteSpeed, Redis, Memcached, or CDN support.
- A private browser window for testing the public version of your site.
Step 1: Install and Open LiteSpeed Cache
The first step is to install the plugin and confirm that WordPress can access the LSCache settings panel. This gives you one central place to control page caching, browser caching, page optimization, image optimization, CDN settings, and database cleanup.
- Log in to your WordPress admin dashboard.
- Go to Plugins > Add New Plugin.
- Search for LiteSpeed Cache.
- Click Install Now, then click Activate.
- In the left sidebar, open LiteSpeed Cache.

Checkpoint: You should see a new LiteSpeed Cache menu in the WordPress admin sidebar. If you do not see it, refresh the dashboard or confirm that your user account has administrator permissions.
Troubleshooting: If installation fails, check your WordPress file permissions, available disk space, and whether your hosting provider blocks plugin installation. You can also install the plugin manually by uploading the plugin ZIP file under Plugins > Add New Plugin > Upload Plugin.
Step 2: Enable Core Page Cache Settings
Page caching is the main reason to use LSCache. When enabled correctly, LSCache stores generated HTML pages so repeat visitors and anonymous users do not force WordPress to rebuild the same page with PHP and database queries every time.
- Go to LiteSpeed Cache > Cache > Cache.
- Set Enable Cache to ON.
- Set Cache Logged-in Users to OFF for most standard blogs and business websites.
- Set Cache Commenters to OFF unless you understand how your comment workflow behaves.
- Set Cache REST API to ON.
- Set Cache Login Page to ON.
- Click Save Changes.
For most websites, public pages should be cached, while personalized areas should be treated carefully. If you need a broader caching foundation before adjusting LSCache, review this complete WordPress caching setup guide.
Checkpoint: Visit your homepage in a private browser window, refresh it once, then view the response headers using your browser developer tools. On LiteSpeed-compatible hosting, you should usually see an LSCache-related cache status header after the page has been cached.
Troubleshooting: If pages do not cache, confirm that your server supports LiteSpeed Cache, disable other page caching plugins, and check whether your host has server-level rules that override plugin behavior.
Step 3: Configure TTL and Purge Rules
TTL means “time to live.” It controls how long cached content remains valid before LSCache refreshes it. Purge rules decide when LSCache should clear cached pages automatically after content changes.
- Go to LiteSpeed Cache > Cache > TTL.
- Keep the default public cache TTL unless your content changes very frequently.
- Go to LiteSpeed Cache > Cache > Purge.
- Enable automatic purge when posts, pages, categories, tags, and the homepage are updated.
- Click Save Changes.
For a typical blog or business site, the default TTL values are usually a safe starting point. The more important setting is automatic purging because it helps visitors see fresh content after you publish or update a page.
Checkpoint: Update a test post, then visit the post and homepage in a private window. The updated content should appear without manually clearing the entire cache.
Troubleshooting: If old content keeps showing, go to LiteSpeed Cache > Toolbox > Purge and run Purge All. If that fixes the issue, your purge rules need adjustment.
Step 4: Exclude Dynamic Pages from Cache
Some pages should not be cached because they show user-specific or transaction-specific content. This is especially important for WooCommerce stores, membership sites, learning platforms, booking websites, forums, and dashboards.
- Go to LiteSpeed Cache > Cache > Excludes.
- Add cart, checkout, account, login, dashboard, and custom portal URLs if your plugin does not exclude them automatically.
- Add URL paths one per line, using partial paths where appropriate.
- Click Save Changes.
/cart/ /checkout/ /my-account/ /account/ /dashboard/ /login/Run these exclusions in the WordPress admin under LiteSpeed Cache > Cache > Excludes, not in your theme editor. The exact paths depend on your site structure, so confirm the live URLs before adding them.
Checkpoint: Open each excluded page in a private window and confirm that carts, logins, account pages, and forms behave normally.
Troubleshooting: If users see another user’s data or stale account information, immediately purge all cache, disable caching for logged-in users, and add stricter exclusions for account-related pages.
Step 5: Configure CSS, JavaScript, and HTML Optimization Safely
Page optimization can improve load times, but it is also where many LSCache configuration problems happen. Minification is usually safer than combining files, while aggressive deferred or delayed JavaScript can break menus, sliders, forms, ads, analytics, and checkout scripts.
- Go to LiteSpeed Cache > Page Optimization > CSS Settings.
- Set CSS Minify to ON.
- Leave CSS Combine OFF at first, especially on HTTP/2 or HTTP/3 hosting.
- Go to LiteSpeed Cache > Page Optimization > JS Settings.
- Set JS Minify to ON.
- Leave JS Combine OFF at first.
- Test Load JS Deferred carefully. If your site breaks, turn it off or exclude the affected script.
- Go to LiteSpeed Cache > Page Optimization > HTML Settings.
- Set HTML Minify to ON.
- Click Save Changes, then purge all cache.
Checkpoint: Your homepage, blog posts, navigation menu, search, forms, and key landing pages should look and work the same after optimization.
Troubleshooting: If your layout breaks, disable CSS Combine, clear cache, and retest. If buttons, menus, popups, or forms stop working, disable JS Combine and JS Deferred, then re-enable settings one at a time.
Step 6: Optimize Images and Lazy Loading
Images are often the largest files on a WordPress page, so LSCache image settings can have a major performance impact. The goal is to reduce image weight while keeping above-the-fold visuals stable and sharp.
- Go to LiteSpeed Cache > Page Optimization > Media Settings.
- Set Lazy Load Images to ON.
- Leave above-the-fold logo, hero, or featured images excluded if lazy loading causes visual delay.
- Go to LiteSpeed Cache > Image Optimization.
- Request image optimization if you plan to use LSCache image services.
- After processing, review image quality on important pages before applying changes globally.
Lazy loading can improve initial load speed, but it should not delay your largest visible hero image. If your Largest Contentful Paint score gets worse after lazy loading, exclude the hero image or featured image from lazy loading.
Checkpoint: Images below the fold should load as you scroll, while the first visible image should appear quickly without a blank delay.
Troubleshooting: If images do not appear, disable lazy loading temporarily, purge cache, and check whether another plugin or your theme already adds lazy loading. Avoid stacking multiple lazy-load systems.
Step 7: Enable Object Cache Only When Your Server Supports It
Object caching stores database query results in memory, which can help dynamic WordPress sites. It is most useful for WooCommerce, membership sites, LMS platforms, large blogs, and sites with heavy database activity.
Before enabling this feature, confirm that your host supports Redis or Memcached. If your server is not configured for object caching, turning this on inside LSCache will not help and may create connection errors.
- Ask your hosting provider whether Redis or Memcached is available.
- Go to LiteSpeed Cache > Cache > Object.
- Set Object Cache to ON only if your server supports it.
- Select Redis or Memcached based on your hosting setup.
- Enter the host, port, username, or password if your provider requires them.
- Click Save Changes.
If you want a beginner-friendly explanation before enabling this feature, read the Redis object cache WordPress beginner guide.
Checkpoint: The Object Cache panel should show a successful connection status. Your admin dashboard and dynamic pages should continue working normally.
Troubleshooting: If you see connection errors, turn Object Cache off, save changes, and ask your host for the correct Redis or Memcached connection details.
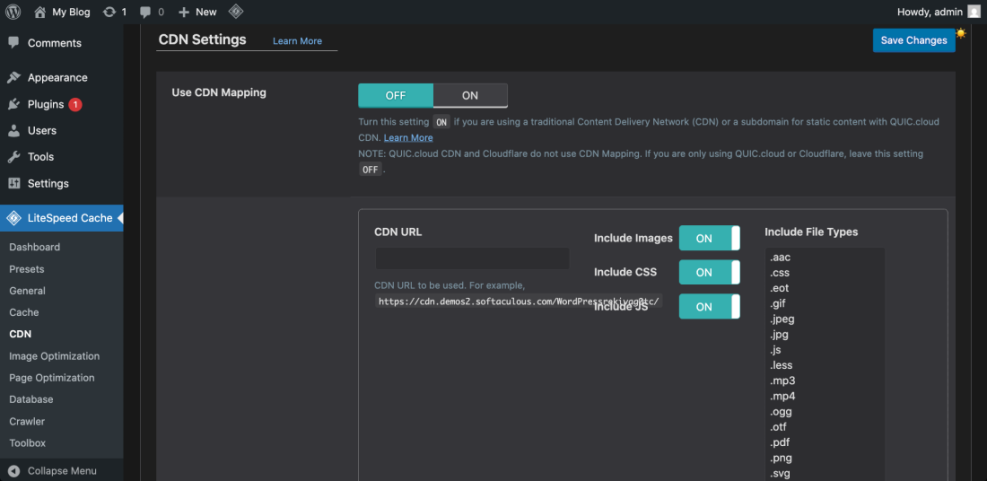
Step 8: Connect a CDN Without Duplicating Optimization
A CDN can serve static files from locations closer to visitors, and some CDN setups can also help with full-page delivery. LSCache includes CDN-related settings, but you should avoid enabling the same optimization in multiple places.
- Go to LiteSpeed Cache > CDN.
- Choose your CDN workflow, such as QUIC.cloud CDN or another CDN provider supported by your hosting stack.
- Follow your provider’s DNS or CNAME instructions carefully.
- Enable CDN rewriting only when your CDN requires it.
- Test images, CSS, JavaScript, fonts, and forms after connecting the CDN.
Checkpoint: Static assets should load correctly, pages should not show mixed-content warnings, and your site should still work over HTTPS.
Troubleshooting: If images, fonts, or styles disappear after enabling CDN, check the CDN URL, SSL configuration, and whether your CDN is serving files over HTTPS. Purge both LSCache and CDN cache after changes.
Step 9: Clean the Database Carefully
LSCache includes database cleanup tools that can remove revisions, trashed posts, spam comments, expired transients, and other stored clutter. This can reduce database size, but it should be handled carefully because some cleanup actions cannot be undone.
- Create a full database backup first.
- Go to LiteSpeed Cache > Database.
- Review each cleanup option before clicking it.
- Start with safer items such as trashed posts, spam comments, and expired transients.
- Avoid deleting all revisions unless you are sure you do not need previous content versions.
Checkpoint: After cleanup, your site should load normally, posts should still be editable, and important plugin data should remain intact.
Troubleshooting: If a plugin behaves unexpectedly after cleanup, restore your database backup and contact the plugin developer before running aggressive cleanup again.
Step 10: Test Performance and Fix Problems
After configuring LSCache, you need to test both speed and functionality. A fast website is not successful if the menu breaks, forms stop submitting, analytics stops tracking, or checkout fails.
- Purge all cache under LiteSpeed Cache > Toolbox > Purge > Purge All.
- Open your site in a private browser window.
- Test the homepage, blog posts, landing pages, contact forms, search, login, and checkout if applicable.
- Run a speed test using PageSpeed Insights, GTmetrix, WebPageTest, or your preferred testing tool.
- Record the before-and-after results for mobile and desktop.
Pay attention to Core Web Vitals, especially Largest Contentful Paint, Interaction to Next Paint, and Cumulative Layout Shift. LSCache can improve performance, but the best settings depend on your theme, plugins, hosting, fonts, images, scripts, and third-party tools.
Checkpoint: Your pages should load faster without visual breakage, script errors, missing images, or broken forms.
Troubleshooting: If performance improves but the site breaks, keep page cache enabled and roll back optimization settings in this order: JS Deferred, JS Minify, CSS Combine, CSS Minify, lazy loading, CDN rewriting.
Your LSCache Setup Is Ready for Real-World Testing
You have now configured the most important Lscache WordPress settings in a safe sequence. You enabled page caching, reviewed purge rules, excluded dynamic pages, optimized CSS and JavaScript carefully, improved media handling, considered object cache, connected CDN settings, cleaned the database, and tested the final result.
The best LSCache setup is not the most aggressive setup. It is the configuration that makes your site faster while keeping layouts, forms, logins, carts, and tracking reliable.
As your site changes, retest LSCache after major theme updates, plugin changes, hosting migrations, CDN changes, and redesigns. Performance optimization is an ongoing maintenance habit, not a one-time switch.
Further Reading
- Best WordPress Caching Plugins
- How to Clear Cache in WordPress
- WordPress Performance Checklist for Bloggers
- How to Fix Common WordPress Performance Issues