AMP How Implement WordPress
A step-by-step guide to setting up AMP in WordPress, choosing the right mode, validating pages, and avoiding SEO or design problems.
AMP can help WordPress pages load faster by using a stricter page framework that limits heavy scripts, unnecessary styling, and slow-loading page elements. But implementing AMP without planning can also break layouts, tracking, ads, forms, or SEO signals.
In this tutorial, you will learn how to implement AMP in WordPress using a plugin-based workflow, configure the right template mode, validate AMP pages, and check whether Google can discover them correctly. Before you begin, it helps to understand the broader role of speed in WordPress speed optimization.
The safest approach is to test AMP on a staging site first, then roll it out gradually after checking your design, analytics, canonical tags, and Search Console reports.
Prerequisites
Before you add AMP to WordPress, make sure your site is ready for a performance-focused change. AMP affects templates, CSS, JavaScript, tracking scripts, forms, ads, and sometimes theme features.
- A working WordPress site with administrator access.
- A recent backup of your files and database.
- A mobile-responsive theme that is actively maintained.
- Access to your SEO plugin settings.
- Google Search Console access for testing and monitoring.
- A staging site if your website receives business-critical traffic.
Step 1: Decide Whether AMP Is Right for Your WordPress Site
AMP is not required for every WordPress website. It can be useful for publishers, blogs, documentation sites, and content-heavy websites that want a faster, simplified reading experience on mobile devices.
AMP may not be ideal if your pages depend heavily on custom JavaScript, complex checkout flows, interactive calculators, membership dashboards, or advanced lead-generation popups. In those cases, standard performance improvements may be safer than maintaining a separate AMP experience.
- Good AMP candidates: blog posts, news articles, tutorials, documentation, recipe pages, and simple landing pages.
- Riskier AMP candidates: WooCommerce checkout pages, course dashboards, booking flows, custom app-like pages, and pages with heavy third-party scripts.
- Alternative path: improve hosting, caching, images, CSS, JavaScript, and Core Web Vitals without AMP.
Checkpoint: You should know whether AMP supports your content goals or whether standard performance work is the better first step.
Step 2: Back Up Your WordPress Site Before Installing AMP
AMP changes how your front-end pages are rendered, so create a backup before installing or configuring anything. A backup gives you a safe restore point if AMP conflicts with your theme, plugins, or tracking setup.
- Go to your hosting dashboard or backup plugin.
- Create a full backup that includes WordPress files and the database.
- Download a copy or confirm the backup is stored off-site.
- Record the backup date so you can identify the restore point later.
If you need a refresher on the process, follow this WordPress site backup guide before continuing.
Checkpoint: You should have a complete backup available before you install the AMP plugin.
Troubleshooting: If your backup fails, check available disk space, PHP memory limits, and whether your backup plugin can write to the storage destination.
Step 3: Install the Official AMP Plugin
The easiest way to implement AMP in WordPress is to use the official AMP plugin from the WordPress plugin directory. This gives you AMP template modes, validation tools, and compatibility controls without manually coding AMP templates.
- Log in to your WordPress admin dashboard.
- Go to Plugins > Add New.
- Search for AMP.
- Choose the official AMP plugin.
- Click Install Now.
- Click Activate.

If you are new to plugin installation, review this guide on how to install a plugin in WordPress so you can confirm you are activating the correct plugin safely.
Checkpoint: After activation, you should see AMP settings available in your WordPress dashboard.
Troubleshooting: If the plugin does not install, check your user role, file permissions, and whether your hosting environment blocks plugin installation from the dashboard.
Step 4: Choose the Correct AMP Template Mode
The template mode controls how AMP is applied to your WordPress site. Choosing the right mode matters because it affects design consistency, compatibility, and how much troubleshooting you may need.
Go to AMP > Settings in your WordPress admin area and review the available template modes. The exact wording may vary by plugin version, but the common choices are Standard, Transitional, and Reader.
- Standard mode: Your site uses AMP as the primary experience. This is best when your theme and plugins are highly compatible.
- Transitional mode: WordPress serves both AMP and non-AMP versions. This can be useful when you want AMP versions while keeping the standard site experience.
- Reader mode: AMP uses simplified templates for content pages. This is often the safest starting point for blogs and publishers.
For most beginners, Reader mode is the easiest way to start because it reduces the risk of theme conflicts. For advanced users with compatible themes, Transitional or Standard mode may provide a more integrated experience.
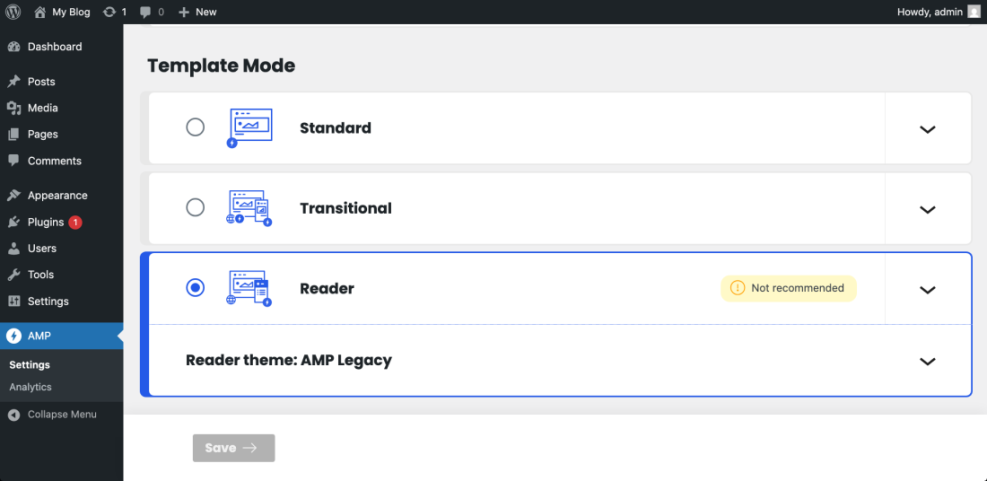
Checkpoint: You should have selected a template mode that matches your theme compatibility, design expectations, and technical comfort level.
Step 5: Select Which Content Types Should Use AMP
AMP does not need to run on every part of your website. In many WordPress setups, it is better to enable AMP only for content types that benefit from a fast reading experience.
- Open your AMP plugin settings.
- Find the section for supported templates or content types.
- Enable AMP for posts first.
- Consider pages only if they are mostly informational.
- Avoid enabling AMP on checkout, cart, account, dashboard, or complex form pages unless you have tested them carefully.
Checkpoint: AMP should be enabled only on content types that make sense for your users and business goals.
Troubleshooting: If important elements disappear on AMP pages, narrow the rollout to posts only and retest your theme, plugins, embeds, and shortcodes.
Step 6: Review AMP Design and Branding
After enabling AMP, check how your pages look on mobile and desktop. AMP pages should still feel like part of your brand, even if the layout is simpler than your standard theme.
- Open a recently published post on the front end.
- View its AMP version using the plugin’s preview or AMP URL format.
- Check the logo, typography, colors, spacing, featured image, author box, navigation, and footer.
- Test at least one short post, one long post, and one post with images or embeds.
Checkpoint: Your AMP pages should be readable, branded, and free from obvious layout breaks.
Troubleshooting: If the AMP layout looks too plain, adjust Reader mode templates if available, review theme support, or switch to a different mode only after testing.
Step 7: Validate AMP Pages and Fix Errors
AMP pages must be valid to work properly. Validation errors usually happen when a theme, plugin, shortcode, embed, or custom script outputs markup that AMP does not allow.
- Go to the AMP plugin validation area in WordPress.
- Review any listed validation errors.
- Open the affected URL and identify the source of the invalid markup.
- Suppress incompatible elements only when they are not essential.
- Replace unsupported embeds, scripts, or widgets with AMP-compatible alternatives where possible.
You can also validate a page by adding the AMP validator fragment to the end of an AMP URL in your browser address bar:
#development=1Run that in your browser after opening the AMP page, then check the browser console for AMP validation messages.
Checkpoint: Your key AMP pages should show no critical AMP validation errors.
Troubleshooting: If one plugin creates repeated validation errors, temporarily disable that plugin on a staging site and retest. If the errors disappear, look for AMP-compatible settings, replacements, or conditional loading options.
Step 8: Configure Analytics, Ads, and Consent Scripts
AMP pages often handle scripts differently from regular WordPress pages. That means analytics, advertising, cookie consent, affiliate scripts, and tracking pixels may need separate configuration.
- Open your analytics plugin, SEO plugin, or tag management settings.
- Check whether AMP tracking is supported.
- Confirm that Google Analytics or your preferred analytics tool records AMP visits correctly.
- Review ad placements on AMP pages if your site uses display ads.
- Check cookie consent behavior if your site serves visitors in regions with privacy requirements.
Checkpoint: Analytics should record AMP traffic, and ads or consent tools should work without breaking validation.
Troubleshooting: If analytics traffic drops after enabling AMP, compare standard URLs and AMP URLs, check whether tracking tags are present, and verify that your analytics plugin supports AMP output.
Step 9: Check Canonical Tags and Search Console
AMP and non-AMP pages must send clear SEO signals. Canonical and AMP HTML tags help search engines understand the relationship between the regular page and the AMP version.
- Open a regular WordPress post in your browser.
- View the page source.
- Look for a link tag that points to the AMP version.
- Open the AMP version and confirm it points back to the canonical non-AMP URL when using paired AMP.
- Inspect several AMP URLs in Google Search Console.
For monitoring, indexing, and page inspection, connect your site with Google Search Console in WordPress before you evaluate AMP performance.
Checkpoint: Search engines should be able to discover AMP pages and understand their relationship to your regular WordPress URLs.
Troubleshooting: If Search Console reports AMP errors, open the affected URL, validate it, identify the invalid element, and fix the theme, plugin, embed, or shortcode causing the issue.
Step 10: Test Speed, UX, and Conversions After AMP Goes Live
AMP should improve the user experience, not just produce a technically valid page. After enabling AMP, compare performance, engagement, and conversions against your regular mobile pages.
- Test loading speed on mobile devices.
- Check readability, image sizing, and spacing.
- Confirm internal links and menus work.
- Submit forms if AMP pages include them.
- Test affiliate links, calls to action, and ad placements.
- Monitor analytics for bounce rate, engagement time, and conversion changes.
Checkpoint: AMP pages should load quickly, remain readable, preserve key user actions, and avoid major design or tracking issues.
Troubleshooting: If AMP improves speed but lowers conversions, review missing calls to action, broken forms, removed scripts, or simplified layouts that may reduce user engagement.
Step 11: Maintain AMP After Theme and Plugin Updates
AMP is not a one-time setup. WordPress updates, theme changes, plugin changes, new embeds, and new tracking tools can create new AMP validation issues over time.
- Check AMP validation after major WordPress updates.
- Retest AMP pages after changing your theme.
- Review AMP compatibility after adding new plugins.
- Inspect new content types before enabling AMP globally.
- Monitor Search Console reports at least monthly.
Checkpoint: AMP should become part of your normal WordPress maintenance workflow.
Troubleshooting: If errors appear suddenly, compare the timing with recent plugin, theme, or tracking changes. Roll back on staging, isolate the conflict, and apply a targeted fix.
AMP Is Best When You Test Before You Scale
You can implement AMP in WordPress safely by backing up your site, installing the official AMP plugin, choosing the right template mode, enabling AMP only where it makes sense, and validating your pages before a full rollout.
The key is to balance speed with functionality. A valid AMP page is useful only if it preserves your branding, tracking, SEO signals, and conversion paths.
After setup, keep AMP testing inside your normal maintenance routine. Recheck validation after updates, monitor Search Console, and compare real user results against your standard mobile pages.
Further Reading
- Beginner Guide to WordPress Speed and Core Web Vitals
- How to Optimize Images for WordPress
- Complete WordPress Caching Setup Guide
- How to Create a Sitemap in WordPress


