How to Speed Up Your WordPress Website
A no-code, 60-minute performance makeover for busy WordPress site owners
Is your WordPress website taking forever to load, even though your design looks great? A slow site scares away visitors, hurts conversions, and can drag down your search rankings—all before anyone ever reads your content.
The good news: you can speed up WordPress dramatically with a focused checklist of no-code changes. In this guide, you’ll benchmark your current speed, tune your hosting and caching, optimize images, and improve Core Web Vitals without touching theme files or writing custom code. If you’re new to performance metrics, our beginner guide to WordPress speed and Core Web Vitals explains what “good” really looks like.
We’ll walk through each improvement step-by-step, using the WordPress dashboard (Classic Editor), Jannah-style news layouts, and popular plugins so you can follow along on almost any site and see measurable gains in under an hour.
Prerequisites
Before you change anything, make sure you have basic access and safety in place. You don’t need to be a developer, but you should be comfortable logging in and installing plugins.
- Administrator access to your WordPress dashboard.
- Access to your hosting control panel (cPanel, Plesk, or custom panel).
- Ability to install and activate plugins.
- A recent full backup of your WordPress site.
Step 1: Benchmark your current WordPress speed
Before optimizing, you need a baseline so you can prove your changes worked. Benchmarks also help you spot when a new plugin or design tweak slows the site down later.
Your goals are simple: measure load time, Core Web Vitals (especially LCP and CLS), and capture screenshots you can compare after optimization.
- Open an incognito/private browser window so your own cache doesn’t skew the results.
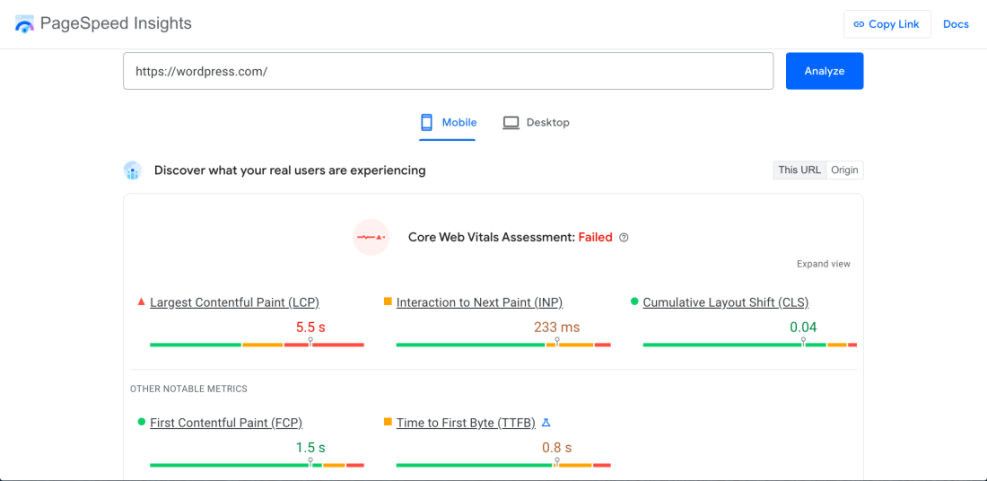
- Run a test in Google PageSpeed Insights:
- Go to PageSpeed Insights.
- Enter your homepage URL and click Analyze.
- Record the mobile score, LCP, and CLS values.
- Run a test in a second tool like GTmetrix or WebPageTest and note:
- Total page load time (in seconds).
- Total page size (in MB).
- Number of requests.
- Repeat the tests for one key content page (e.g., a popular blog post) and one WooCommerce/product page if you run a store.
Step 2: Improve hosting and PHP settings
No amount of plugin tweaking can fully fix slow, overcrowded hosting. If your server is underpowered or running outdated software, you’ll feel it on every page view.
Your aims here are: make sure you’re on at least PHP 8.x, enable server-level performance features, and decide whether your current host is good enough.
- Check your hosting type. Log in to your hosting control panel and confirm whether you’re on basic shared hosting, managed WordPress hosting, or a VPS. Managed WordPress or a performant VPS usually delivers better speed.
- Upgrade PHP to 8.x or higher.
- In cPanel-like dashboards, find PHP Selector or PHP Manager.
- Select PHP 8.0+ (or the latest supported version) and save.
- Test your site frontend and admin to ensure everything still works.
- Increase WordPress memory limit (if needed).If you frequently see white screens or “memory exhausted” errors, raise the memory limit in
wp-config.phpusing your host’s File Manager or FTP:Openwp-config.phpand add this line above the comment that says “That’s all, stop editing!”:define( 'WP_MEMORY_LIMIT', '256M' ); - Evaluate if you need a better host. If your TTFB (time to first byte) is consistently above ~600–800ms even for a cached page, it’s a strong signal that you may need to upgrade plans or switch providers.
For deeper help comparing options and features, see our fast WordPress hosting guide and use it as a checklist when talking to potential providers.
Step 3: Set up a caching plugin in WordPress
Caching stores pre-rendered copies of your pages so WordPress and PHP don’t have to rebuild everything on every visit. This is one of the highest-impact changes you can make.
Most modern themes (including news-style themes like Jannah) work fine with popular caching plugins, but you should still test for layout issues after enabling advanced options.
- Install a caching plugin.
- In your WordPress dashboard, go to Plugins → Add New.
- Search for a reputable caching plugin (paid or free).
- Click Install, then Activate.
- Enable basic page cache. In the plugin’s settings (often under Settings → Cache or a top-level menu), turn on:
- Page cache / disk cache.
- Browser cache (sets cache headers for visitors).
- Compression (GZIP or Brotli, if available).
- Set cache rules for logged-in users. Make sure the plugin does not cache the admin bar or dashboard, and that it treats logged-in users differently than anonymous visitors.
- Clear cache and test. Purge all cache from the plugin, then re-run your speed tests from Step 1 to see the impact.

Step 4: Optimize images and media files
On most WordPress sites, images are the single heaviest part of the page. Every oversized header image or uncompressed product photo adds seconds to your load time.
Your goals: compress existing images, serve the right size for each layout, and lazy-load images below the fold.
- Install an image optimization plugin.
- Go to Plugins → Add New and search for “image optimization”.
- Choose a well-reviewed plugin that supports WebP and bulk optimization.
- Install and activate it, then connect any required API key if you use a SaaS-based optimizer.
- Run a bulk compression. In the plugin’s settings, run a bulk optimization of your existing Media Library. Choose a “lossy but visually fine” setting; you can always exclude key brand images if needed.
- Check image sizes in Classic Editor. When you insert images in Classic Editor:
- Use Medium or Large sizes instead of Full Size for in-content images.
- Make sure the displayed width in your Jannah layout matches the actual image width (e.g., don’t load 2000px-wide images for 800px-wide columns).
- Enable lazy loading. Turn on lazy loading in your image plugin, caching plugin, or theme options so images below the fold load only as users scroll.
For a more detailed, image-only workflow, follow our image optimization checklist for WordPress websites alongside these steps.
Step 5: Minify and defer CSS and JavaScript
Even on fast hosting, large CSS and JavaScript files can block rendering and delay your first meaningful paint. The goal here is to shrink these files and control when they load, without breaking your layout.
- Turn on HTML/CSS/JS minification in your caching plugin.
- Enable HTML minification first and test.
- Then enable CSS minification, clear cache, and re-check key pages.
- Finally, enable JS minification, testing again after clearing cache.
- Defer non-critical JavaScript. Look for options like “Load JavaScript deferred” or “Delay JavaScript execution until user interaction” and test them. This is especially helpful for analytics, chat widgets, and tracking scripts.
- Exclude problematic files if something breaks. If sliders, menus, or Jannah’s mega-menu behave oddly:
- Identify the responsible script in your browser console.
- Add it to the caching plugin’s exclusion list so it’s not minified or deferred.
Step 6: Use a content delivery network (CDN)
A CDN stores copies of your static assets (images, CSS, JS) on servers worldwide and serves them from the location closest to each visitor. This is crucial if you have an international audience.
- Choose a CDN provider. Many managed WordPress hosts include a CDN. If yours does, start there; otherwise, pick a reputable third-party CDN service that integrates with WordPress.
- Connect your site to the CDN.
- Install the CDN’s WordPress plugin or enable the integration in your caching plugin.
- Enter the CDN URL or API key as instructed.
- Enable CDN for images, CSS, JS, and fonts if supported.
- Purge cache and verify. Clear both your WordPress cache and the CDN cache, then reload your site and check your browser’s developer tools to confirm assets are served from the CDN domain.
/wp-admin/) on your origin server. Step 7: Clean up plugins and optimize the database
Every extra plugin and bloated database table adds a little overhead. Over time, this “weight gain” can make even a well-hosted site feel sluggish.
Here you’ll remove what you don’t need and tidy up what’s left, without touching your actual content.
- Audit your plugins.
- Go to Plugins → Installed Plugins.
- List plugins you no longer use (old sliders, form plugins you replaced, demo importers).
- Deactivate one at a time and verify the site still works, then click Delete for truly unused ones.
- Check plugin overlap. Avoid running multiple plugins that do similar things (e.g., two page builders, three social share plugins). Consolidate to one well-maintained plugin per function.
- Use WP-CLI (optional) to inspect active plugins.If your host provides SSH access with WP-CLI, run this in your terminal to list active plugins:
wp plugin list --status=activeThis helps you spot must-use plugins and anything that may not show up in the standard list.
- Optimize the database.
- Install a trusted optimization plugin that can clean revisions, transients, and spam comments.
- Run a one-time cleanup, excluding anything you’re unsure about (e.g., custom tables for major plugins).
- Schedule a weekly or monthly cleanup for non-critical items.
Step 8: Optimize for mobile and Core Web Vitals
Most WordPress traffic now comes from mobile devices, and Google’s Core Web Vitals are measured from real users on those devices. A site that feels fast on your laptop can still feel clunky on a phone.
Now that you’ve cached, optimized images, and cleaned up plugins, you’ll fine-tune the mobile view and check that your improvements show up in Web Vitals.
- Re-run PageSpeed Insights on mobile. Focus on LCP, CLS, and First Input Delay/Interaction to Next Paint. Aim to move any “poor” metrics into the “needs improvement” or “good” range.
- Check your Jannah/mobile theme layout.
- View key templates on a real phone (not just browser dev tools).
- Look for oversized hero images, long blocks of text, or slow-loading sliders on mobile that you can simplify or remove.
- Reduce above-the-fold weight. Keep the visible top of the page light:
- Use a single hero image instead of carousels.
- Limit above-the-fold ads where possible.
- Ensure fonts are loaded efficiently and avoid too many font variants.
- Monitor real-user data over time. Use Search Console’s Core Web Vitals report to see how your real users experience the site over the next few weeks.
Turn your WordPress speed wins into a routine
Speeding up your WordPress website isn’t a one-time project—it’s an ongoing habit. By benchmarking, improving hosting, enabling smart caching, optimizing images, taming CSS/JS, using a CDN, and cleaning up plugins and the database, you’ve tackled the biggest performance bottlenecks site owners face.
From here, treat performance like security or SEO: review it regularly. Each time you add a new plugin, change themes, or launch a big marketing campaign, re-run your tests and confirm your hard-won speed isn’t slipping away. Over time, you’ll build a WordPress site that feels as fast as it looks polished.
Further Reading
- WordPress Speed Optimization Step-by-Step
- WordPress Speed Test Checklist
- Caching Plugin Comparisons for WordPress Performance
- How to Fix Common WordPress Performance Issues
- WordPress Performance Checklist for Bloggers