How to Speed Up WordPress for Better Core Web Vitals
A practical optimization workflow for improving LCP, INP, and CLS on a WordPress site without breaking your design or SEO.
A slow WordPress site frustrates visitors, lowers conversions, and makes it harder to pass Google’s Core Web Vitals assessment. The biggest problems usually come from heavy themes, unoptimized images, too many plugins, render-blocking scripts, weak hosting, and layout shifts.
In this guide, you will learn how to speed up WordPress with a safe, step-by-step workflow focused on Largest Contentful Paint, Interaction to Next Paint, and Cumulative Layout Shift. You will measure your current performance, fix the biggest bottlenecks, and confirm improvements before making risky changes live.
If you are new to performance work, review this beginner guide to WordPress speed and Core Web Vitals first so the metrics and testing terms feel familiar before you start optimizing.
Prerequisites
Before changing performance settings, prepare a safe testing process. Speed optimization often touches caching, CSS, JavaScript, images, and plugins, so you should avoid editing a live site blindly.
- Administrator access to your WordPress dashboard.
- Access to your hosting control panel or managed hosting dashboard.
- A recent full-site backup.
- A staging site if your host provides one.
- Access to PageSpeed Insights, Chrome DevTools, or another performance testing tool.
Step 1: Audit Your Current Core Web Vitals
The first step is to measure your site before making changes. Without a baseline, you cannot tell whether a caching plugin, image fix, or hosting change actually helped.
- Open PageSpeed Insights in your browser.
- Enter the URL of an important page, such as your homepage, main blog post, product page, or landing page.
- Run the test for both mobile and desktop.
- Write down your Largest Contentful Paint, Interaction to Next Paint, Cumulative Layout Shift, First Contentful Paint, and SEO and UX, and where you will see it in daily work.”>Time to First Byte.
- Repeat the test for at least three different page types.
Checkpoint: You should have a short list of your slowest templates and the main warning areas for each page. For example, one page may have a large hero image problem while another may be slowed down by JavaScript.
Step 2: Improve Hosting, PHP, and Server Response Time
Server speed affects every WordPress performance metric. If your Time to First Byte is slow, the browser waits too long before it can even start loading the page.
Start by checking your hosting dashboard for your PHP version, object cache options, server-level cache, and resource usage. If you are unsure whether your hosting is limiting performance, compare your setup with this guide on fast WordPress hosting.
- Log in to your hosting control panel.
- Find the PHP version tool and use a currently supported PHP version recommended by your host.
- Enable server-level caching if your host provides it.
- Check CPU, memory, and disk usage for signs that your plan is overloaded.
- Contact your host if Time to First Byte stays high even after caching is enabled.
Checkpoint: Your site should respond faster, especially on uncached visits. In performance reports, Time to First Byte should move closer to the recommended range for a responsive WordPress site.
Troubleshooting: If updating PHP causes errors, a theme or plugin may be outdated. Roll back through your host’s PHP selector, update your plugins and theme, and test again on staging before applying the change to production.
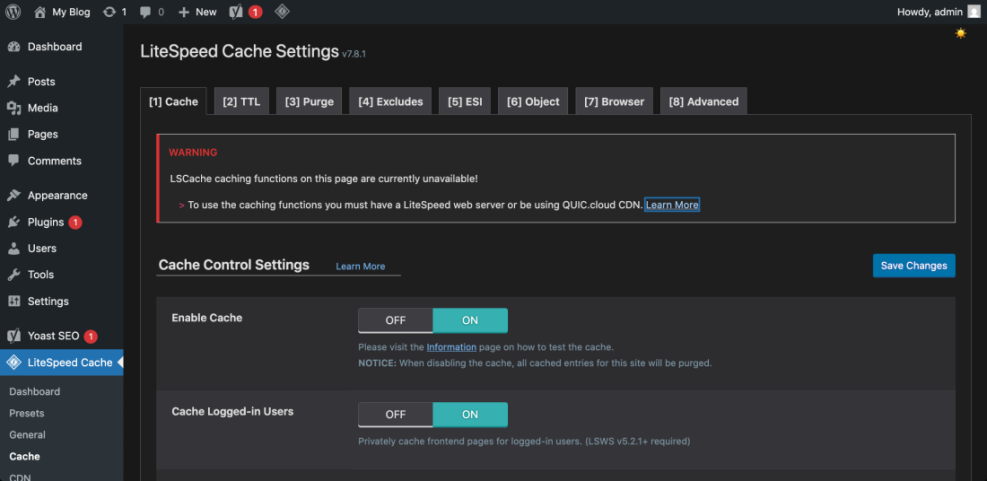
Step 3: Set Up Page Caching and Browser Caching
Caching creates faster page delivery by reducing the amount of work WordPress performs for repeat requests. A good cache setup can improve LCP, reduce server load, and make your site feel more responsive.
- In WordPress, go to Plugins > Add New.
- Install a reputable caching plugin or use your managed host’s built-in caching system.
- Enable page caching.
- Enable browser caching if available.
- Enable cache preloading if your plugin supports it.
- Clear all caches after saving your settings.
For a deeper walkthrough, use this complete WordPress caching setup guide to configure caching without duplicating features across multiple plugins.
Checkpoint: Visit your site in an incognito browser window, refresh the page, and confirm that repeat loads feel faster. Your caching plugin may also show a cache status message in its settings screen.
Troubleshooting: If your layout breaks after enabling CSS or JavaScript optimization, turn off minification, combine files, and delay JavaScript settings one at a time. Keep page caching active while you isolate the risky option.
Step 4: Optimize Images for Faster LCP
Large images are one of the most common reasons WordPress pages fail Largest Contentful Paint. Hero banners, featured images, background images, and product images often load much larger than they need to be.
- Identify the LCP element in PageSpeed Insights.
- If the LCP element is an image, resize it to the maximum display width needed by your theme.
- Compress the image before uploading or use a WordPress image optimization plugin.
- Use modern formats such as WebP when supported by your optimization tool.
- Set width and height attributes so the browser can reserve space before the image loads.
- Avoid lazy loading the main above-the-fold hero image.
Checkpoint: Your main image should load quickly without appearing blurry. PageSpeed Insights should show fewer warnings related to properly sizing images, serving next-gen formats, or reducing image payload.
Troubleshooting: If images look soft after compression, reduce the compression level and regenerate thumbnails. If an image does not change on the front end, clear your WordPress cache, CDN cache, and browser cache.
Step 5: Remove Plugin Bloat and Script Overlap
Plugins can add CSS, JavaScript, database queries, tracking scripts, fonts, widgets, and background tasks. A few well-coded plugins are fine, but overlapping plugins often slow down WordPress and create INP problems.
- Go to Plugins > Installed Plugins.
- Deactivate plugins you no longer use.
- Look for duplicate features, such as multiple SEO plugins, multiple analytics plugins, or multiple performance plugins.
- Test important pages after each deactivation.
- Delete inactive plugins after confirming they are not needed.
Checkpoint: Your plugin list should be lean, with each plugin serving a clear purpose. Pages should have fewer unnecessary scripts and less admin clutter.
Step 6: Optimize CSS, JavaScript, Fonts, and Third-Party Code
CSS, JavaScript, fonts, ads, embeds, chat widgets, and analytics scripts can delay rendering and make pages respond slowly. These issues often affect Interaction to Next Paint because the browser’s main thread becomes busy.
- Open your caching or performance plugin settings.
- Enable CSS minification first, then test your site.
- Enable JavaScript minification only if your theme and plugins still work correctly.
- Delay non-critical JavaScript such as chat widgets, social embeds, and marketing tags.
- Use system fonts or locally hosted fonts when possible.
- Remove third-party scripts you do not actively use.
Checkpoint: Your site should remain visually correct while loading fewer blocking assets. Menus, sliders, forms, carts, search, and popups should still work after optimization.
Troubleshooting: If a button, menu, form, or checkout feature stops working, exclude that script from delay or defer settings. Test logged-out pages and important conversion paths before keeping the setting enabled.
Step 7: Fix Layout Shifts and Above-the-Fold Instability
Cumulative Layout Shift happens when visible content moves after the page starts loading. Common causes include missing image dimensions, late-loading ads, injected banners, web fonts, cookie notices, and embeds.
- Review CLS warnings in PageSpeed Insights.
- Add width and height attributes to images and embeds.
- Reserve space for ads, banners, videos, and iframe embeds.
- Avoid inserting notification bars above the header after page load.
- Use font-display settings carefully so text does not jump dramatically when fonts load.
Checkpoint: Reload the page several times on mobile and desktop. The header, hero section, buttons, images, and content blocks should stay visually stable as the page loads.
Troubleshooting: If layout shift only happens after accepting a cookie notice or loading an ad, reserve a fixed space for that element or move it below the main content area.
Step 8: Use a CDN for Global Delivery
A content delivery network stores static files closer to visitors. This can improve load times for users who are far from your hosting server, especially when your site uses many images, CSS files, JavaScript files, or downloadable assets.
- Choose a CDN through your host, DNS provider, or performance plugin.
- Follow the provider’s setup instructions to connect your domain.
- Enable CDN delivery for images, CSS, JavaScript, and fonts.
- Turn on image optimization features only if they do not duplicate another plugin.
- Clear your CDN cache after major design or content changes.
Checkpoint: Static assets should load from CDN URLs or CDN edge servers. International visitors should experience faster asset delivery.
Troubleshooting: If old images, CSS, or JavaScript keep appearing, purge the CDN cache and your WordPress cache. If mixed content warnings appear, confirm that the CDN is serving all assets over HTTPS.
Step 9: Clean the Database and Background Tasks
A cluttered database can slow down admin tasks, searches, queries, and scheduled processes. While database cleanup may not always create a dramatic Core Web Vitals improvement, it supports long-term WordPress performance and stability.
- Back up your site before touching the database.
- Remove spam comments, trashed posts, expired transients, and unnecessary post revisions.
- Check scheduled tasks if your optimization plugin or host provides a cron viewer.
- Disable plugin modules that create unnecessary logs or background scans.
- Optimize database tables only with a trusted tool or your host’s built-in feature.
Checkpoint: Your WordPress admin area should feel cleaner, and database-heavy pages may respond faster. You should also have fewer unnecessary background processes competing for server resources.
Step 10: Retest, Compare, and Monitor Results
After applying performance fixes, retest the same URLs you measured at the beginning. Use the same testing tools and compare the same page types so your before-and-after results are meaningful.
- Clear your WordPress cache, CDN cache, and browser cache.
- Run PageSpeed Insights again for the same URLs.
- Compare LCP, INP, CLS, TTFB, and total page size.
- Click through your most important pages manually.
- Test forms, navigation menus, search, checkout, login, and interactive elements.
Checkpoint: Your pages should load faster, feel smoother, and show fewer diagnostics related to images, render-blocking assets, JavaScript execution, and layout shifts.
Troubleshooting: If lab scores improve but field data does not change immediately, give real-user data time to update. Field data reflects actual visitors and usually changes more slowly than one-time lab tests.
Your WordPress Site Is Now Built for Faster Real-World Performance
Speeding up WordPress for better Core Web Vitals is not about chasing a perfect score with random plugin settings. It is about measuring the right pages, fixing the largest bottlenecks first, and protecting the user experience while you optimize.
Start with hosting, caching, images, plugin cleanup, and layout stability. Then refine CSS, JavaScript, fonts, third-party scripts, CDN delivery, and database health. When you test after every major change, you can improve performance without breaking your design, SEO, or conversions.
Further Reading
- WordPress Speed Optimization Checklist
- How to Fix Cumulative Layout Shift in WordPress
- Image Optimization Checklist for WordPress Websites
- How to Use a CDN in WordPress