How to Configure Caching Plugins for Faster WordPress Blogs
A practical setup guide for page caching, browser caching, minification, preload, CDN settings, and safe testing on WordPress blogs.

A slow WordPress blog can lose readers before your content has a chance to load. Caching plugins help by saving ready-made versions of your pages, reducing repeated server work, and delivering posts faster to visitors.
In this guide, you will configure a caching plugin safely for a blog, including page cache, browser cache, preload, minification, database cleanup, CDN options, and testing. If you are still diagnosing why your site feels sluggish, start with this guide on why WordPress is so slow before changing multiple settings at once.
The steps below apply to popular caching plugins such as WP Rocket, LiteSpeed Cache, W3 Total Cache, WP Fastest Cache, and similar tools. Menu names may vary slightly, but the workflow and safety checks are the same.
Prerequisites
Before changing cache settings, make sure you can recover your site if a setting breaks the layout or blocks an important feature. Caching is powerful, but it should be configured in a controlled way.
- Administrator access to your WordPress dashboard.
- One active caching plugin only.
- A recent backup of your files and database.
- Access to your hosting dashboard or file manager.
- A speed testing tool such as PageSpeed Insights, GTmetrix, or WebPageTest.
If you do not already have a reliable backup process, follow this WordPress backup guide before continuing.
Step 1: Measure Your Blog Before Changing Cache Settings
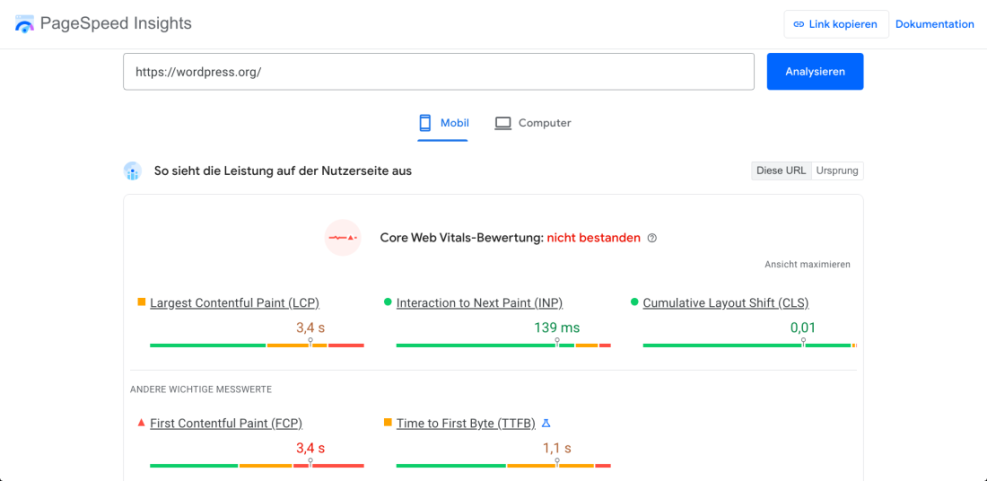
Start with a baseline test so you know whether your caching changes actually improve performance. Without a before-and-after comparison, it is easy to mistake a broken optimization for a speed improvement.
- Open your preferred speed testing tool.
- Test your homepage, one blog post, and one category archive.
- Save the results for Largest Contentful Paint, Total Blocking Time, Cumulative Layout Shift, total page size, and requests.
- Open each tested page in an incognito browser window and note how long it feels to load.
Checkpoint: You should have at least three test results saved before you configure the plugin.
Troubleshooting: If results vary widely between tests, run each URL three times and use the middle result. First tests are often slower because external services, fonts, ads, or CDN edges may not be warmed up.
Step 2: Choose One Caching Plugin That Fits Your Hosting
The best caching plugin depends on your host, server stack, and comfort level. A lightweight blog usually needs reliable page caching, browser caching, cache preload, and safe asset optimization rather than every advanced feature enabled.
- LiteSpeed Cache: Best when your server uses LiteSpeed or OpenLiteSpeed.
- WP Rocket: Beginner-friendly premium option with strong defaults.
- W3 Total Cache: Flexible but requires more careful configuration.
- WP Fastest Cache: Simple option for basic page and browser caching.
- Host-provided caching: Useful when your managed host already handles server-level cache.
To install a plugin, go to Plugins > Add New, search for the plugin name, click Install Now, and then click Activate. If you need more detail, use this guide on how to install a plugin in WordPress.
Checkpoint: Your WordPress dashboard should show only one active caching plugin under Plugins > Installed Plugins.
Troubleshooting: If your host already provides caching, check the host documentation before enabling page cache inside a plugin. Some hosts recommend using their cache for page delivery and a plugin only for asset optimization.
Step 3: Enable Page Cache for Public Blog Pages
Page cache stores static HTML versions of your posts, pages, homepage, and archives. This is usually the biggest performance win for a content-focused WordPress blog because visitors can receive cached pages without WordPress rebuilding each page from the database.
- Open your caching plugin settings from the WordPress dashboard.
- Find the section named Cache, Page Cache, or Cache Settings.
- Enable caching for desktop visitors.
- Enable caching for mobile visitors if your theme uses the same responsive design for mobile and desktop.
- Leave caching for logged-in users disabled unless you fully understand your membership, LMS, or user dashboard behavior.
- Save changes.
Checkpoint: Open a blog post in an incognito window, refresh it twice, and confirm the second load feels faster. Many plugins also show a cache status message in the page source or plugin toolbar.
Troubleshooting: If your admin bar disappears, private content appears publicly, or user-specific content is cached, immediately clear the cache and disable caching for logged-in users.
Step 4: Add Cache Exclusions for Dynamic URLs and Cookies
Most blogs can cache almost every public post and page. However, certain URLs should stay uncached because they process form submissions, previews, searches, user sessions, or temporary actions.
In your caching plugin, look for Advanced Rules, Exclusions, Never Cache URLs, or Do Not Cache. Add only the exclusions your site actually needs.
/wp-admin//wp-login.phppreview=true/cart/,/checkout/, and/my-account/if WooCommerce is installed.- Contact form confirmation pages if they show visitor-specific messages.
- Membership, LMS, booking, or account pages.
Checkpoint: Public blog posts should remain cached, while admin, login, checkout, account, and preview pages should stay uncached.
Troubleshooting: Avoid broad exclusions like /blog/ unless absolutely necessary. A broad rule can accidentally prevent your most important posts from being cached.
Step 5: Configure Browser Caching and Cache Lifespan
Browser caching tells a visitor’s browser to reuse static files such as images, CSS, JavaScript, and fonts instead of downloading them again on every page view. This improves repeat visits and helps readers move through multiple posts faster.
- Open the plugin section named Browser Cache, Static Files, or Cache Headers.
- Enable browser caching for images, CSS, JavaScript, fonts, and media files.
- Use a long expiration period for static assets, such as 30 days or longer.
- Keep automatic cache clearing enabled when posts, pages, menus, or theme files change.
- Save changes and clear all caches.
Checkpoint: After testing your site, speed tools should show fewer warnings about serving static assets with a short cache lifetime.
Troubleshooting: If visitors still see old CSS after a design update, clear the plugin cache, CDN cache, and host cache. Then hard refresh the browser with Ctrl + F5 on Windows or Cmd + Shift + R on macOS.
Step 6: Turn On Cache Preload for Important Blog URLs
Cache preload builds cached versions of your pages before visitors request them. This is especially useful after publishing a new post, updating a theme, or clearing the full cache.
- Open Preload, Cache Preload, or Crawler in your caching plugin.
- Enable sitemap-based preload if available.
- Add your XML sitemap URL if the plugin asks for it.
- Enable preload after publishing or updating content.
- Use a moderate crawl speed on shared hosting to avoid CPU spikes.
Checkpoint: After clearing cache, your homepage and latest posts should become cached automatically instead of waiting for the first visitor to generate them.
Troubleshooting: If your hosting account shows high CPU usage after enabling preload, reduce the preload speed, limit the number of URLs, or preload only your homepage, top posts, and key category pages.
Step 7: Optimize CSS and JavaScript Carefully
CSS and JavaScript optimization can improve loading speed, but it can also break menus, sliders, forms, ads, analytics, and layout styling. Enable these settings one at a time and test after each change.
- Open the plugin section named File Optimization, Minify, or CSS/JS Optimization.
- Enable CSS minification first, save, clear cache, and test your homepage and posts.
- Enable JavaScript minification next, save, clear cache, and test again.
- Try deferred JavaScript loading only after minification works correctly.
- Use delay JavaScript execution carefully for non-critical scripts such as social widgets, embeds, or analytics.
Checkpoint: Your pages should visually match the original layout, menus should open, forms should submit, and speed tests should show reduced file size or fewer render-blocking warnings.
Troubleshooting: If the layout breaks, disable the last setting you enabled. Then exclude the affected file from minification, defer, or delay settings. Common problem files include page builder scripts, slider scripts, reCAPTCHA, ad scripts, and form plugin JavaScript.
Step 8: Enable Lazy Loading Without Hurting the First Screen
Lazy loading delays off-screen images and iframes until the visitor scrolls near them. This can reduce initial page weight, but your logo and above-the-fold featured image should load normally if they are part of the first visible screen.
- Open Media, Lazy Load, or Image Optimization in your caching plugin.
- Enable lazy loading for images below the fold.
- Enable lazy loading for iframes and videos if your posts include YouTube or social embeds.
- Exclude your logo, hero image, and first featured image if they are delayed incorrectly.
- Save changes and clear cache.
Checkpoint: Images below the first screen should load as you scroll, while the top visible image should appear quickly without a blank delay.
Troubleshooting: If your Largest Contentful Paint gets worse after enabling lazy load, exclude the main featured image from lazy loading. Delaying the largest above-the-fold image often harms perceived speed.
Step 9: Connect CDN Settings Only After Local Cache Works
A CDN can serve static files from locations closer to your readers. However, it is easier to troubleshoot caching when your local page cache works first, so add CDN configuration after page cache, browser cache, and asset settings are stable.
- Create or confirm your CDN account with your host, Cloudflare, Bunny CDN, or another provider.
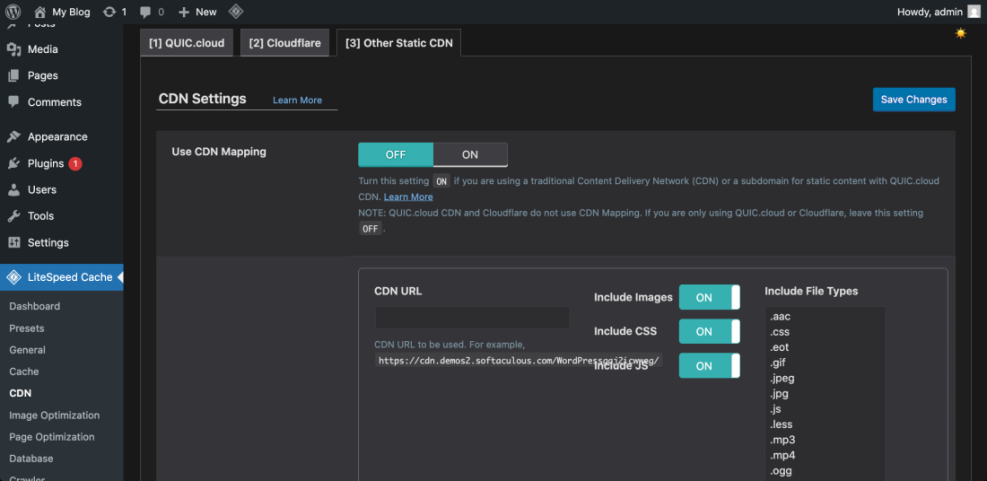
- Open the caching plugin section named CDN or Content Delivery Network.
- Enter the CDN hostname if your provider gives you one.
- Enable CDN delivery for images, CSS, JavaScript, fonts, and media files.
- Save changes, clear plugin cache, and purge CDN cache.
Checkpoint: Your static files should load from the CDN hostname or proxy network, and your site should still display correctly over HTTPS.
Troubleshooting: If fonts, images, or CSS fail to load, check HTTPS settings, mixed content warnings, and CORS rules. Temporarily disable CDN rewriting in the plugin to confirm whether the CDN layer is the problem.
Step 10: Use Database Cleanup Settings Conservatively
Some caching plugins include database cleanup tools for revisions, transients, spam comments, trashed posts, and overhead. These can help reduce clutter, but they should not replace a proper backup or maintenance routine.
- Open Database, Database Optimization, or Cleanup.
- Review each cleanup option before selecting it.
- Start with safe items such as expired transients, trashed comments, and spam comments.
- Avoid deleting post revisions unless you are sure you no longer need older drafts.
- Run the cleanup manually first before scheduling automatic cleanup.
Checkpoint: The cleanup should complete without database errors, missing content, or changed post formatting.
Troubleshooting: If cleanup fails or times out, run smaller cleanup batches. On large blogs, use your host’s database tools or WP-CLI instead of forcing everything through the WordPress admin screen.
Step 11: Clear Cache and Test the Final Configuration
After enabling the main settings, clear every cache layer and retest your blog. WordPress sites may have plugin cache, host cache, CDN cache, object cache, and browser cache, so old files can remain visible until each layer is refreshed.
- Click Clear Cache, Purge All, or Delete Cache inside your caching plugin.
- Purge your host cache if your host provides one.
- Purge your CDN cache if you connected a CDN.
- Open your site in an incognito window.
- Test your homepage, a blog post, a category archive, and a form page.
- Run fresh speed tests and compare them to your baseline.
Checkpoint: Your final results should show faster repeat loads, lower page generation time, fewer static asset warnings, and no broken visual elements.
Troubleshooting: If speed scores improve but the site feels broken, prioritize usability over the score. Disable the most aggressive setting first, usually delayed JavaScript, combined CSS, unused CSS removal, or lazy loading for the first image.
Step 12: Create a Simple Cache Maintenance Routine
Caching is not a one-time task. Plugin updates, theme changes, new ads, new forms, and design edits can all affect cached pages, so you need a lightweight routine to keep the blog stable.
- Clear all caches after theme, plugin, and major content updates.
- Retest key templates after changing optimization settings.
- Review exclusions when adding forms, memberships, WooCommerce, or login features.
- Check performance monthly for your homepage and top traffic posts.
- Document your enabled settings so you can restore them after troubleshooting.
Checkpoint: You should have a repeatable process for clearing, testing, and documenting cache changes.
Troubleshooting: If a problem appears only for some visitors, ask them to test in a private window and note their device, browser, and URL. This helps you identify whether the issue is browser cache, CDN cache, or a device-specific script conflict.
Your Blog Should Now Load Faster and Feel More Stable
A well-configured caching plugin can make a WordPress blog noticeably faster without changing your content or design. The safest approach is to enable page cache first, then browser caching, preload, asset optimization, lazy loading, CDN delivery, and database cleanup in that order.
Keep your setup simple, test after each change, and avoid overlapping plugins that do the same job. Once your configuration is stable, review it monthly and after major updates so your blog stays fast for both new and returning readers.
Further Reading
- Best WordPress Caching Plugins
- Complete WordPress Caching Setup Guide
- How to Clear Cache in WordPress
- WordPress Speed Optimization Checklist
- How to Use a CDN in WordPress
Frequently Asked Questions
What is the best caching plugin setting to enable first?
Why did my WordPress layout break after enabling cache settings?
Why are visitors still seeing old content after I updated a post?
Can caching create security or privacy problems?
How much faster will my blog become after configuring caching?