WordPress CDN can make your blog feel much faster for visitors all over the world. Instead of sending every image and script from a single server, a content delivery network stores copies on many edge servers that sit closer to your readers.
In this guide, you see how to choose a CDN, connect it to a WordPress blog, and avoid common mistakes. The steps focus on simple plugins and hosting options, so you can improve performance without touching complex server settings.
WordPress CDN Quick Setup Steps
What Do You Need Before Using a CDN?
Before you add a CDN, you need a working WordPress blog, access to your hosting account, and the ability to change DNS or install plugins. In addition, you should know which domain will serve assets, for example cdn.yoursite.com, so you can keep links consistent.
How Do You Enable a CDN in WordPress?
Most bloggers connect a WordPress CDN through a plugin or a hosting panel. First, you sign up with a CDN or enable one from your host. Next, you install a helper plugin that rewrites static file URLs to the CDN domain. Finally, you test a few pages in an incognito browser and speed test tool.
What a CDN Does for Blogs
How Does a CDN Speed Up Pages?
A CDN copies images, CSS, JavaScript, and other static files to many edge servers around the world. When someone opens your blog, the CDN serves those files from the nearest location, which reduces latency and time to first byte. As a result, pages feel snappier, even on slower connections.
Static and Dynamic Content Explained
Static content includes images, fonts, style sheets, and scripts that do not change for each visitor. Dynamic content includes HTML generated for logged-in users, carts, and forms. Generally, a WordPress CDN handles static assets, while your origin server keeps serving the dynamic HTML for each request.
You still need solid hosting, because the CDN cannot fix a very slow database or heavy PHP code by itself. However, when you offload large assets, your server handles fewer requests and can respond more quickly to each visitor.
How to Choose a CDN Provider
Key Features to Compare
When you compare providers, you should look at global locations, ease of WordPress integration, and pricing. In addition, check whether the CDN supports HTTPS on custom domains, HTTP/2 or HTTP/3, and built-in security features such as DDoS protection or a web application firewall.
- Edge locations near your main audience
- Simple WordPress plugin integration
- Support for HTTPS and HTTP/2 or HTTP/3
- Clear pricing based on bandwidth or requests
- Good support and documentation
This checklist helps you avoid cheap but tiny networks that may not have a point of presence near your readers, which can actually slow down your site.
Simple CDN Options for Bloggers
Many bloggers start with a reverse proxy CDN such as Cloudflare, or an image and static file CDN such as Jetpack Site Accelerator. Others pick traditional pull CDNs like Bunny.net or KeyCDN that plug into WordPress through helper plugins. Each option has different strengths for cost, control, and security.
Before you decide, you can also combine a CDN with a future WordPress speed optimization checklist to cover caching, database cleanup, and hosting quality in one plan.
Here is a compact comparison of common approaches you might use for a WordPress blog:
| CDN Type | Best For | WordPress Setup Method | Notes |
|---|---|---|---|
| Reverse Proxy CDN (Cloudflare style) | Blogs needing extra security and caching | Change DNS to point through CDN | Can cache HTML, protect against attacks |
| Image and File CDN (Jetpack style) | Simple image offload and optimization | Install plugin and toggle CDN feature | Very easy, but less control over rules |
| Traditional Pull CDN | Serving static assets from a cdn domain | Use plugin to rewrite asset URLs | Fine control over cache and file paths |
| Host Built-In CDN | Managed hosting with one-click tools | Enable in hosting panel | Tight integration, low setup effort |
This table gives you a quick way to match your budget and skills to a type of CDN, without locking you into a single product.
Connect Your Blog Through a Plugin
Install a CDN Helper Plugin
Many third-party CDNs work best when a WordPress plugin rewrites asset URLs. Popular choices include CDN Enabler, W3 Total Cache, and some premium caching plugins that bundle CDN tools. First, you choose a plugin that your CDN supports and confirm that it is actively maintained.
In your WordPress Dashboard, go to Plugins » Add New and search for the plugin name you picked.
- Click Install Now on the correct plugin.
- After installation, click Activate.
- Open the plugin’s settings page from the left-hand menu.
- Enter the CDN URL provided by your CDN panel.
- Save the settings and clear any existing page cache.
These steps replace URLs like yoursite.com/wp-content/uploads with cdn.yoursite.com, so the CDN can serve images, styles, and scripts from edge servers.
Map Your Assets to the CDN URL
Most plugins let you pick which directories to serve through the CDN, such as wp-content/uploads and wp-includes. In addition, some let you exclude paths like premium downloads or sensitive files. You should keep admin and login pages off the CDN to reduce risk and avoid cookie issues.
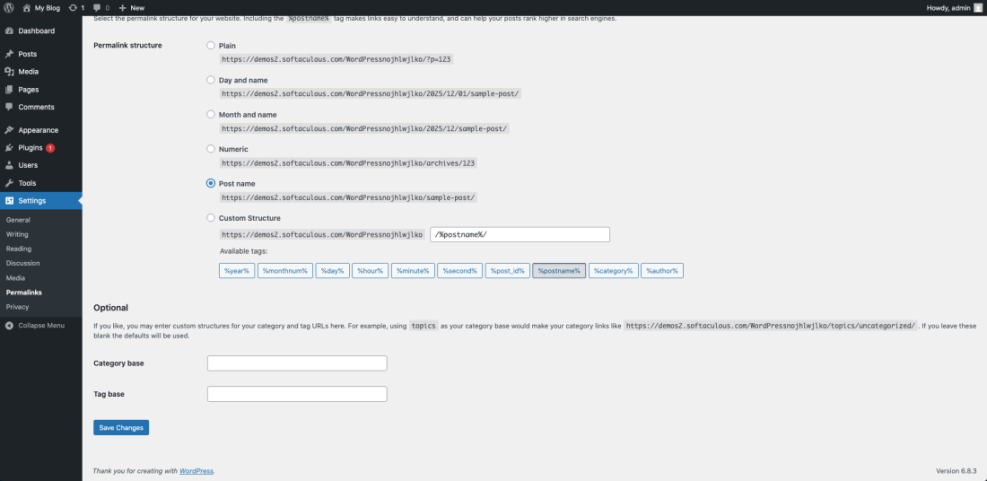
Navigate to Settings » Permalinks and save once after you set up your CDN, even if you do not change anything. This refreshes rewrite rules and helps avoid odd 404 errors on some hosts.
Use a CDN From Your Hosting
Enable CDN in Your Hosting Panel
Many managed WordPress hosts bundle a WordPress CDN you can enable with one click. Usually, you find this under a Performance, CDN, or Caching section for your site. This option suits bloggers who want performance gains but do not want to manage separate CDN accounts.
- Log in to your hosting control panel.
- Select your WordPress site from the list.
- Open the CDN or Performance section.
- Toggle the CDN to On and save.
- Clear cache and test a few public pages.
This built-in method often configures optimal cache headers and integrates with the host’s own edge network, which keeps setup quick and predictable.
Point DNS to a Reverse Proxy CDN
Some CDNs sit in front of your site as a proxy and require DNS changes. First, you add your domain to the CDN, then you update your domain’s nameservers or specific DNS records to point to the CDN. After that, traffic flows through the CDN, which can cache both static and some dynamic requests.
Once DNS changes finish, you test the blog in an incognito browser and verify that the SSL certificate works and that URLs remain on your primary domain.
CDN Caching and Image Optimization Tips
How Long Should You Cache CDN Files?
Static assets rarely change, so you can cache them for days or weeks on the CDN. However, theme files and scripts may change when you update plugins, so you should keep a balance. Many CDNs let you purge by URL or tag when you update, which avoids stale content.
If your host uses Apache, you can add long cache headers for common static types in your .htaccess file:
<IfModule mod_expires.c>
    ExpiresActive On
    ExpiresByType image/jpg "access plus 1 year"
    ExpiresByType image/jpeg "access plus 1 year"
    ExpiresByType image/png "access plus 1 year"
    ExpiresByType text/css "access plus 1 month"
    ExpiresByType application/javascript "access plus 1 month"
</IfModule>
After you add rules like this, you purge your CDN cache once so new headers propagate to every edge location.
Optimize and Offload Images
Images often make up most of a page’s weight, so combining a WordPress CDN with image compression brings a big speed win. Many CDNs support WebP conversion and on-the-fly resizing. In addition, you can use an image plugin that compresses files before they ever reach the CDN.
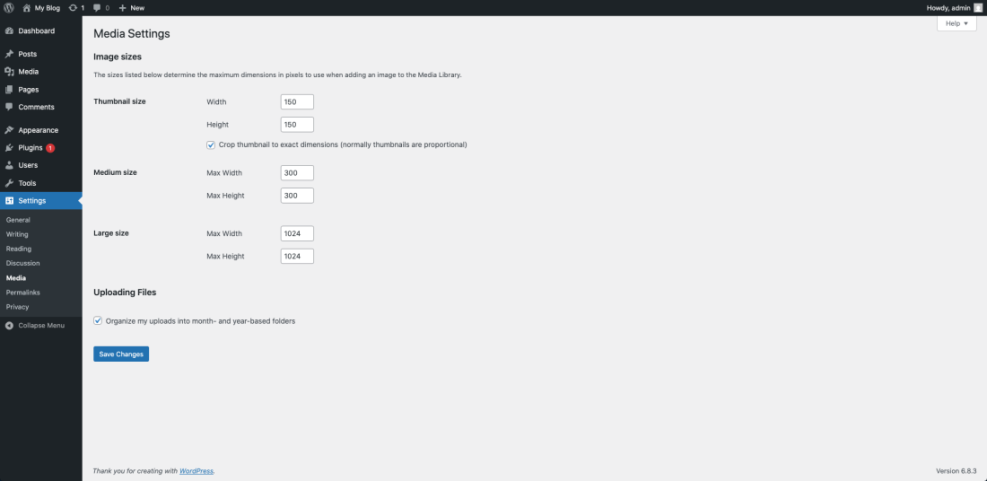
Go to Settings » Media and review the default thumbnail sizes so you do not generate more image copies than you need.
Common CDN Issues and Fixes
Why Are My Changes Not Showing?
If you edit CSS or JavaScript and do not see changes, the CDN is probably serving cached versions. First, purge the file or the entire CDN cache from the CDN panel. Next, clear any page cache in WordPress and hard refresh your browser with Ctrl+F5 or Command+Shift+R to fetch fresh assets.
What If SSL or Mixed Content Break?
Sometimes a WordPress CDN causes mixed content warnings when some URLs still use http://. You should make sure your CDN uses HTTPS and that your plugin rewrites asset URLs to https://. In addition, running a search and replace for old http URLs inside the database often fixes stubborn warnings.
Open your browser’s Developer Tools and switch to the Network tab to inspect which assets come from the CDN domain and whether they show a HIT or MISS cache header.
Later, you can study a future Advanced Caching Rules article to fine-tune which pages get cached and how long they stay at the edge.
WordPress CDN Conclusion and Next Steps
A well-configured WordPress CDN takes pressure off your origin server, improves Core Web Vitals, and makes your blog feel responsive for visitors anywhere. When you pair it with solid hosting, smart caching, and image optimization, you build a performance stack that scales with your traffic.
Your next step is simple. Choose a CDN type that fits your needs, connect it with either a plugin or your host’s panel, then test and refine your caching rules. Once your WordPress CDN runs smoothly, you can focus on publishing content instead of fighting slow load times.
More WordPress Guides You Might Like
You can combine a CDN with other performance and optimization tactics to get even better results from your blog. These future and related resources help you build a complete speed and maintenance strategy around your WordPress site.
- WordPress speed optimization new bloggers
- Beginner guide to WordPress speed optimization
- WordPress speed optimization step by step
- How to start a blog WordPress
- Beginner guide WordPress speed core web vitals
You can treat this CDN setup guide as your starting point, then work through these related topics to create a fast, stable, and search-friendly blog.


