Internal Linking Strategy For Blog Posts
A practical WordPress workflow for planning, adding, auditing, and improving internal links across your blog content.

An internal linking strategy for blog posts helps search engines understand your content, helps readers find related articles, and keeps valuable pages from being buried deep inside your site. Without a clear system, even helpful blog posts can become isolated, hard to discover, and weaker than they should be in search results.
In this guide, you will build a repeatable workflow for planning links before publishing, adding contextual links inside WordPress, auditing old posts, and improving link equity across your blog. You will also learn how to avoid common mistakes such as over-linking, weak anchor text, and sending every link to the same few pages.
If you are still building your broader search foundation, review this WordPress SEO beginner guide before applying the steps below. Internal links work best when they support a clear site structure, useful content, and optimized pages.
Prerequisites
Before you create an internal linking strategy, make sure you have access to the tools and pages you will need. You do not need a premium SEO plugin, but you do need a consistent process.
- Administrator or editor access to your WordPress dashboard.
- A list of your most important blog posts, service pages, product pages, or category pages.
- Access to Google Search Console, Google Analytics, or another analytics tool.
- A spreadsheet, content calendar, or SEO tool for tracking links.
- A basic understanding of your blog categories and target keywords.
Step 1: Define the Goal of Each Internal Link
Every internal link should have a job. Some links help readers move to the next useful tutorial, some support a high-value money page, and others help search engines discover older content that still matters.
Start by dividing your links into three practical goals. This prevents random linking and keeps every link useful.
- Navigation links: These help users move to a closely related tutorial, guide, or next step.
- Authority links: These point from supporting articles to a high-priority pillar post, service page, or conversion page.
- Discovery links: These help search engines and readers find older posts that are still relevant.
Open one blog post and ask, “What should a reader do next after this section?” If the answer is a related guide, comparison, tutorial, or definition, you have a strong internal linking opportunity.
Checkpoint: You should be able to explain why each planned internal link exists before adding it. If the link does not help the reader or support your content structure, leave it out.
Step 2: Map Your Blog Posts Into Topic Clusters
Topic clusters make internal linking easier because they show which posts should connect naturally. A cluster usually includes one broad pillar page and several supporting posts that answer narrower questions.
For example, a WordPress SEO cluster might include a main SEO guide, a keyword research article, an on-page SEO tutorial, a title tag guide, and an internal linking guide. These posts should link to each other where the context makes sense.
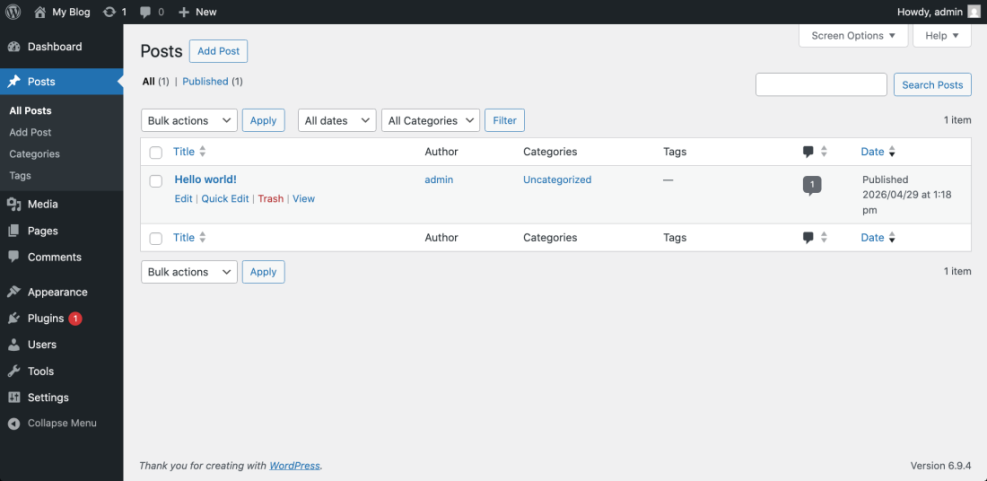
- Go to Posts > All Posts in your WordPress dashboard.
- Filter posts by category or use the search box to find articles around one topic.
- List the broadest guide as the pillar post.
- List the narrower tutorials underneath it as supporting posts.
- Mark which supporting posts should link up to the pillar and which posts should link sideways to each other.
If your content library is small, start with three to five posts in one cluster. If your blog has hundreds of articles, begin with your highest-value topics instead of trying to map the entire site at once.
Checkpoint: You should have one topic cluster with a clear main page and several supporting blog posts. Each supporting post should have at least one logical internal link target.
Step 3: Choose Descriptive Anchor Text
Anchor text is the clickable text in a link. It should tell readers what they will get after clicking and help search engines understand the relationship between two pages.
Avoid vague anchors such as “click here,” “read more,” or “this post.” They do not provide enough context. Instead, use natural phrases that describe the destination page.
- Weak: Click here
- Better: WordPress on-page SEO checklist
- Weak: This guide
- Better: guide to adding internal links in WordPress
When you are writing or editing a blog post, place internal links where the sentence already introduces a related idea. For example, if you mention optimizing headings, titles, and content structure, you can naturally point readers to a step-by-step guide to on-page SEO in WordPress.
Checkpoint: A reader should understand the destination of the link without reading the full paragraph. The anchor should feel natural, not stuffed with keywords.
Step 4: Add Internal Links in WordPress
Once you know the goal, cluster, and anchor text, add the links directly inside your blog post. WordPress makes this simple in both the Block Editor and Classic Editor.
Using the Block Editor
- Go to Posts > All Posts.
- Open the post you want to edit.
- Highlight the text you want to turn into a link.
- Click the link icon in the floating toolbar.
- Search for the destination post title or paste the internal URL.
- Select the correct result and press Enter.
- Click Update to save the post.
Using the Classic Editor
- Go to Posts > All Posts.
- Open the post in the editor.
- Highlight your anchor text.
- Click the chain link icon in the toolbar.
- Search for an existing post or paste the URL.
- Click the apply button.
- Click Update.
If you need a beginner-friendly walkthrough of the editing process, follow this guide on how to add an internal link in WordPress and then return to this strategy workflow.
Checkpoint: Preview the post and click the new link. It should open the correct internal page, use the intended anchor text, and fit naturally inside the paragraph.
Step 5: Place Links Where They Are Most Useful
Internal links perform best when they appear near relevant context. A link buried in an unrelated paragraph is less helpful than a link placed exactly where the reader needs the next explanation.
Use the body content first. Contextual links inside paragraphs usually provide stronger relevance than a large list of links at the end of a post. You can still use “Further Reading” sections, but they should support the article rather than replace meaningful contextual links.
- Add links near definitions when a reader may need more background.
- Add links after a step when a reader may need a deeper tutorial.
- Add links inside comparison sections when a related guide helps clarify the choice.
- Add links near troubleshooting advice when another article solves a specific issue.
Do not overload the introduction with too many links. One useful link near the beginning can help, but too many early links may distract readers before they understand the article.
Checkpoint: Scan the post from top to bottom. Each internal link should appear close to the idea it supports, and no section should feel interrupted by unnecessary links.
Step 6: Send More Links to Priority Pages
Not every page on your site has the same value. Your internal linking strategy should give extra support to pages that matter most for traffic, leads, sales, or topical authority.
Create a short list of priority pages. These may include pillar guides, product pages, service pages, high-converting tutorials, or posts already ranking on page two of Google. Then look for older posts that can link to those pages naturally.
- Open Google Search Console.
- Go to Performance > Search results.
- Filter for pages with impressions but lower average positions.
- Identify pages that deserve more internal links.
- Search your WordPress posts for related terms.
- Add contextual links from relevant older posts to the priority page.
You can also search your site with Google using this format:
site:yourdomain.com "target topic"Run that search in Google, replacing yourdomain.com with your website and target topic with the keyword or phrase related to your priority page. This helps you find older posts that mention the topic but may not yet link to the important page.
Checkpoint: Each priority page should receive internal links from multiple relevant posts, not just from menus or sidebar widgets.
Step 7: Audit Existing Internal Links
An internal linking strategy is not finished after publishing. Blog archives change, URLs get updated, categories shift, and old posts may lose relevance. A regular audit keeps your link structure clean and useful.
Run a quarterly internal link audit for active blogs. For smaller sites, a twice-yearly audit may be enough. Focus on broken links, redirect chains, orphaned posts, excessive links, and pages that deserve more internal support.
- Broken links: Links that lead to deleted pages or 404 errors.
- Redirect chains: Links that pass through one or more redirects before reaching the final page.
- Orphaned posts: Published posts with few or no internal links pointing to them.
- Over-linked posts: Pages with too many links that dilute user attention.
- Under-supported pages: Important pages that need more contextual links.
Checkpoint: After the audit, you should have a prioritized list of links to fix, remove, update, or add.
Step 8: Avoid Common Internal Linking Mistakes
Internal linking mistakes usually happen when links are added for search engines instead of readers. Good SEO still depends on clarity, relevance, and usefulness.
- Linking every keyword mention: Repeating links too often makes the post harder to read.
- Using generic anchor text: Vague anchors reduce context for readers and search engines.
- Ignoring old posts: New content often gets links, while older useful posts become buried.
- Linking only to top-level pages: Supporting posts also need links to each other.
- Creating irrelevant links: A link should match the topic and reader intent of the surrounding text.
- Using too many nofollow attributes: Internal editorial links usually should not be nofollow unless there is a specific technical reason.
A good rule is to add links only when they help the reader continue the journey. If the link feels forced, it probably is.
Checkpoint: Review one finished article and remove any internal link that does not clearly help the reader, support the section, or strengthen your content structure.
Step 9: Build Internal Linking Into Your Publishing Workflow
The best internal linking strategy is not a one-time cleanup. It is a publishing habit. Add internal linking checks to your content workflow so every new article strengthens the rest of your blog.
- Before writing, identify the topic cluster and target pillar page.
- During outlining, choose two or three possible internal link targets.
- During editing, add contextual links with descriptive anchor text.
- Before publishing, click every internal link in preview mode.
- After publishing, update two or three older posts to link to the new article.
- During audits, improve anchor text, fix broken links, and support priority pages.
This workflow prevents new posts from becoming orphaned. It also helps your older articles stay useful because you revisit them whenever you publish related content.
Checkpoint: Your editorial checklist should include both outgoing internal links from the new post and incoming internal links from older posts.
Turn Internal Links Into a Repeatable SEO System
An effective internal linking strategy for blog posts starts with intent, structure, and consistency. Instead of adding links randomly, connect related posts inside topic clusters, use descriptive anchor text, and give extra support to pages that matter most.
Start with one content cluster this week. Map the main post, choose supporting articles, add contextual links, and then audit the results. Once the process works for one cluster, repeat it across the rest of your blog.
Further Reading
- How to Fix Internal Nofollow Links in WordPress
- How to Fix Broken Links in WordPress
- Content Planning Workflow for WordPress Blogs
- Categories and Tags Beginner Guide
- Beginner Checklist for Optimizing WordPress Blog Posts
Frequently Asked Questions
How many internal links should a blog post have?
Why are my internal links not helping rankings?
What should I do if an internal link goes to a 404 page?
Should internal links open in a new tab?
Can too many internal links hurt SEO?