How to Use WordPress to Create a Website is one of the first things beginners want to learn when they start building an online presence. The good news is you don’t need to be a developer: with a domain, hosting, and a few clicks, you can have a professional-looking site up and running.
In this step by step guide, you’ll learn how to use WordPress to create a website from scratch — choosing hosting, installing WordPress, selecting a theme, adding plugins, creating pages, and finally launching your site to the world.
What You Need Before You Use WordPress to Create a Website
- A clear idea of your site’s goal (blog, business site, portfolio, store, etc.).
- A domain name (like
yourname.com) or at least an idea of what you want. - A web hosting account that supports WordPress (most shared hosts do).
- Ability to access your hosting control panel and email.
- A bit of time to follow each step without rushing.
Step 1: Choose the Right WordPress Platform
When people talk about learning how to use WordPress to create a website, they usually mean self-hosted WordPress.org, not WordPress.com. Here’s the difference in simple terms:
- WordPress.org: You install WordPress on your own hosting. Full control, can install any theme or plugin, best for long-term projects and businesses.
- WordPress.com: Hosted service with limits on themes/plugins unless you pay for higher plans. Good for very simple sites or hobby blogs.
In this guide, we’ll focus on the self-hosted WordPress.org approach, because it gives you more flexibility and looks more professional.
Step 2: Choose a Domain Name and Hosting
To make your site available on the internet, you need:
- A domain name — the address people type to visit your site.
- Web hosting — the server space where your WordPress files and database live.
- Choose a short, memorable domain that matches your brand or topic.
- Sign up with a WordPress-friendly host (most offer “WordPress hosting” plans).
- During signup, register your domain (or connect an existing one).
- Make a note of your hosting login and any email accounts you create.
Step 3: Install WordPress
Once hosting is ready, it’s time to actually install WordPress so you can start building your site.
- Log in to your hosting control panel (often cPanel or a custom dashboard).
- Look for a section like WordPress, Website, or Softaculous Apps Installer.
- Click the WordPress installer icon.
- Choose the domain where you want to install WordPress (for example,
https://example.com). - Fill in basic site details:
- Site Title (you can change this later).
- Admin Username and Password (choose something strong).
- Admin Email (where important notices will be sent).
- Click Install and wait for the process to finish.
- When done, note the admin URL (usually
https://example.com/wp-admin/).
Step 4: Get Comfortable with the WordPress Dashboard
Now that WordPress is installed, you can log in and see the dashboard where you’ll manage your site.
- Visit
https://yourdomain.com/wp-admin/. - Enter the username and password you chose during installation.
- Once logged in, explore key areas in the left sidebar:
- Posts: Blog posts or news updates.
- Pages: Static pages like Home, About, Contact.
- Appearance: Themes, menus, widgets, and the Site Editor/Customizer.
- Plugins: Extra features like contact forms, SEO, backups.
- Settings: Site title, timezone, permalinks, and more.
Step 5: Pick and Install a Theme
Your theme controls your site’s design and layout. You can change it anytime without losing content.
- In the dashboard, go to Appearance » Themes.
- Click Add New to browse free themes from the official directory.
- Use the search or filters (Popular, Latest, Feature Filter) to find a theme that fits your niche.
- Hover over a theme and click Preview to see a live demo.
- Click Install, then Activate when you find one you like.

Step 6: Customize Your Design and Branding
After activating a theme, you’ll customize it so the site looks like your brand instead of a generic template.
Customize Using the Customizer (Classic Themes)
- Go to Appearance » Customize.
- Set your Site Title, Tagline, and upload a Logo.
- Adjust Colors and Typography to match your brand.
- Configure the Homepage Settings (static page vs latest posts).
- Click Publish to save your changes.
Customize Using the Site Editor (Block/FSE Themes)
- Go to Appearance » Editor.
- Edit templates like Home, Single, and Page using blocks.
- Use the Styles panel to set global fonts, colors, and spacing.
- Save your changes and preview your site on the front end.
Step 7: Create Your Core Pages
To use WordPress to create a website that feels complete, you’ll want a few core pages:
- Home: The main page that introduces your brand or offers.
- About: Who you are, what you do, why visitors should trust you.
- Contact: Contact form, email, and other ways to reach you.
- Blog: Optional page showing your latest posts.
- Go to Pages » Add New.
- Enter a title (e.g., “Home”, “About”, “Contact”).
- Use the block editor to add headings, text, images, and buttons.
- Click Publish when the page looks good.
- Repeat for each essential page.
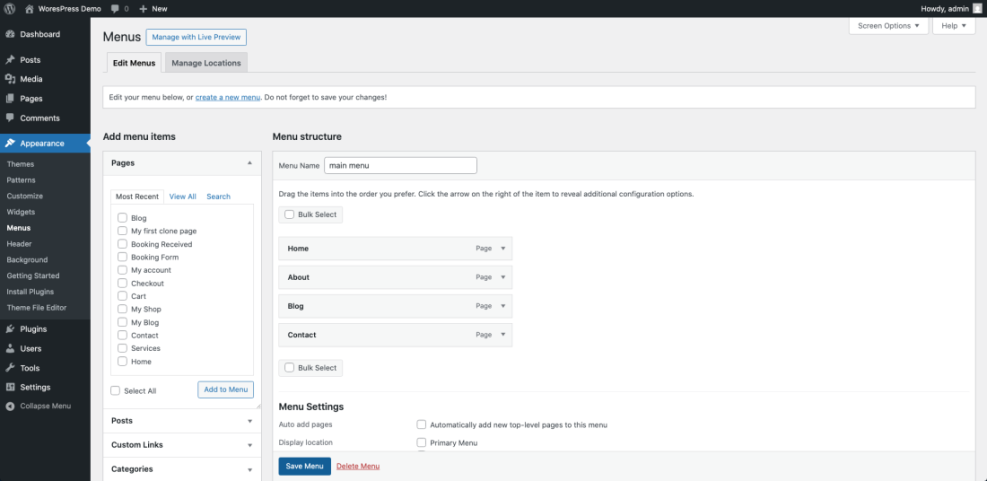
Step 8: Build Your Navigation Menu
Your navigation menu helps visitors find the main parts of your site.
- Go to Appearance » Menus (or Appearance » Editor » Navigation block for block themes).
- Create a new menu and give it a name like “Primary Menu”.
- Add pages like Home, About, Blog, and Contact to the menu.
- Drag and drop items to change their order or create dropdowns.
- Assign the menu to the Primary or Main location.
- Save the menu and refresh your site to see it live.
Step 9: Add Essential Plugins and Features
Plugins let you extend WordPress without coding. For a basic website, you don’t need dozens — just a few essentials:
- Contact form: So visitors can send you messages.
- SEO plugin: Helps with meta titles, descriptions, and search visibility.
- Caching/performance: Makes your site load faster.
- Security: Basic protection and login hardening.
- Backup: Automated backups stored off-site.
- Go to Plugins » Add New.
- Search for the type of plugin you need (for example, “contact form”).
- Check ratings, active installs, and last updated date.
- Click Install Now then Activate.
- Configure basic settings for each plugin (the plugin’s menu will guide you).
Step 10: Fine-Tune Key Settings Before Launch
A few quick settings help your site behave correctly and look more professional.
- Go to Settings » General:
- Confirm your Site Title and Tagline.
- Set the correct Timezone and Date Format.
- Go to Settings » Reading:
- Choose whether your homepage shows a static page or your latest posts.
- Ensure “Discourage search engines from indexing this site” is unchecked when you’re ready to go live.
- Go to Settings » Permalinks:
- Select Post name for cleaner URLs (for example,
/about/instead of/?p=123).
- Select Post name for cleaner URLs (for example,
Quick Comparison of Ways to Use WordPress to Create a Website
Use this table to see your main options and pick what fits your experience level and goals.
| Method | Who It’s For | Main Benefits | Main Limitations |
|---|---|---|---|
| Self-Hosted WordPress.org (This Guide) | Businesses, blogs, portfolios, serious projects | Full control, thousands of themes/plugins, scalable, ownership of data | Requires separate hosting, basic setup and security knowledge |
| WordPress.com Free / Low-Tier Plans | Hobby blogs, personal journals, experiments | No hosting setup, quick to start, handled updates | Limited themes/plugins, WordPress.com branding, less control |
| Page Builders on Top of WordPress | Users wanting pixel-perfect page designs | Drag-and-drop layouts, advanced design options | Can add bloat, learning curve, sometimes theme lock-in |
| Custom-Coded Theme / Developer Build | Larger brands, complex or unique designs | Fully tailored design and features | Higher cost, requires developer to maintain |
Step 11: Review Everything and Go Live
Before telling the world, give your new site a quick check.
- Click through every page and menu item to make sure links work.
- Test your contact form and any other important features.
- View your site on mobile and tablet to ensure it’s responsive.
- Ask a friend or colleague to visit the site and report anything confusing.
- Remove any “Coming Soon” or maintenance plugins when you’re ready to go live.
Conclusion: You Know How to Use WordPress to Create a Website
By now, you’ve seen how to use WordPress to create a website from scratch: choosing hosting, installing WordPress, picking a theme, adding plugins, creating pages, and checking key settings before launch.
From here, your job is to keep improving: publish content regularly, refine your design, and learn a bit more about SEO and performance. WordPress is flexible enough that you can start simple and grow into something powerful without rebuilding everything later.


