Want to start a WordPress blog but feel overwhelmed by hosting plans, themes, and settings? You are not alone. Many beginners stall out on the technical setup and never get to hit “Publish” on their first post.
This guide walks you through exactly how to start a WordPress blog step by step: choosing the right hosting, installing WordPress, picking a theme, configuring settings, and publishing your first SEO-friendly article. If you are unsure what WordPress is or how it works, you can quickly review what WordPress is and how it works before you begin.
By the end of this tutorial, you will have a live, secure, and ready-to-grow WordPress blog, even if you have never built a website before.
Prerequisites for Starting a WordPress Blog
Before you touch any settings, it helps to have a few basics ready. These will make the setup smoother and reduce back-and-forth later.
- Blog topic or niche: A clear subject (e.g., travel, fitness, finance) to keep your content focused.
- Blog name and domain idea: A short, memorable name you can use as your domain (like mytravelblog.com).
- Email address: For hosting and WordPress admin notifications.
- Payment method: A card or PayPal account to pay for hosting and your domain.
- 30–60 minutes of focused time: To go through the initial install and configuration without rushing.
Step 1: Choose Your Hosting and Register a Domain
Your hosting provider is the foundation of your WordPress blog. A good host keeps your site fast, secure, and online; a bad one causes endless downtime and speed issues.
When choosing a host, look for:
- One-click WordPress installation and automatic updates.
- Free SSL certificate (https://) for security.
- Reliable support that understands WordPress.
- Servers optimized for WordPress performance.
If you want a deeper comparison of plans and providers, read a dedicated guide on how to choose the right WordPress hosting, such as how to choose the right WordPress hosting, before you commit to a long contract.
- Sign up for a hosting plan: Visit your chosen host and select a basic shared or managed WordPress plan. For a new blog, the entry-level plan is usually enough.
- Register your domain: During signup, register a new domain or connect an existing one. Ensure the spelling and extension (like .com or .net) are correct.
- Connect domain to hosting: If your domain is registered elsewhere, update its nameservers to point to your hosting account, following your host’s instructions.
Checkpoint: You should now have a hosting account and a domain pointing to it (this may take a few hours due to DNS propagation).
Step 2: Install WordPress on Your Domain
Most modern hosting providers offer a simple WordPress installer in their control panel, so you do not need to upload files manually or use FTP. The exact labels differ by host, but the flow is similar.
Here is the typical one-click install process from your hosting control panel:
- Log in to your hosting dashboard: Access cPanel or your custom hosting panel.
- Find the WordPress installer: Look for “WordPress,” “Softaculous,” or “WP Installer.”
- Choose the installation URL: Select your domain and ensure the path is blank so WordPress installs at yourdomain.com, not yourdomain.com/blog (unless you prefer a subfolder).
- Set admin details: Enter an admin username, a strong password, and your email address. Do not use “admin” as the username.
- Click Install: Wait a few moments for the installer to complete.
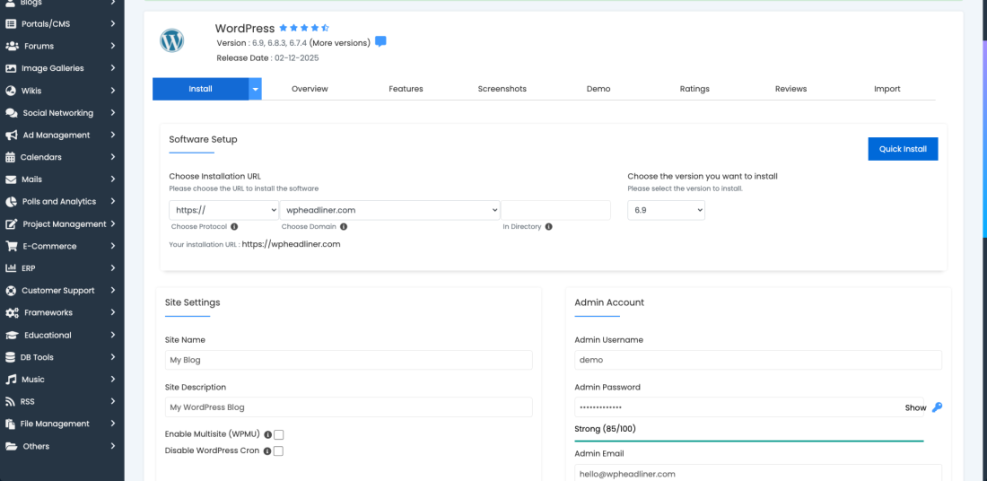
Checkpoint: You should now be able to visit yourdomain.com and see the default WordPress homepage, and access the admin at yourdomain.com/wp-admin.
Step 3: Choose a Theme and Design Your Blog
Now that WordPress is installed, it is time to make your blog look like a real site instead of the default theme. Your theme controls layout, typography, and many visual elements.
To install and activate a theme from your WordPress dashboard:
- Log in to WordPress admin: Go to yourdomain.com/wp-admin and enter your login details.
- Go to Appearance > Themes: Click Add New to browse available themes.
- Search for a theme: Use the search bar to find a blog-friendly theme, or upload a premium theme like Jannah if you have purchased one.
- Install and Activate: Hover over the theme, click Install, then Activate.
Once your theme is active:
- Go to Appearance > Customize to adjust your logo, colors, fonts, and header layout.
- Create essential pages like About and Contact (Pages > Add New).
- If your theme (like Jannah) provides demo imports, use them to quickly set up a professional-looking layout.
Step 4: Configure Essential Blog Settings
Default WordPress settings are not ideal for a long-term blog. Adjusting a few options now will save you SEO and usability headaches later.
4.1 Set site title, tagline, and timezone
- Go to Settings > General in your WordPress dashboard.
- Enter your Site Title (blog name) and a short, descriptive Tagline.
- Set your Timezone, Site Language, and Date/Time formats.
- Save changes.
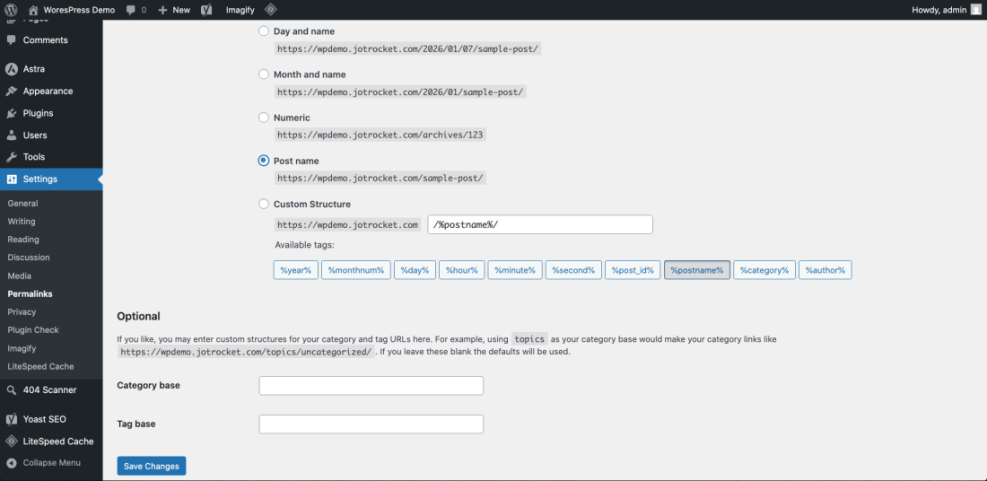
4.2 Configure SEO-friendly permalinks
Permalinks are the URLs for your posts (for example, yourdomain.com/my-first-post/). Using the right structure helps SEO and makes links easier to read.
- Go to Settings > Permalinks.
- Select the Post name option to use clean URLs.
- Click Save Changes.
4.3 Set your homepage and blog feed
Decide whether your homepage should show your latest posts or a static page.
- Go to Settings > Reading.
- Under Your homepage displays, choose:
- Your latest posts for a classic blog homepage; or
- A static page to use a landing page and show posts on a separate “Blog” page.
- If you select a static homepage, assign which page is Homepage and which is Posts page.
- Save changes.
4.4 Tidy up comments and discussion settings
- Go to Settings > Discussion.
- Enable or disable comments according to your preference.
- Turn off pingbacks/trackbacks to reduce spam.
- Enable Comment must be manually approved to prevent spam from going live.
Checkpoint: Your site now has correct titles, URLs, and basic discussion behavior set up. You are ready to publish content.
Step 5: Write and Publish Your First Blog Post
With your design and settings in place, it is time to write your first article. This is where your blog starts to become useful to real visitors.
5.1 Create a new post
- Go to Posts > Add New.
- Enter a clear, benefit-driven title like “10 Simple Recipes for Busy Weeknights.”
- Use headings (H2, H3) to break your article into sections.
- Add images where they help explain your content (and set alt text for accessibility and SEO).
5.2 Assign categories and tags
Categories and tags help organize your content and make navigation easier for readers (and search engines).
- In the right sidebar of the editor, assign a Category for the post (or create a new one).
- Add a few relevant Tags that describe the specific topics inside the post.
5.3 Set a featured image and publish
- Click Set featured image in the editor sidebar and upload/select an image that represents your post.
- Click Preview to see how the post will look on desktop and mobile.
- When you are happy, click Publish and confirm.
Checkpoint: Your first post is now live, and your WordPress blog is publicly accessible.
Step 6: Optimize Your Blog for Traffic and Growth
Launching is just the beginning. To grow your WordPress blog, you should optimize it for search engines, user experience, and conversions from day one.
6.1 Install essential plugins
- SEO plugin: Install and configure a plugin like Yoast SEO or Rank Math to control titles, meta descriptions, and sitemaps.
- Caching plugin: Use a caching plugin to speed up your site for visitors.
- Security and backups: Add plugins that help you block attacks and automatically back up your site.
6.2 Follow basic WordPress SEO best practices
Good SEO helps your blog posts rank in Google and bring in consistent organic traffic. For a full walkthrough, you can follow a dedicated WordPress SEO beginner guide, but here are the basics:
- Use descriptive titles that include your main keyword naturally.
- Write clear meta descriptions that encourage clicks.
- Use headings to structure content and make it easy to scan.
- Link related posts together with internal links as your content library grows.
6.3 Plan your content and publishing schedule
- Create a simple list of topics you want to cover in the first 10–20 posts.
- Set a realistic publishing schedule (for example, one post per week).
- Track important metrics like traffic and engagement over time to see what resonates.
Start WordPress Blog Live—What Comes Next?
You have chosen hosting, installed WordPress, picked a theme, configured your settings, and published your first post. That is all you need to officially start WordPress blog and share your ideas with the world.
From here, your main job is to keep publishing useful content, refine your design based on real visitors, and steadily improve performance and SEO. If you follow the steps in this guide and keep learning, your blog can grow from a simple first post into a valuable online asset over time.
Further Reading
- WordPress Guides & Tutorials Overview
- Beginner Checklist for Optimizing WordPress Blog Posts
- Content Planning Workflow for WordPress Blogs
- Beginner Guide to WordPress Speed & Core Web Vitals
- Beginner WordPress Security Best Practices Guide