Beginner Checklist for Optimizing Every WordPress Blog Post
Simple steps to optimize every new article
A WordPress blog post is easiest to optimize when you follow a simple checklist instead of guessing what to fix every time. Without a clear process, it is easy to forget SEO basics like titles, links, images, and readability, which can cost you traffic and conversions.
In this beginner friendly tutorial you will use a repeatable checklist inside WordPress so every new or updated post is optimized for readers and search engines before you click Publish or Update.
What You Need to Start
- Access to your WordPress admin dashboard with an Administrator or Editor role.
- An active SEO plugin such as Yoast SEO, All in One SEO, or Rank Math.
- At least one draft or existing WordPress blog post you want to optimize.
- One or more relevant images saved on your computer in JPG or PNG format.
Step 1: Plan the topic and keyword
Every optimized WordPress blog post starts with the right topic and keyword. Planning this first helps your content match real searches and keeps the rest of the checklist focused.
If you have never done keyword research before, walk through Best keyword research tools for seo first, then come back to this checklist with a short list of phrases that match your audience.
- Open your preferred keyword research tool or simply search in Google for ideas related to your topic.
- Choose one primary phrase that clearly describes your post, such as “beginner WordPress SEO” or “how to compress images in WordPress”.
- Log in to your WordPress admin area and navigate to Posts » All Posts.
- Click the post you want to optimize or click Add New to create a fresh draft.
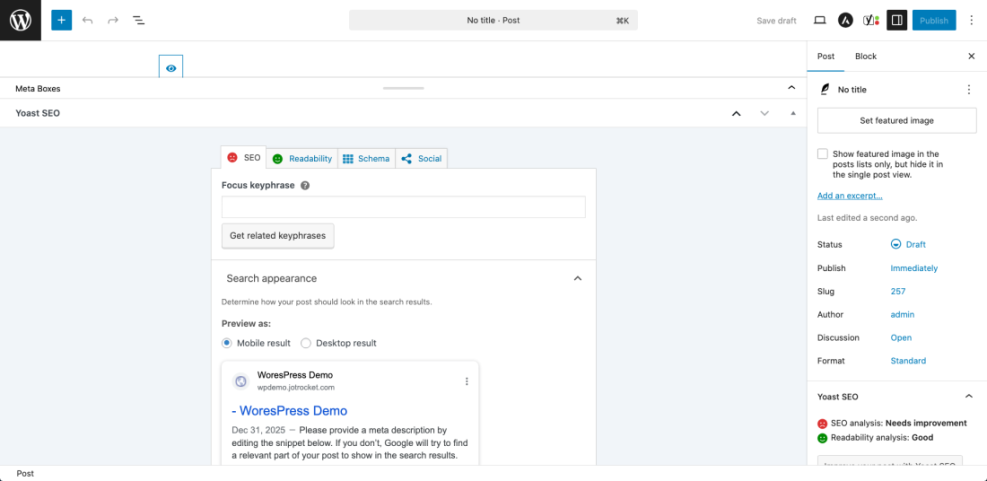
- Scroll to your SEO plugin panel and type your chosen phrase into the Focus keyphrase or similar field.
You will know this step is complete when each WordPress blog post has one clearly defined focus keyword saved in your SEO plugin for that post.
Step 2: Draft and structure the content
Well structured content is easier to read and easier for search engines to understand. Short paragraphs, clear headings, and scannable lists keep visitors on the page longer.
- Inside the WordPress editor, click into the main content area and write or paste your article text.
- Break long blocks of text into paragraphs of two to four sentences so the content is easy to skim.
- Highlight key section titles and set them to Heading 2 using the formatting toolbar or block settings panel.
- Use Heading 3 for sub points under each main section where needed.
- Click Save Draft or Update, then click Preview » Preview in new tab to see how the layout looks.
You will know this step is complete when your WordPress blog post has a clear introduction, logical sections, and short, readable paragraphs throughout the content.
Step 3: Optimize SEO title URL and meta description
Your title, permalink, and meta description are what searchers see in search results. Optimizing these three items makes your WordPress blog post easier to click and easier for search engines to categorize.
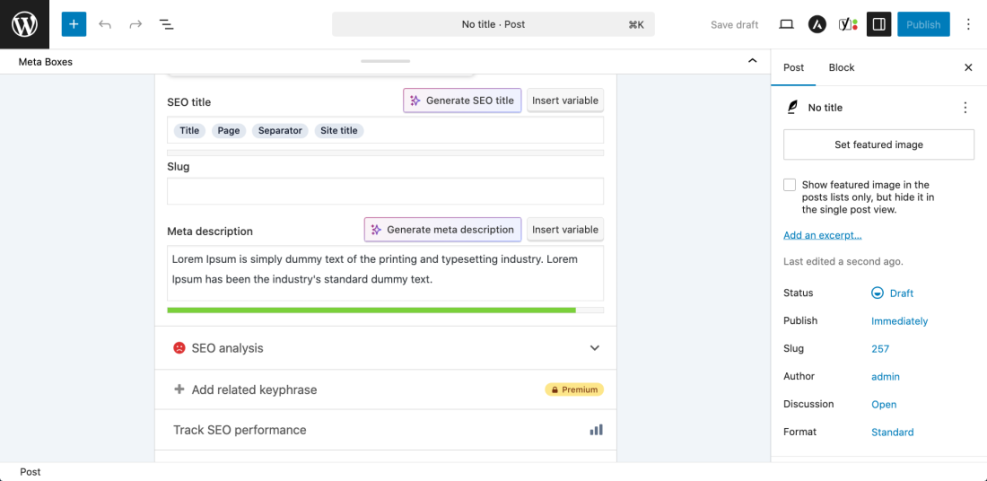
- Scroll to your SEO plugin panel below the editor and locate the snippet or SEO title area.
- Edit the SEO title so it includes your focus keyword near the beginning and clearly promises a benefit.
- Click the Slug or URL field and shorten it to a few hyphen separated words that also include your focus keyword.
- Write a concise Meta description (about 150 to 160 characters) that summarizes the post, includes your keyword once, and encourages a click.
- Click Update or Save Draft to store your changes.
You will know this step is complete when your snippet preview shows a short URL, a compelling SEO title, and a custom meta description with no warning icons from your SEO plugin.
Step 4: Improve headings and readability
Headings give your WordPress blog post a clear outline. They help visitors jump to the section they care about and help search engines understand how ideas are grouped on the page.
- Scan your post and make sure every major idea starts with a Heading 2 rather than bolded body text.
- Convert any sub points under those main sections into Heading 3 blocks where it makes sense.
- Look for long sentences and split them into two shorter sentences where possible.
- Use bullet or numbered lists for steps, tips, or examples to improve scannability.
- Open your SEO plugin readability analysis and review any suggestions it gives, such as shortening paragraphs or adding transition words.
<h2>Why this topic matters</h2>
<p>Short paragraph introducing the section.</p>
<h3>Sub point one</h3>
<p>Explain the first supporting idea.</p>
<h3>Sub point two</h3>
<p>Explain the second supporting idea.</p>
You will know this step is complete when your headings form a logical outline, your readability analysis is mostly green, and your post is easy to skim on both desktop and mobile screens.
Step 5: Add internal links external links and calls to action
Internal links help search engines crawl connected content and keep readers moving through your site. External links to trusted sources support your claims and improve credibility.
- In the editor, select a phrase that naturally describes another article on your site.
- Press Ctrl + K (or click the Link icon) and paste the relevant URL, then click Apply.
- Add at least two to five internal links to closely related posts such as tutorials, checklists, or product pages.
- Add one or two external links to authoritative sources where they genuinely help the reader.
- At the end of the post, add a clear call to action such as subscribing, contacting you, or reading a related article.
When you are ready to go deeper on this topic, follow the process in Internal linking WordPress beginners to plan internal links across your whole site instead of one post at a time.
You will know this step is complete when your WordPress blog post includes several internal links, at least one helpful external link, and a clear action you want the reader to take next.
Step 6: Optimize images and featured image
Optimized images make your post more engaging without slowing down your site. Search engines also use image alt text and file names to better understand your content.
- In the editor, click the + button where you want an image and choose Image or Gallery.
- Click Upload, select your image file, and wait for the upload to finish.
- In the block settings sidebar, enter a short, descriptive Alt text that explains the image and includes your focus keyword only where it fits naturally.
- Scroll to the Featured image panel, click Set featured image, and choose a relevant, high quality image.
- Update the post and reload the preview to make sure images display correctly and do not push important text too far down the page.
For a deeper walkthrough of visuals, review the steps in Is WordPress good for seo and apply them across all your posts.
You will know this step is complete when every important section has a supporting image, each image has descriptive alt text, and your featured image looks good in the preview.
Step 7: Set categories tags and schema basics
Correct categories and tags help users and search engines understand how your WordPress blog post fits into the rest of your site. Consistent use of these taxonomies improves navigation and topical relevance.
- Open the post settings sidebar and locate the Categories section.
- Select exactly one main category that best matches the topic of your post.
- Scroll to the Tags section and add two to four specific tags that describe the topic, audience, or format.
- If your SEO plugin supports schema, choose the appropriate Content type or Schema type such as Article or Blog Posting.
- Save your changes with Update or Save Draft.
To see more examples of good structures, read Categories tags beginner guide and apply those naming patterns to your own site.
You will know this step is complete when each post has one main category, a small set of accurate tags, and the correct schema type selected in your SEO plugin.
Step 8: Run final technical checks and publish
Before you publish or update your WordPress blog post, run a quick set of technical checks. This helps you catch issues with mobile layout, links, and SEO settings.
- Click Preview and open the post in a new tab on both desktop and mobile views.
- Scroll through the post and confirm headings, images, and lists look correct and are not cut off or overlapping.
- Click each internal and external link to confirm they open the correct pages in a new tab when appropriate.
- Review the SEO plugin panel one last time and fix any high priority warnings, especially for title, meta description, or indexing.
- When everything looks correct, click Publish or Update, then open the live URL in your browser to confirm the changes are active.
You will know this step is complete when the live version of your WordPress blog post matches your preview, loads correctly on mobile, and passes the basic checks in your SEO plugin.
Conclusion You Are Ready to Go
By following this beginner checklist, you have optimized your WordPress blog post from the focus keyword through to the final publish click. Your titles, content structure, links, images, and taxonomies now work together to improve search visibility and reader experience.
Use this same process every time you publish or update a post. The more consistently you apply the checklist, the easier it becomes to spot quick wins and keep your entire blog optimized without feeling overwhelmed.
Further Reading
- Is WordPress good for seo
- Is WordPress good for seo
- WordPress migration checklist for blogs
- WordPress seo complete beginners guide
- Reusable Onpage SEO Checklist