How to Build a WordPress Website
Step-by-step beginner’s guide from domain to launch
Building a WordPress website can feel overwhelming when you’re starting from a blank page. There are domains, hosting plans, themes, plugins, and settings to think about before you can even publish your first page. This guide walks you through every step so you can launch a professional-looking site without needing to be a developer.
You’ll go from choosing a domain and hosting, to installing WordPress, customizing your design, adding pages and menus, and finally making your website live. We’ll use the standard WordPress dashboard, Classic Editor, and a theme-friendly setup like Jannah so you can follow along easily.
If you’re still not completely sure what WordPress actually is, it can help to first read a clear overview of what WordPress is and how it works, then come back to this step-by-step build.
Prerequisites
Before you start clicking around in WordPress, make sure you have a few basics ready. Having these in place will make the build process much smoother and prevent common beginner roadblocks.
- A domain name: e.g.
yourbusiness.com, registered with a domain provider. - Web hosting with WordPress support: A shared, VPS, or managed WordPress hosting plan.
- Admin access: Login details for your hosting control panel (cPanel, Plesk, or custom dashboard).
- 30–90 minutes of focused time: Enough to go through install, basic setup, and a few essential pages.
- Content basics: A short “About” text, your contact details, and 2–3 headlines for your homepage.
Step 1: Choose your WordPress hosting and plan your site
The right hosting plan will affect your site’s speed, reliability, and even security. It’s easier to choose now than to migrate later.
- List your website’s main goals (e.g. simple brochure site, blog, small online store, portfolio).
- Choose hosting that supports PHP and MySQL and explicitly advertises WordPress compatibility.
- Compare at least two plans for disk space, bandwidth, SSL support, and backup options.
- Decide whether you prefer standard shared hosting or a managed WordPress plan that handles updates and some performance tasks for you.
For a deeper breakdown of plan types, pricing, and performance considerations, see this guide to choosing the right WordPress hosting.
Step 2: Point your domain to your hosting
Connecting your domain to your hosting ensures visitors see your WordPress site when they type your URL into a browser.
- Log in to your domain registrar (where you bought the domain).
- Find the DNS or Nameservers settings for your domain.
- Update the nameservers to the ones provided by your hosting company (usually two or more
ns1.example.com,ns2.example.comentries). - Save changes and wait for DNS propagation (this can take a few minutes up to 24 hours, but often is much quicker).
Step 3: Install WordPress on your hosting
Most modern hosts offer “1-click” WordPress installers that do all the database and file setup for you. If your host doesn’t, you can install manually, but we’ll focus on the easier option first.
- Log in to your hosting control panel (cPanel or your provider’s dashboard).
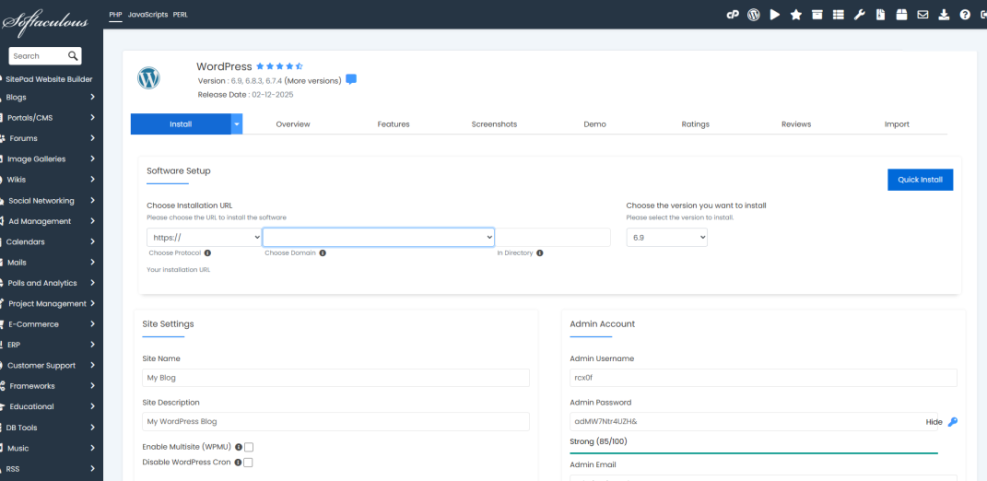
- Look for an app installer section labeled “WordPress,” “Softaculous,” or “App Installer.”
- Click the WordPress installer and choose your domain from the dropdown.
- Set your site title (you can change this later), admin username, strong password, and admin email.
- Ensure HTTPS is selected if you already have an SSL certificate (many hosts provide free SSL).
- Run the installer and wait for confirmation that WordPress has been installed.
When it’s finished, you’ll get a login URL—usually something like https://yourdomain.com/wp-admin/—plus the username and password you set.
Step 4: Configure essential WordPress settings
Before you start designing, it’s smart to configure a few key settings to avoid messy URLs, incorrect time zones, or unwanted default content.
- Log in to your WordPress dashboard at
/wp-admin/. - Go to Settings → General and set your Site Title and Tagline.
- Check that your WordPress Address (URL) and Site Address (URL) use
https://if SSL is active. - Set your timezone, date format, and time format to match your locale.
- Go to Settings → Permalinks and choose the Post name structure for cleaner URLs.
- Delete sample content under Posts → All Posts and Pages → All Pages (e.g. “Hello world!”, “Sample Page”).
Step 5: Choose and customize a WordPress theme
Your theme controls the layout and design of your WordPress website. You can start with a free theme, a bundled theme like Jannah, or a premium theme you upload.
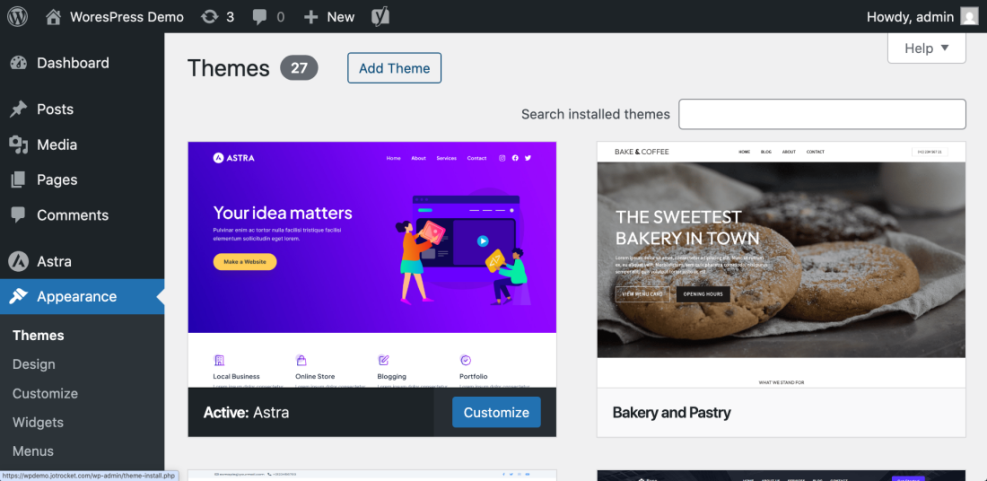
- In the WordPress dashboard, go to Appearance → Themes.
- Click Add New to browse free themes from the WordPress directory.
- Use the search and filter options (e.g. “blog,” “business,” “portfolio”) to find a design that suits your site.
- Hover over a theme and click Preview to see a live demo with your content.
- Click Install, then Activate to switch your site to the new theme.
If you’re using a theme like Jannah, you’ll typically upload it via Appearance → Themes → Add New → Upload Theme and then activate it. Many premium themes also include demo imports to quickly replicate a ready-made layout.
- Go to Appearance → Customize to open the WordPress Customizer.
- Adjust your site identity (logo, favicon), colors, fonts, and layout options.
- Save changes and preview your site in a new tab to ensure everything looks consistent.
Step 6: Create your core website pages
Most WordPress websites start with a few foundational pages. You’ll create these using the editor your site is set up with—this guide assumes the Classic Editor or a classic-style page builder.
- Go to Pages → Add New.
- Create the following common pages:
- Home: A quick overview of what you do and who you help.
- About: Your story, credentials, and what makes you different.
- Services/Products: What you offer and how to buy or contact you.
- Contact: How visitors can reach you (form, email, phone, location).
- For each page, add a clear heading, a few concise paragraphs, and any images or calls to action.
- Click Publish when you’re happy with each page.
Step 7: Build your navigation menus
Your navigation menu helps visitors move around your site easily. A clean, simple menu is better than one overloaded with links.
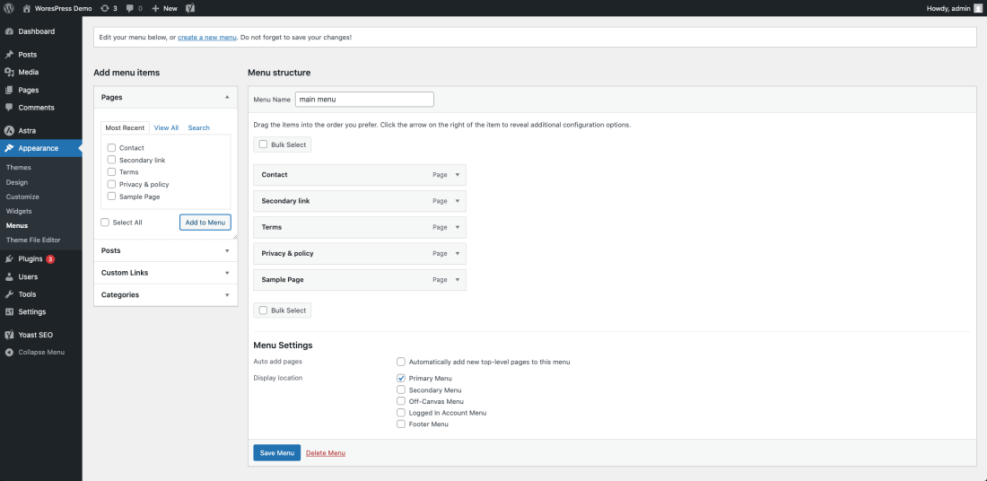
- Go to Appearance → Menus.
- Click Create a new menu and give it a name like “Main Menu.”
- On the left, select your key pages (Home, About, Services, Contact) and click Add to Menu.
- Drag and drop items to reorder them. You can drag an item slightly right to make it a submenu.
- Under Menu Settings, check the box that assigns this menu to your theme’s primary or main navigation location.
- Click Save Menu, then visit your site to confirm the menu appears where you expect.
To dive deeper into menu structures, dropdowns, and footer menus, see this beginner’s guide to WordPress menus and navigation.
Step 8: Install essential WordPress plugins
Plugins add functionality to your site—contact forms, SEO tools, caching, security, and more. Start with a small, focused set; you can always add more later.
- Go to Plugins → Add New.
- Search for plugins you need (e.g. “contact form,” “SEO,” “cache”).
- Click Install Now and then Activate on each plugin you choose.
- Configure each plugin under its settings menu or under Settings in the left sidebar.
- Contact form plugin: To allow visitors to send you messages.
- SEO plugin: To manage titles, descriptions, and SEO basics.
- Caching plugin: To speed up page loading times.
- Security plugin: To harden login and basic security.
- Backup plugin: To automate full-site backups.
Step 9: Check performance, security, and backups
Before you launch publicly, take a few minutes to confirm your site is reasonably fast and protected, and that you can recover it if something goes wrong.
- Performance: Run a speed test using a performance testing tool and note any major issues.
- Image sizes: Make sure images aren’t unnecessarily large; use an image optimization plugin if needed.
- Security basics: Confirm you’re using a strong admin password, change the default “admin” username if necessary, and enable basic firewall and brute-force protection in your security plugin.
- Backups: Configure your backup plugin to run automatic backups (daily or weekly) and store copies off-site (cloud storage or remote server).
- Test SSL: Visit
https://yourdomain.comand make sure the browser shows a secure padlock with no major warnings.
Step 10: Launch and maintain your WordPress website
Once everything looks good in your browser and on mobile, you’re ready to launch. The main job from here is to keep content fresh and make sure your site remains healthy.
- Proofread key pages (Home, About, Services, Contact) for typos and broken links.
- Test your contact form by submitting a test message and confirming it arrives in your inbox.
- Ask one or two friends or colleagues to browse the site on their devices and share feedback.
- Submit your site to search engines by creating an XML sitemap via an SEO plugin and connecting to tools like Google Search Console.
- Set a recurring reminder (weekly or monthly) to log in, update plugins/themes, and review basic analytics.
Launch your new WordPress website with confidence
You’ve planned your site, connected your domain, installed WordPress, picked a theme, built core pages, created menus, and added the most important plugins. At this point, you have a fully functional WordPress website that’s ready for visitors.
From here, your focus should shift to publishing useful content, monitoring performance, and refining your design based on how real users interact with your site. With a solid foundation in place, you can confidently grow your WordPress website into an asset that supports your business or project for years to come.
Further Reading
- How to Create a Website with WordPress
- Beginner Guide to WordPress Speed Optimization
- Beginner WordPress Security Best Practices Guide
- How to Do SEO for WordPress Website
- How to Backup WordPress Site
Frequently Asked Questions
How long does it take to build a WordPress website from scratch?
My WordPress site shows a blank page or error after installation. What should I check first?
plugins folder via your hosting file manager or FTP. If the site loads afterward, re-enable plugins one by one to find the culprit. Also verify your PHP version meets WordPress requirements and that your hosting account hasn’t exceeded resource limits. If you still see errors, check your host’s error logs for clues. Why is my new WordPress website not showing as secure (no HTTPS padlock)?
http://. Confirm that your host has issued an SSL certificate for your domain, then update the URLs under Settings → General to use https://. You may also need to clear your cache or use a plugin to fix “mixed content” (images or scripts loading via http://). 


