Learning how to install WordPress plugin correctly lets you add new features to your site without breaking anything. When you install WordPress plugins the right way, you reduce errors, keep your site secure, and save time.
In this step by step guide, you will learn how to install a WordPress plugin using the built in search, upload a premium plugin ZIP, install a plugin with FTP, and optionally use WP CLI. By the end, you will confidently install, activate, and manage any WordPress plugin on your site.
What You Need Before You Install a WordPress Plugin
- A working self hosted WordPress.org site already set up. If you still need this, follow the How to Install WordPress tutorial first before you install any WordPress plugin.
- Administrator access to your WordPress dashboard, so you can manage and install WordPress plugins.
- The name or download link of the plugin you want to install in WordPress.
- Optional FTP or SFTP login details from your hosting provider for manual plugin installation.
- Optional SSH access and WP CLI already installed, if you want to install WordPress plugins from the command line.
- A recent backup of your site, or a tested backup strategy, before installing new WordPress plugins.
Step 1: Open Your WordPress Dashboard Before Installing Plugins
Before you can install WordPress plugin files, you must confirm that you can log in as an administrator. You need full access to install, activate, and remove plugins safely.
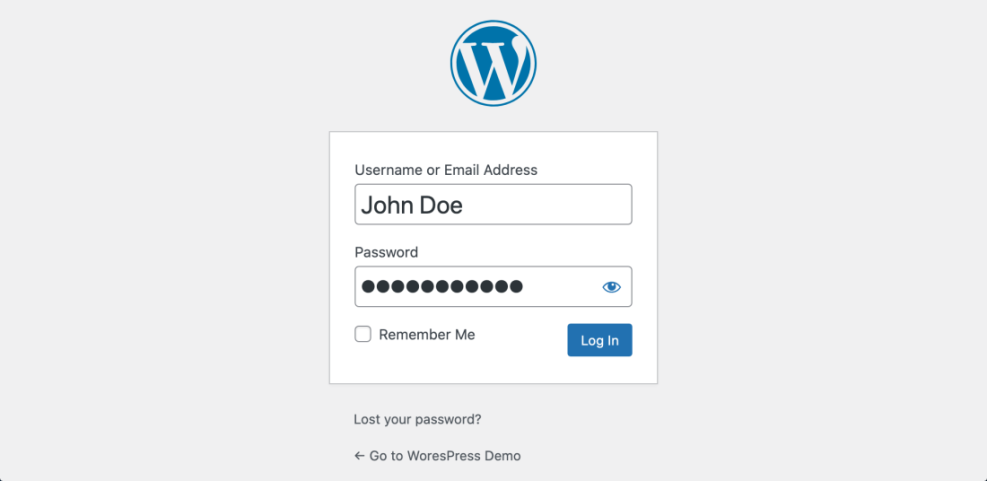
- Open your web browser and go to your site login URL, usually yourdomain.com/wp-admin or yourdomain.com/wp-login.php. If you are not sure, see How to Find Your WordPress Login URL so you can log in and install WordPress plugins.
- Enter your Username or Email Address and Password, then click Log In.
- Confirm you see the WordPress admin menu on the left and the Dashboard home screen in the center.
To verify success, check that the top admin bar is visible and that you can see the Plugins menu in the left sidebar. If you cannot see the Plugins menu, you will not be able to install WordPress plugins with this account.
Step 2: Choose a Safe Plugin Before You Install It
Installing the wrong plugin can slow down your site or cause conflicts, so it is important to be selective when you install WordPress plugin files. Take a moment to choose a reputable plugin before you click install.
- From the left admin menu, navigate to Plugins » Add New Plugin. This is the main screen where you install WordPress plugins.

- Use the Search plugins box to type the plugin name or the feature you need.
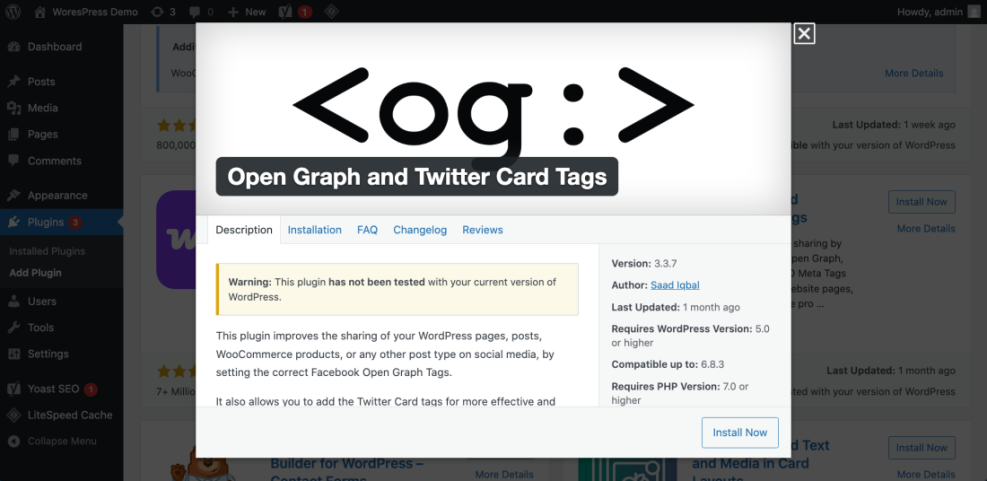
- In the results list, click the plugin name to open its details screen before you install the WordPress plugin.
- Check the Active Installations, Last updated date, Tested up to WordPress version, and user ratings.
- Prefer plugins that are well rated, actively maintained, and compatible with your WordPress version so you can safely install the WordPress plugin.
To verify success, you should have a short list of plugins you trust before you move to the actual plugin installation.
Step 3: How to Install a WordPress Plugin from the Directory
This is the easiest method to install WordPress plugin from the official WordPress.org Plugin Directory. Use this whenever the plugin is available there as a free plugin.
- In your dashboard, go to Plugins » Add New Plugin if you are not already on that screen.
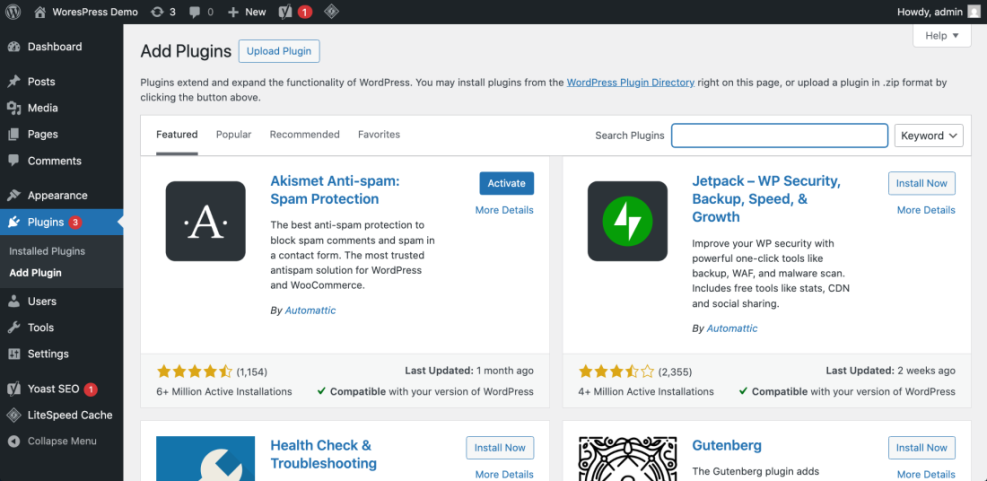
- Type the plugin name in the Search plugins field and wait for the list to refresh.
- Find the plugin card you want and click Install Now to install the WordPress plugin directly from the directory.
- Wait until the button changes to Activate, then click Activate to finish installing the WordPress plugin.
- After activation, look for new menu items or a notice that explains where to configure the plugin.
To verify success, go to Plugins » Installed Plugins and confirm the plugin appears in the list with the label Active. This confirms that you managed to install WordPress plugin correctly using the directory method.
Step 4: How to Install a WordPress Plugin from a ZIP File
Premium or custom plugins are usually provided as a ZIP file. Use the upload method when your plugin is not listed in the free directory but you still want to install WordPress plugin safely.
- Download the plugin ZIP file from the developer or marketplace and save it on your computer without unzipping it.
- In your WordPress admin, go to Plugins » Add New Plugin to start installing a WordPress plugin from your computer.
- At the top of the screen, click the Upload Plugin button.
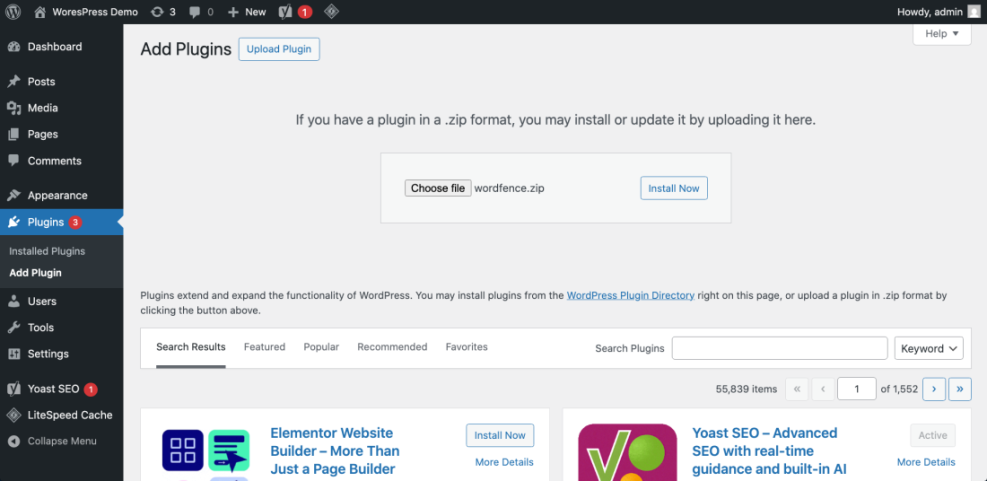
- Click Choose File, select the plugin ZIP file from your computer, then click Install Now. WordPress will upload and install the WordPress plugin ZIP file.
- Wait for WordPress to upload and unpack the file. When you see the success message, click Activate Plugin to complete the installation.
To verify success, visit Plugins » Installed Plugins and confirm your premium plugin is listed and active. This confirms you know how to install a WordPress plugin via ZIP upload.
Step 5: How to Install a WordPress Plugin Manually with FTP
If the upload method fails or your host restricts file uploads, you can still install WordPress plugin files manually by copying them with FTP or SFTP.
- Download the plugin ZIP file to your computer and unzip it. You should see a folder containing the plugin files.
- Open your FTP or SFTP client (for example, FileZilla) and connect using the Host, Username, Password, and Port supplied by your host.
- In the remote site panel, navigate to your WordPress root folder, then open wp-content » plugins. This is the folder where you manually install WordPress plugins.
- Upload the entire unzipped plugin folder from your computer into the plugins directory.
- When the upload completes, go back to your WordPress dashboard and open Plugins » Installed Plugins.
- Find the plugin you just uploaded and click Activate to finish manually installing the WordPress plugin.
To verify success, ensure the plugin activates without errors and appears as Active in the list. This is the classic way to install WordPress plugin manually when the normal upload method does not work.
Step 6: How to Install a WordPress Plugin with WP CLI
WP CLI lets you install WordPress plugins from the command line. This method is ideal for developers or for automating plugin installs on multiple sites.
- Connect to your server via SSH and change directory to your WordPress install (where wp-config.php lives).
- Run the following command, replacing plugin-slug with the plugin’s slug from WordPress.org.
wp plugin install plugin-slug --activate- Wait for the messages Downloading installation package, Unpacking the package, and Plugin installed successfully, followed by Success: Plugin activated. These messages confirm that WP CLI managed to install the WordPress plugin for you.
To verify success, log in to the dashboard and confirm the plugin is listed as active under Plugins » Installed Plugins.
Step 7: Configure and Test Your Newly Installed WordPress Plugin
Most plugins need configuration before they provide value. After you install a WordPress plugin, setting it up right away prevents conflicts and unexpected behavior.
- Look for a new menu item in the left sidebar or under Settings that matches your plugin name.
- Click the plugin’s settings page and review all sections, starting with basic options.
- Follow any setup wizard the plugin offers, such as connecting to an API key or selecting default behavior.
- Save changes using the Save or Save Changes button.
- Visit the front end of your site in a new browser tab and test the feature the plugin adds, such as a form, widget, or performance boost, to confirm your WordPress plugin installation works correctly.
Optional: Common Ways to Edit Image Alt Text in WordPress
While you are configuring new plugins, you may also want to clean up your image alt text for better accessibility and SEO. This is especially useful if you just installed a WordPress plugin that optimizes images or improves on-page SEO. Here is a quick comparison of common alt text editing methods in WordPress:
| Alt Text Editing Method | Best For | Where You Edit Alt Text | Notes |
|---|---|---|---|
| Media Library (single image edit) | Setting a default alt text for images you reuse often | Media » Library » Attachment details » Alternative Text | Updates the attachment record; existing posts may still use the old alt text saved in their HTML. |
| Block Editor image block (Gutenberg) | Modern sites using the block editor fixing alt text inside posts and pages | Open post, select image block, edit Alt text in the Block settings panel | Directly changes the rendered <img> tag in that specific post or page. |
| Classic Editor image details popup | Legacy sites or themes that still use the Classic Editor | Click image in Classic Editor, click pencil icon, edit Alternative Text in Image Details | Works well on older sites; remember to save both the image details and the post. |
| Code snippet / theme filter | Developers who want automatic fallback alt text | Add a wp_get_attachment_image_attributes filter in a child theme or code snippets plugin | Good for filling blanks with a default, but still needs human-written alt text on important images. |
Use the method that best matches your workflow: editors can work directly in posts and pages, while developers can add fallbacks via code or via an image SEO plugin they recently installed in WordPress.
Step 8: Keep Your Installed WordPress Plugins Updated Safely
Outdated plugins are a common security risk. Updating them on a schedule keeps your site fast and secure and protects all the plugins you previously chose to install in WordPress.
- Before updating multiple plugins, ensure you have a recent backup. For strategy ideas, see WordPress Backup Strategy That Never Fails.
- In your dashboard, go to Dashboard » Updates or open Plugins » Installed Plugins.
- Update one plugin at a time by clicking Update now so you can see which update causes issues if something breaks after you install or update a WordPress plugin.
- After updates, quickly test your homepage, a key post or page, and any critical forms or checkout flows.
- For bigger sites, consider using a staging site and follow Safely Testing Plugins on a Staging Site before updating on production.
To verify success, check that no errors appear after updates and that the plugin version numbers in the list show as current. Regular updates are part of safely managing every WordPress plugin you install.
Conclusion: You Know How to Install a WordPress Plugin
You have learned several ways to install WordPress plugin on your site, including directory search, ZIP uploads, FTP, and WP CLI. You also know how to activate, configure, test, and safely update plugins without putting your site at risk.
From here, you can confidently install WordPress plugins to extend your site with new features, whether you are adding a contact form, improving SEO, or enhancing performance. Keep your backups current, update plugins regularly, and your WordPress site will stay powerful and stable.
Further Reading on Installing and Using WordPress Plugins
- What is managed WordPress
- How to use ai in WordPress
- Developer hooks for optimizing WordPress plugins with code
- WordPress migration checklist for blogs
- WordPress migration checklist for blogs