How to Create a Contact Form in WordPress is something almost every site owner needs to know. A simple contact page lets visitors reach you without exposing your email address to spambots and keeps messages organized in your inbox.
In this step by step tutorial, you’ll learn how to create a contact form in WordPress using a plugin or block, customize the fields, set up email notifications, and protect your form from spam so you don’t miss important messages.
What You Need Before You Create a Contact Form
- A self-hosted WordPress site (WordPress.org).
- Administrator access to your WordPress dashboard.
- An email address that can receive form notifications.
- Optional: An SMTP plugin to improve email deliverability.
- A recent backup before installing new plugins or changing settings.
Step 1: Decide What Your Contact Form Needs
Before you install anything, decide what information you actually need to collect. A shorter form usually converts better and is easier for visitors to complete.
- Basic fields: Name, Email, Message.
- Optional fields: Subject, Phone, “How did you hear about us?”.
- Checkboxes: Newsletter opt-in, terms and conditions.
- Spam protection: Simple math question, honeypot field, or CAPTCHA.
Write down your ideal form layout. This makes it much easier to build the form later without constantly guessing which fields to add or remove.
Step 2: Install a Contact Form Plugin in WordPress
While you can code forms by hand, the easiest way for most users is to use a dedicated contact form plugin. Popular options include WPForms, Contact Form 7, Ninja Forms, Formidable Forms, and others.
- In your WordPress dashboard, go to Plugins » Add New.
- Search for “contact form” or the name of a specific plugin you prefer.
- Click Install Now next to the plugin, then click Activate.
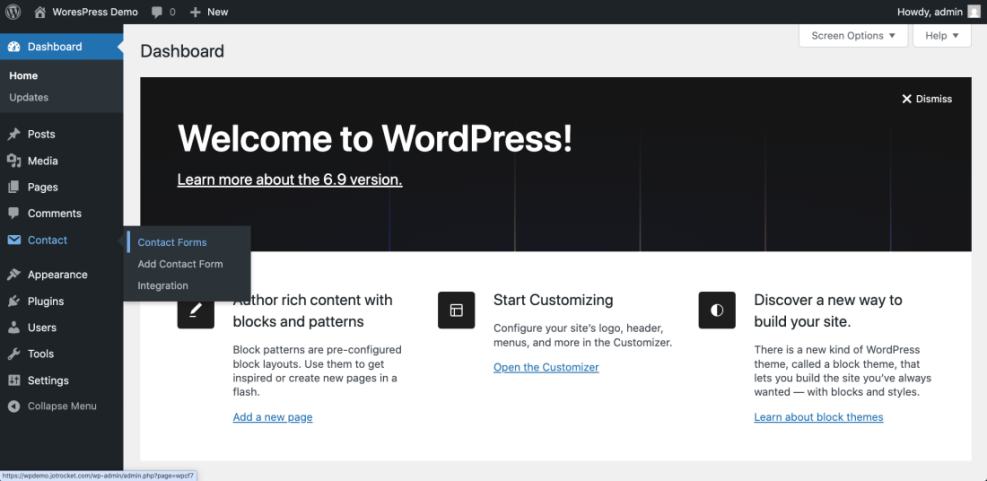
- After activation, look for a new menu item in your dashboard like Forms, Contact, or the plugin’s name.
Step 3: Create a Contact Form in WordPress with the Plugin
Most contact form plugins give you a drag-and-drop builder or at least a simple form editor. The exact screens differ by plugin, but the steps are similar.
- In your dashboard, go to your form plugin menu (for example, WPForms » Add New or Contact » Add New).
- Choose a Simple Contact Form template if available, or start with a blank form.
- Give your form a clear name like “Main Contact Form”.
- Ensure the basic fields are present:
- Name (single or first/last)
- Message / Your Message
- Drag in any extra fields you planned earlier (Subject, Phone, dropdowns, checkboxes, etc.).
- Click on each field to edit its label, placeholder, and whether it is required.
- Save your form when you are happy with the layout.
Step 4: Add Your Contact Form to a Page or Post
After you build the form, you need to display it on a page—usually a dedicated “Contact” page in your main navigation.
- Go to Pages » Add New (or edit an existing Contact page).
- In the block editor, click the + icon to add a new block.
- Search for your form plugin’s block (for example, “Contact Form”, “WPForms”, “Form” block).
- Select the block and choose your new form from the dropdown list of forms.
- If your plugin uses shortcodes instead:
- Copy the shortcode from the plugin’s form list (for example,
[contact-form-7 id="123"]). - Paste the shortcode into a Shortcode block or a regular paragraph block.
- Copy the shortcode from the plugin’s form list (for example,
- Add any additional text you want above or below the form (contact details, map, office hours).
- Click Publish or Update to save the page.
Step 5: Configure Email Notifications for the Contact Form
A contact form is useless if you never receive the messages. Take a moment to verify where submissions are sent and how they look in your inbox.
- Open your form in the plugin’s builder and look for a Notifications or Mail tab.
- Set the To email address to the one you actually check (for example,
info@yourdomain.com). - Adjust the From name and email—often, this should be from your site or a generic address on your domain.
- Use merge tags for the subject line if available (for example, “New contact form message from {name}”).
- Customize the email body to include all fields submitted by the user.
- Save your notification settings.
Step 6: Protect Your Contact Form from Spam
Once your form is live, spam bots will eventually find it. A little protection up front saves you time later.
- Check your form plugin for built-in honeypot or anti-spam options and enable them.
- Add a simple math or checkbox field like “I am human” if your plugin supports it.
- Integrate Google reCAPTCHA or hCaptcha if you’re comfortable adding API keys.
- Use a security or anti-spam plugin to filter obvious spam submissions sitewide.
- Periodically review submissions and adjust your spam filters if needed.
Step 7: Test and Troubleshoot Your New Contact Form
Before you add “Contact” to your menu and forget about it, send a few test submissions to make sure everything works end to end.
- Visit your contact page as a regular user (in a different browser or an incognito window).
- Fill out the form with test data and submit it.
- Check your inbox to see if the email arrives and looks correct.
- If no email arrives:
- Check the spam/junk folder.
- Verify the notification settings in your form plugin.
- Test again after configuring an SMTP plugin.
- Test the form on mobile to ensure the fields and button are easy to tap.
Quick Comparison of Ways to Add a Contact Form in WordPress
Use this table to choose the best way to add a form based on your skill level and needs.
| Method | Where You Use It | Main Purpose |
|---|---|---|
| Form Plugin with Builder | Dashboard » Form plugin menu + page editor | Drag-and-drop builder to create a contact form in WordPress quickly, no coding needed. |
| Theme’s Built-in Form | Appearance » Customize or theme options | Basic built-in form for simple sites without extra plugins (depends on theme features). |
| Shortcodes from a Plugin | Paste shortcode into block editor | Embed forms anywhere using shortcodes, including posts, pages, and widgets. |
| Manual HTML + PHP | Custom page template or child theme | Full control over form markup and processing for developers comfortable with code. |
| Page Builder Form Widgets | Elementor, Beaver Builder, Divi, etc. | Build and style forms visually inside your page builder for complex layouts. |
Conclusion: You Can Now Create a Contact Form in WordPress
You’ve learned how to Create a Contact Form in WordPress using a plugin, add it to a page, configure email notifications, and protect it from spam. A working contact form makes it easy for visitors to reach you and helps you look professional.
Start with a simple form that collects only the essentials, then improve it over time as you understand what your visitors need. As long as you test regularly and keep your plugins updated, your contact form will quietly do its job in the background—and you’ll never have to publish your email address on the web again.