How to Change WordPress Theme
A step-by-step guide to safely switch your WordPress theme without breaking your site
Changing your WordPress theme can completely refresh your site’s design, but it also feels risky. One wrong click and your layout, menus, or widgets might look broken or disappear from where you expect them.
In this step-by-step guide, you’ll learn how to change your WordPress theme safely: how to back up your site, test a new theme, customize it, and only then make it live. You’ll reduce downtime, avoid nasty surprises, and keep your visitors happy throughout the process.
If you’re brand new to WordPress and still learning what WordPress is and how it works, read that first so this tutorial makes more sense.
Prerequisites
Before you start changing your WordPress theme, make sure you have a few essentials in place so you don’t get stuck halfway through.
- Administrator access to your WordPress dashboard.
- Login access to your hosting account (for backups or file access if needed).
- A new theme in mind that is compatible with your WordPress version and plugins.
- Time to test the new theme on multiple devices (desktop, tablet, mobile).
Step 1: Back Up Your WordPress Site
Before you touch your theme, take a full backup. A backup lets you roll back instantly if something breaks after the switch.
You should back up both your database (posts, pages, settings) and your files (themes, plugins, uploads). Many hosts offer one-click backups, or you can follow a more detailed WordPress backup strategy dedicated to long-term protection.
- Log in to your hosting control panel or WordPress dashboard.
- Create a full site backup (not just the database) using your host’s backup tool or a backup plugin.
- Download a copy of the backup to your local computer or cloud storage for extra safety.
Step 2: Decide Where to Change WordPress Theme (Live vs Staging)
The safest way to change your theme is on a staging site—a private copy of your site where you can experiment without affecting visitors.
- Use staging if your site gets regular traffic, has e-commerce, bookings, or memberships.
- Change on live (carefully) if your site is new, low-traffic, or you’re comfortable with a brief “work in progress” period.
If your host provides staging:
- Create a staging copy of your site from the hosting dashboard.
- Log in to the staging WordPress dashboard (usually a subdomain like
staging.yoursite.com). - Perform all theme changes and testing there first, then push changes to live once you’re happy.
Step 3: Choose and Install Your New Theme
Once you know where you’ll make the changes, it’s time to choose and install the new theme. Picking a high-quality, well-supported theme will save you a lot of pain later.
If you haven’t chosen a new theme yet, review this guide on how to choose the right WordPress theme so you don’t end up switching twice.
Install a theme from the WordPress directory
- Log in to your WordPress dashboard.
- Go to Appearance > Themes.
- Click Add New.
- Use the search bar or filters (Popular, Latest, Feature Filter) to find a theme.
- Hover over the theme you like and click Install.
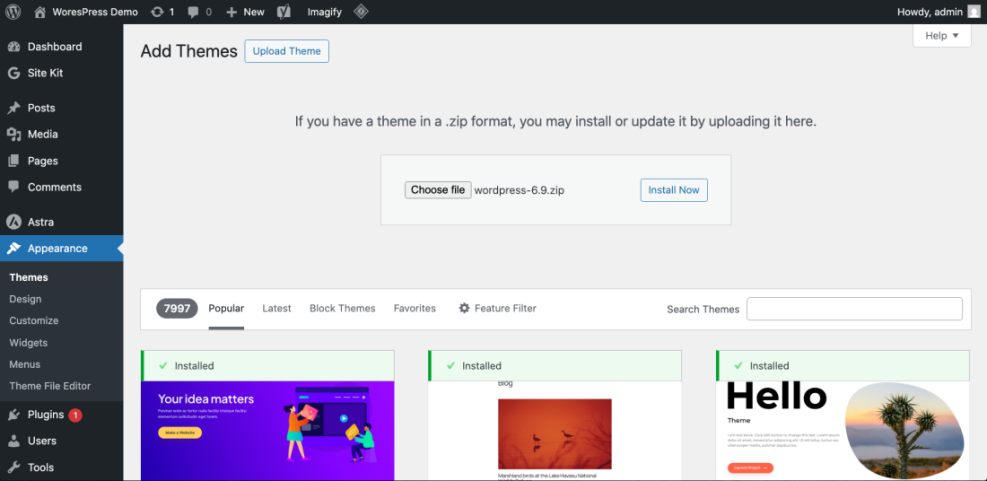
Upload a premium or custom theme
- Download the theme ZIP file from the provider.
- In WordPress, go to Appearance > Themes > Add New.
- Click Upload Theme, choose the ZIP file, then click Install Now.
- Wait for the upload and installation to complete. Don’t click away while it’s installing.
Step 4: Preview and Customize the New Theme
Installing a theme doesn’t change what visitors see until you activate it. Before activation, use the built-in preview tools to see how your content will look.
Use Live Preview (without activating)
- Go to Appearance > Themes.
- Find your newly installed theme.
- Click Live Preview (or Preview for block themes).
WordPress will load a preview of your site using the new theme while keeping the old one active for visitors.
Adjust basic settings in the Customizer or Site Editor
Depending on your theme type, you’ll see either the Customizer or the new Site Editor (for block themes). Here are key areas to review:
- Site identity: Logo, site title, tagline, and favicon.
- Menus: Make sure your primary navigation menu is assigned correctly.
- Widgets/sidebars: Check that sidebar and footer widgets appear where they should.
- Homepage layout: Choose whether your homepage shows a static page or your latest posts.
- Typography and colors: Set fonts and brand colors for headings, body text, and links.
Step 5: Activate the Theme and Test Your Site
Once you’re satisfied with the preview, you’re ready to make the new theme live. This is where your visitors will see the new design.
- From Appearance > Themes, hover over your new theme.
- Click Activate.
- Visit your homepage in a new browser tab and open key pages (home, blog, contact, product pages, etc.).
Run through this quick checklist after activation:
- All menus appear and link correctly.
- Sidebar and footer widgets appear as expected.
- Forms (contact, checkout, login) still work properly.
- Mobile navigation is usable on phones and tablets.
- No obvious layout issues like overlapping text or images.
Step 6: Roll Back Safely if Something Breaks
Even with careful preparation, you might discover a major issue after switching themes—like a broken layout, missing widget area, or plugin conflict.
Option 1: Re-activate your old theme
- Go to Appearance > Themes.
- Find your previous theme.
- Click Activate to revert instantly.
This puts your old design back in place. You can then troubleshoot the new theme on a staging site instead.
Option 2: Restore from backup
If re-activating the old theme doesn’t fix everything, or if you changed settings and plugins along the way, use the backup you created in Step 1:
- Restore via your host’s backup restore tool; or
- Use your backup plugin to restore both files and database to the earlier state.
After restoring, review what went wrong (for example, an incompatible plugin or missing theme requirement) before attempting another theme change.
Change WordPress Themes With Confidence
Change WordPress theme doesn’t have to be stressful. With a solid backup, a safe place to test, and a clear step-by-step process, you can switch designs without risking your content or uptime.
By backing up first, previewing and customizing the new theme, and testing it thoroughly before and after activation, you’ll keep control of the process and avoid unpleasant surprises. The next time you want a fresh look, you’ll know exactly how to change your WordPress theme confidently and safely.
Further Reading
- How to Install and Activate a WordPress Theme
- How to Create a Child Theme in WordPress
- WordPress Performance Tuning: Beginner’s Guide
- WordPress Maintenance and Backup Plan