How to Update WordPress
A step-by-step guide to safely updating WordPress core without breaking your site
Keeping WordPress up to date is one of the simplest ways to improve your site’s security, performance, and compatibility. But if you have ever worried that clicking “Update Now” might break your site, you are not alone.
In this guide, you will learn exactly how to update WordPress core safely: how to prepare your site, create backups, use staging, run the update from the Dashboard or WP-CLI, and verify everything is working afterward.
By the end, you’ll have a repeatable update workflow you can use for every new WordPress release, so updates feel routine—not risky.
Prerequisites
Before you update WordPress, make sure you have the right access and basic safety measures in place. This helps you avoid downtime and makes it easy to roll back if something goes wrong.
- Administrator access to your WordPress Dashboard.
- Access to your hosting control panel (cPanel, Plesk, or similar) or SFTP/SSH.
- A reliable backup solution (plugin or host-level backups).
- Enough disk space on your hosting account to store backups and update files.
- Login details for your domain registrar or DNS panel (in case you need emergency maintenance routing).
Step 1: Check Your Current WordPress Version
Before you update, find out which WordPress version your site is currently running. This helps you understand how big the jump is and whether you’re moving to a major or minor release.
In your WordPress Dashboard, look in the bottom-right corner of any admin page. You’ll usually see your version number there. You can also go to Dashboard → Updates, where WordPress shows the version you’re on and whether an update is available. For a full walkthrough, see how to check your WordPress version.
Knowing your version helps you read the official release notes and spot potential compatibility issues (for example, PHP or plugin requirements) before you update.
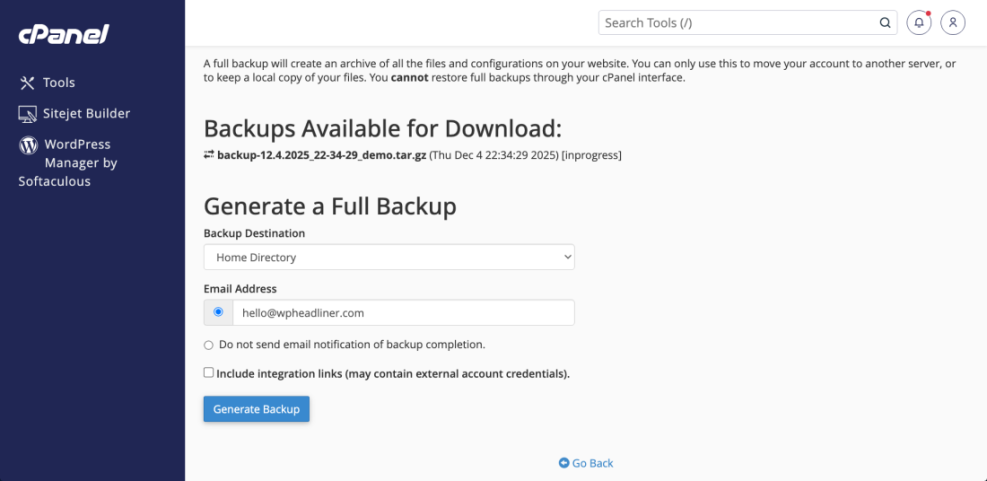
Step 2: Back Up Your WordPress Site Before Updating
Backing up your site is the most important safety step. If the update causes an error, you can restore from backup and get back online quickly.
You should back up both your WordPress files and database. Many backup plugins and hosting control panels allow one-click full backups. At minimum, ensure the following are saved:
- Files: WordPress core files,
wp-content(themes, plugins, uploads), configuration files likewp-config.php. - Database: All your posts, pages, settings, and plugin data.
If you prefer a plugin-based approach, follow the instructions in how to back up a WordPress site for a backup workflow tailored to beginners and small businesses.
Step 3: Create a Staging Site (Recommended)
A staging site is a private copy of your site where you can test updates without affecting your visitors. Many managed WordPress hosts offer one-click staging environments.
Typical staging workflow:
- In your hosting control panel, find the Staging or Clone option for your WordPress site.
- Create a staging copy (your host may add a subdomain like
staging.yoursite.com). - Log in to WordPress on the staging site using the same admin credentials.
- Run the updates on staging first and test your key pages and features there.
Step 4: Run the WordPress Core Update from the Dashboard or WP-CLI
Once you have backups (and ideally a staging site), you’re ready to run the core update. The easiest method for most users is using the WordPress Dashboard.
Option A: Update from the WordPress Dashboard
- Log in to your WordPress admin area.
- Go to Dashboard → Updates.
- Review the “An updated version of WordPress is available” message.
- Click Update Now.
WordPress will put your site in maintenance mode briefly, download the new files, and apply the update. When it’s done, you’ll see a confirmation screen with your new version number.
Option B: Update Using WP-CLI (Advanced)
If you’re comfortable with the command line and have SSH access, WP-CLI can update WordPress core quickly and scriptably.
From your hosting account’s SSH terminal, navigate to your WordPress directory and run:
# Run in your site's root directory via SSH (WP-CLI installed)
wp core update
wp core update-db
This updates the core files and then updates the database if required. Always verify that you are targeting the correct site path, especially if multiple WordPress installs exist on the same server.
Don’t Forget: Plugin and Theme Updates
After updating WordPress core, it’s critical to keep plugins and themes in sync with that version. Outdated extensions are a common cause of errors after a core update. Follow the process described in how to update WordPress plugins to keep your site’s ecosystem compatible.
Step 5: Test Your Site After Updating
After the update finishes, your site might look fine at first glance—but subtle issues can hide on specific pages or devices. A quick test plan helps you catch problems early.
- Clear caching: Clear your WordPress caching plugin and server cache (if used), then refresh your site in a private/incognito window.
- Check key pages: Visit your homepage, top landing pages, product pages, and any forms (contact, checkout, signup).
- Log in/out: Test logging in and logging out of WordPress to ensure sessions are working.
- Test mobile: Check your site on a phone or tablet to ensure layouts and menus still behave correctly.
- Review the error log: Look at your host’s error logs or any monitoring tools for new warnings.
Step 6: Set Up a Safe Ongoing Update Strategy
Updating WordPress should be a regular, low-stress task—not a fire drill. A simple update strategy keeps your site secure and reduces the chance of surprise issues.
- Pick a maintenance window: Choose a low-traffic time (for example, weekly or monthly) to review and apply updates.
- Always back up first: Run or confirm a full backup before major WordPress releases.
- Use staging for big jumps: When moving across multiple major versions, test in staging first.
- Enable safe auto-updates: Consider enabling automatic updates for minor releases (security and maintenance) while manually testing major releases.
- Document changes: Keep a simple changelog of when you updated WordPress, plugins, and themes. This helps debug issues later.
Keep WordPress Updates Safe and Predictable
Updating WordPress doesn’t have to be risky. With a backup in place, a staging site (when available), and a clear testing checklist, you can apply even major releases with confidence.
Follow the same workflow each time: check your version, back up, test on staging if possible, run the core update, then verify your site and extensions. With that habit, you’ll keep your site secure, fast, and ready for the latest features—without surprise outages.
Further Reading
- How to Update a WordPress Theme Safely
- How to Update PHP in WordPress
- Beginner WordPress Security Best Practices Guide
- Monthly WordPress Maintenance Plan
Frequently Asked Questions
Do I need to back up my site every time I update WordPress?
What should I do if the update gets stuck or times out?
.maintenance file from your site’s root directory via FTP or File Manager to bring the site back, then restore from backup and try again during low-traffic hours or via WP-CLI. My site shows a white screen after updating. How do I fix it?
WP_DEBUG in wp-config.php or checking your host’s error logs to find the offending plugin or theme.Temporarily disable plugins by renaming the wp-content/plugins folder, or switch to a default theme. Once you identify the conflict, roll back that plugin/theme or seek an update from the developer.