How to Add Keywords to WordPress
A step-by-step workflow for placing SEO keywords in your WordPress posts and pages without keyword stuffing

Keywords are how search engines understand what your WordPress content is about. But “adding keywords” doesn’t mean cramming the same phrase into every line or relying on outdated meta keywords fields. If you place keywords in the wrong spots, you can hurt your rankings instead of helping them.
In this guide, you’ll learn a clean, repeatable workflow for adding keywords to WordPress posts and pages using the Block Editor, Classic Editor, and a modern SEO plugin (Yoast SEO). You’ll see exactly where keywords belong (titles, headings, URLs, content, images, and more) and how to avoid keyword stuffing.
If this is your very first time dealing with SEO on your site, start with the WordPress SEO complete beginner’s guide, then come back here to implement your keyword workflow in the editor.
Prerequisites
Before you start editing posts, make sure a few basic pieces are in place. This tutorial assumes you already know which keyword you want to target and that you can log in to your WordPress dashboard.
- Administrator or Editor access to your WordPress site (wp-admin).
- Content draft ready (post or page) that you want to optimize.
- Keyword chosen from your research (primary phrase + a few variations).
- Yoast SEO plugin (or a similar SEO plugin) installed and activated.
- Basic familiarity with the Block Editor (Gutenberg) or Classic Editor in WordPress.
Step 1: Choose your main keyword and set it in Yoast SEO
Your keyword workflow starts before you touch any titles or headings. You need a clear primary keyword (often called a “focus keyphrase”) that matches the search intent of the page and the language your visitors use.
- Confirm your main keyword. Use your keyword research notes to pick one main phrase (for example, how to speed up a WordPress site) for each post or page.
- Log in to WordPress. Go to Posts > All Posts (or Pages) and click Edit on the content you want to optimize.
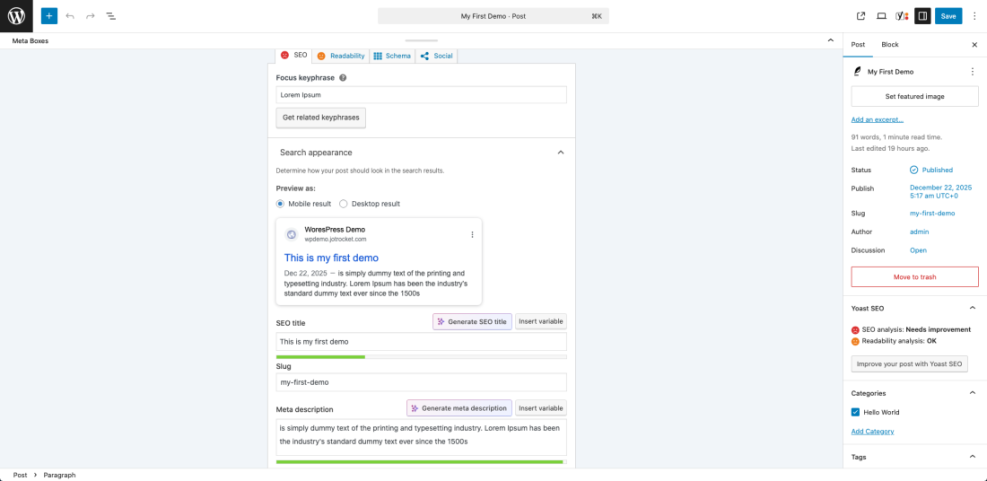
- Find the Yoast SEO box. In the Block Editor, scroll under the content editor; in the Classic Editor with Jannah, you’ll see Yoast under the main text area.
- Enter the keyword in “Focus keyphrase”. Type your main keyword into the Focus keyphrase field. This tells Yoast which phrase to check for as you optimize.
Step 2: Add your keyword to the SEO title and meta description
The SEO title and meta description are what searchers see in Google’s results. WordPress uses your post title by default, but your SEO plugin lets you customize how it appears to search engines.
- Open the Yoast preview snippet. In the Yoast box, click the SEO title field or the snippet preview to expand the editor.
- Rewrite the SEO title. Make sure your main keyword appears near the beginning of the title. For example: How to Add Keywords to WordPress (Beginner-Friendly Checklist).
- Check the title length. Use Yoast’s meter to avoid titles that are too short or too long. Aim for a readable phrase, not just keywords separated by pipes.
- Write a compelling meta description. Include your keyword naturally once and focus on benefits or outcomes, like what users will learn or fix.
- Preview on mobile and desktop. Make sure the title and description don’t get cut awkwardly in the preview.
Step 3: Place keywords in the URL, headings, and content
Once your SEO title and meta description are set, the next step is to place the keyword in the parts of your content that search engines rely on most: the URL (slug), headings (H1, H2), and the body text itself.
- Clean up the URL slug. Under the post title, click the URL/Permalink field. Use a short, descriptive slug like
how-to-add-keywords-to-wordpress. Remove stop words and random numbers. - Use your keyword in the H1 naturally. Your post title is usually your H1. Make sure it includes your keyword but still sounds natural (no keyword lists).
- Add the keyword to at least one H2. If it fits naturally, include the main keyword (or a close variation) in a subheading that introduces a key section of the content.
- Use the keyword early in the introduction. Try to mention the main phrase once in the first 100–150 words of your article.
- Sprinkle related phrases in the body. Throughout the post, use synonyms and related terms, not just the exact same keyword repeated in every paragraph.
Step 4: Add keywords to images and internal links
Images and internal links help search engines understand your topic in more detail. When used correctly, they reinforce your main keyword and related topics without over-optimizing.
- Rename image files before upload. Use descriptive file names like
wordpress-keyword-settings.pnginstead ofIMG_1234.png. - Set descriptive alt text. In the Block or Classic Editor, click an image and add alt text that describes the image and includes a relevant phrase if it fits naturally (for example, Yoast SEO focus keyword field in WordPress).
- Use captions where helpful. Captions can include related phrases, but prioritize clarity over keyword density.
- Add internal links with descriptive anchors. When you mention related topics, link to other posts using descriptive anchor text instead of “click here”.
For a bigger picture of all the key places you can optimize, see this overview of where to add keywords in WordPress and how each one affects SEO and user experience.
Step 5: Check keyword usage with Yoast SEO
Now that your visible content is optimized, use your SEO plugin as a checklist, not a rulebook. Yoast SEO will scan your page and flag issues or opportunities related to your focus keyphrase.
- Scroll to the Yoast analysis. In the Yoast box, review the list of recommendations under SEO analysis.
- Check “Keyphrase in introduction”. If this is marked red or orange, revisit your first paragraph and add the phrase naturally.
- Check “Keyphrase in subheading”. If missing, adjust one relevant H2 or H3 to include a variation of your keyword.
- Review “Keyphrase density”. Aim for a healthy range. Too low means you might not be signaling relevance; too high can look like stuffing.
- Look at readability scores. Even if the SEO lights are green, fix readability issues like long sentences and big blocks of text.
Step 6: Fix common keyword mistakes in WordPress
Even experienced WordPress users fall into a few classic traps when they start optimizing for keywords. Fixing these issues can give you quick SEO and usability wins.
1. Keyword stuffing in titles and headings
Repeating the same phrase multiple times in your H1 and H2s is a red flag to both visitors and search engines.
- Fix: Limit the exact keyword to once in the title and maybe once in a subheading. Use variations and natural language in other headings.
2. Ignoring search intent
Sometimes the problem isn’t where you place the keyword, but what the page delivers. If the keyword implies a tutorial, your content should walk through steps, not just define terms.
- Fix: Compare your content to the top results manually and make sure your article format matches what searchers expect (guide, checklist, comparison, etc.).
3. Over-optimizing meta keywords or tags
Modern search engines ignore the old meta keywords tag, and stuffing tag archives with dozens of similar keywords can create thin, duplicate pages.
- Fix: Keep your categories and tags focused and useful for readers. Only use a few targeted tags per post, not every variation of your keyword.
4. Forgetting to update older posts
Many sites have strong, older posts that never had a focus keyword or structured optimization.
- Fix: Create a list of your top-performing posts (by traffic or conversions) and refresh them with the workflow from this guide—title, URL, headings, content, images, and Yoast checks.
Turn your keyword list into optimized WordPress content
Adding keywords to WordPress is less about ticking boxes and more about following a consistent workflow. Once you know how to place keywords in titles, URLs, headings, content, images, and SEO fields, every new post becomes easier to optimize.
Use this guide as your per-post checklist: confirm your focus keyphrase, optimize the SEO title and meta description, adjust the slug and headings, refine your content, tune images and internal links, then let Yoast SEO help you double-check your work. Over time, these small, repeatable steps compound into better visibility, more relevant traffic, and a clearer site structure for both users and search engines.
Further Reading
- How to Add Keywords in WordPress Without Hurting Your SEO
- How to Add SEO Keywords to a WordPress Website
- Step-by-Step Guide to On-Page SEO in WordPress
- Beginner Checklist for Optimizing WordPress Blog Posts
- What Is WordPress SEO?