How to Add Internal Links in WordPress
A step-by-step guide to connecting your WordPress content with smart internal links
You can publish great content in WordPress and still struggle to get traffic if your posts and pages are not connected. Without internal links, your articles become isolated, making it harder for visitors to explore your site and for search engines to understand your structure.
In this guide, you’ll learn how to add internal links in WordPress using both the Block Editor (Gutenberg) and the Classic Editor. You’ll also see how to choose the right anchor text, where to place those links, and how to keep everything clean for SEO. If you’re new to on-page optimization, you may also find our step-by-step on-page SEO guide for WordPress helpful while you follow along.
By the end, you’ll know exactly how to build a simple workflow for adding internal links to new and existing content so your readers and Google can easily find your most important pages.
Prerequisites
Before you start adding internal links, make sure you have a few basics in place:
- A working WordPress site with the ability to log in to your WordPress admin dashboard.
- The correct user role (Editor or Administrator) so you can edit posts and pages.
- At least a few published posts or pages you can link from and to.
- Basic familiarity with either the Block Editor (Gutenberg) or the Classic Editor.
Step 1: Understand Internal Links in WordPress
An internal link is any clickable link from one page or post on your WordPress site to another page or post on the same domain. Internal links help visitors discover related content and help search engines crawl and understand your site structure.
Key parts of an internal link:
- Source page: The post or page where the link lives.
- Target page: The post or page you are pointing to.
- Anchor text: The visible, clickable words (for example, “WordPress SEO guide”) that should describe what users will find when they click.
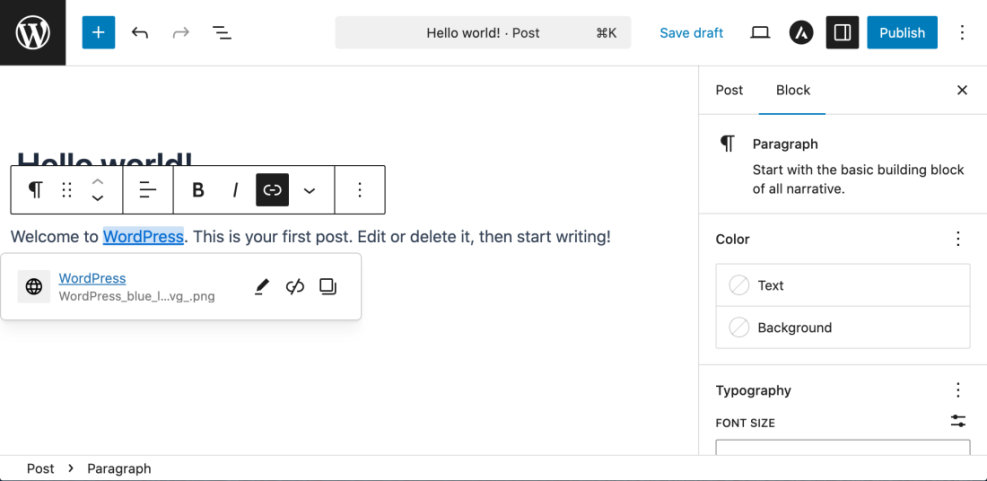
<a href="https://example.com/wordpress-internal-linking-guide/">WordPress internal linking guide</a>rel="nofollow". You want search engines to follow and understand the relationships between your own pages. Step 2: Add Internal Links in the Block Editor (Gutenberg)
If your site uses the Block Editor, follow these steps to add an internal link inside a post or page:
- In your WordPress dashboard, go to Posts > All Posts (or Pages > All Pages) and click Edit on the item you want to update.
- Find the sentence where you want the internal link to appear and highlight the words that should become the anchor text (for example, “WordPress SEO checklist”).
- In the small toolbar that appears above the text, click the link icon (it looks like a chain). You can also press Ctrl + K (Windows) or Cmd + K (Mac).
- In the link field that opens, start typing the title of the post or page you want to link to. WordPress will suggest matching items under the field.
- Click the correct post or page from the suggestions. WordPress will automatically insert the full internal URL.
- Press Enter or click the confirm/checkmark button to apply the link.
- Click Preview (top right) and then Update to save your changes once you are happy with the link.
Step 3: Add Internal Links in the Classic Editor
If your site uses the Classic Editor, the steps are similar but the interface looks different:
- In the WordPress dashboard, go to Posts > All Posts (or Pages > All Pages) and click Edit on your chosen content.
- Inside the editor, highlight the words that should become your internal link anchor text.
- Click the Insert/edit link icon (chain symbol) in the formatting toolbar.
- In the popup, you can either paste a URL directly or click Or link to existing content to browse your published posts and pages.
- Select the correct target page from the list. WordPress fills in the URL for you.
- Click Add Link, then Update the post or page.
Step 4: Find Smart Internal Link Opportunities
Adding any link is easy; picking the right internal links is what improves user experience and SEO. Focus on connecting related content and pointing visitors toward your most important posts or pages.
Here’s a simple workflow you can follow:
- Identify pillar content: List your key guides (for example, “WordPress SEO”, “Site Speed”, “Beginner WordPress guide”). These should receive more internal links.
- Map related posts: For each pillar, note which shorter or more specific posts support it. Those are good places to add links back to the pillar.
- Search by topic: In the WordPress dashboard, use the search box on the Posts screen to find articles with related keywords and add internal links between them.
- Check category/tag archives: Browse posts under the same category or tag to spot content that should be cross-linked.
For a complete walkthrough of building this kind of structure from scratch, see internal linking in WordPress for beginners, then return to this guide to implement the practical editor steps you’ve learned.
Step 5: Use SEO Plugins for Internal Link Suggestions
As your site grows, manually finding every internal link opportunity becomes time-consuming. Many popular SEO plugins for WordPress include internal link suggestion features that recommend relevant posts while you write.
In general, the process looks like this:
- Install and activate your chosen SEO plugin from Plugins > Add New.
- Open a post in the editor. Look for an internal link suggestions panel (usually below the content or in the sidebar).
- Review the suggested posts and pages. Add links only where they are truly relevant and useful to the reader.
- Periodically edit old posts, using the suggestion panel to add a few targeted internal links each week.
Step 6: Audit and Fix Internal Links
Internal links are not “set and forget.” Over time, you will rename posts, change slugs, or delete pages. That can leave behind broken or outdated links.
Build a simple audit routine:
- After changing a URL: Immediately update the internal links from your most important related posts.
- After deleting a page: Remove or update any internal links that pointed to it, and consider setting up a redirect if needed.
- Every few months: Use an SEO or link checker tool to scan your site for internal 404 errors and fix them.
Step 7: Follow Internal Linking Best Practices
Once you know how to add internal links, the next step is to keep them clean and useful. Follow these best practices:
- Use descriptive anchor text: Replace “click here” with text that describes the destination, such as “complete WordPress SEO checklist.”
- Avoid overstuffing links: Too many internal links in a single paragraph can look spammy. Focus on the most helpful 3–5 links for typical blog posts.
- Link from strong pages to weaker ones: If a post gets good traffic, use it to point users toward newer or less visible but important content.
- Keep navigation consistent: Make sure your menus and key sidebar widgets support the same structure you build with in-content links.
Wrap Up: Your WordPress Posts Are Now Properly Connected
Adding internal links in WordPress is one of the fastest ways to improve both user experience and SEO. With just a few clicks in the Block or Classic Editor, you can connect related content and gently guide visitors toward your most valuable pages.
As you publish new posts, keep this workflow in mind: choose relevant targets, add clear anchor text, and regularly audit existing content. Over time, your site will form a clear, logical structure that helps users stay longer and helps search engines understand what you should rank for.
Further Reading
- Internal Linking Strategies for WordPress Sites
- WordPress SEO Complete Beginner’s Guide
- How to Fix Broken Links in WordPress
- How to Fix Internal Nofollow Links in WordPress