Complete WordPress Caching Setup Guide
Make your WordPress site load faster for visitors
Nothing hurts a WordPress site more than feeling slow. Long page loads cost you visitors, search visibility, and even sales. Caching is one of the highest-impact ways to make your site feel instantly snappier without rewriting your entire theme or switching platforms.
In this guide, you’ll build a complete WordPress caching stack: page caching, browser caching, object caching, and CDN integration. We’ll stay plugin-agnostic and focus on settings you can apply regardless of whether you use LiteSpeed Cache, WP Rocket, W3 Total Cache, or another solution.
If you’re totally new to performance tuning, you can pair this tutorial with a broader optimization walkthrough like a beginner guide to WordPress speed optimization, then return here to lock in a rock-solid caching configuration.
Prerequisites
Before you start changing caching settings, make sure you have a few basics in place so you don’t lock yourself out or break live pages for visitors.
- Admin access to your WordPress dashboard.
- Access to your hosting control panel (cPanel, Plesk, or custom) or FTP/SFTP.
- A recent full backup of your WordPress site (files and database).
- Basic familiarity with installing and configuring plugins.
- Optional but helpful: staging site to test changes before going live.
Step 1: Understand WordPress caching layers
Before toggling switches, it helps to understand which caching layers are involved. That way you know what your plugin is actually doing and how it interacts with your host or CDN.
- Page cache (full-page HTML cache): Stores rendered pages as static HTML so WordPress and PHP don’t run on every request.
- Browser cache: Tells visitors’ browsers how long to keep static assets (CSS, JS, images, fonts) so they don’t re-download them on every page view.
- Opcode cache (server-level): PHP-level cache (like OPcache) that compiles and stores PHP bytecode. Usually handled by your host, not WordPress.
- Object cache: Stores database query results and WordPress “objects” (options, queries) so they can be reused between requests.
- CDN cache: Globally distributed cache that serves static (and sometimes dynamic) content from edge locations near your visitors.
Step 2: Choose and install your caching plugin
Most site owners rely on a caching plugin to manage WordPress-level caching rules. Your goal is to pick one that integrates well with your host and fits your comfort level with advanced options.
Look for a plugin that offers at least page caching, browser caching, cache preloading, and the ability to exclude URLs or cookies. If you need more, check for features like object cache integration, database cleanup, and CDN integration.
To install a caching plugin:
- In your WordPress dashboard, go to Plugins > Add New.
- Search for the caching plugin you want to use (for example, “LiteSpeed Cache” or “W3 Total Cache”).
- Click Install Now, then Activate.

If you’re still deciding which plugin makes sense for your stack, compare features and hosting compatibility using a detailed roundup of the best WordPress caching plugins.
Step 3: Configure basic page caching
Once your plugin is active, the first priority is enabling full-page caching for anonymous visitors. This is where most of your speed gains will come from.
- In the WordPress admin, open your caching plugin’s settings (often under Settings > Cache or its own top-level menu).
- Locate the Page Cache or Enable Caching option and switch it on.
- Set a reasonable cache lifetime (TTL). A common starting point is 10–24 hours for blogs or small business sites.
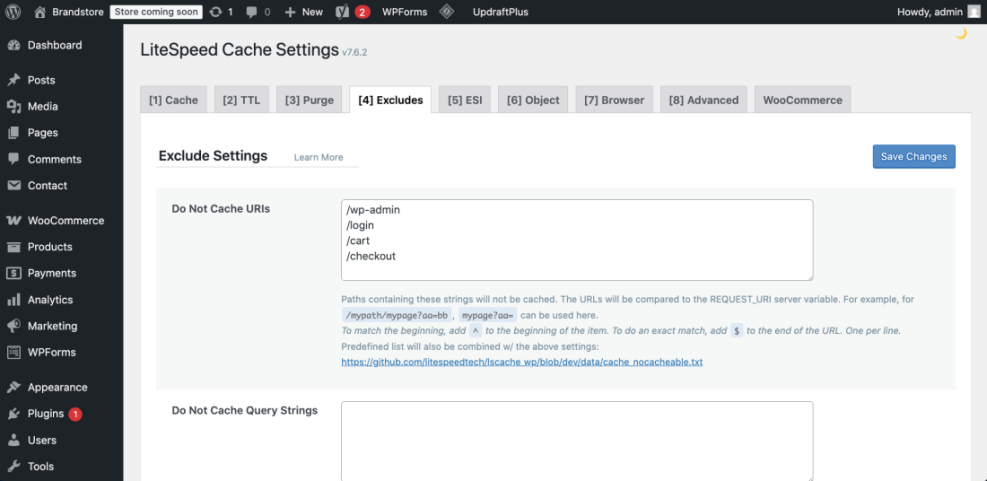
- Exclude pages that must always be dynamic, such as:
- WooCommerce cart, checkout, and my account pages.
- Membership dashboards and login pages.
- Search results pages if they change frequently.
Checkpoint: Visit your homepage as a logged-out visitor in an incognito window. Refresh it twice. The first load should be slightly slower, and subsequent loads noticeably faster as the cached version is served.
Step 4: Enable browser caching and compression
Browser caching and compression reduce the size of responses and how often assets are re-downloaded. Many caching plugins can automatically add rules to .htaccess (Apache) or suggest equivalent Nginx rules.
In your caching plugin’s settings, look for options like Browser Cache, Static Files Caching, or HTTP Headers, and enable them. Typical settings will set long expiration times on static assets (e.g., 30 days or more).
If you manage .htaccess manually on Apache, your plugin might insert something similar to:
# Enable compression
<IfModule mod_deflate.c>
  AddOutputFilterByType DEFLATE text/plain text/html text/xml text/css text/javascript application/javascript application/json
</IfModule>

# Leverage browser caching
<IfModule mod_expires.c>
  ExpiresActive On
  ExpiresByType text/css "access plus 30 days"
  ExpiresByType text/javascript "access plus 30 days"
  ExpiresByType application/javascript "access plus 30 days"
  ExpiresByType image/jpeg "access plus 30 days"
  ExpiresByType image/png "access plus 30 days"
  ExpiresByType image/gif "access plus 30 days"
  ExpiresDefault "access plus 7 days"
</IfModule>
For Nginx-based hosting, you may see configuration that looks more like:
gzip on;
gzip_types text/plain text/css application/javascript application/json application/xml;
gzip_min_length 1024;

location ~* \.(js|css|png|jpg|jpeg|gif|svg|ico)$ {
    expires 30d;
    add_header Cache-Control "public, max-age=2592000";
}
Always apply Nginx changes via your hosting panel or support team if you don’t manage the server directly.
Step 5: Add object caching for dynamic and database-heavy sites
Object caching improves performance for logged-in users and database-heavy operations by caching query results and complex objects. This is especially valuable for WooCommerce stores, membership sites, and custom applications.
Many WordPress hosts offer Redis or Memcached support. The usual pattern is:
- Enable Redis or Memcached in your hosting control panel (sometimes called “Object Cache” or “Persistent Cache”).
- Install an object caching plugin (for example, a Redis Object Cache plugin) and activate it.
- Connect the plugin to your Redis or Memcached instance using the host, port, and password provided by your host.
Some caching plugins ship with built-in object cache modules you can simply toggle on in their settings.
// Example: wp-config.php snippet for Redis salt
define( 'WP_CACHE_KEY_SALT', 'example.com:' );
For a more detailed walkthrough of Redis specifically, follow a beginner’s guide to Redis object caching in WordPress while keeping this overall setup in mind.
Step 6: Integrate a CDN with your caching plugin
A content delivery network (CDN) offloads static assets to edge servers closer to your visitors, reducing latency and bandwidth usage. Many caching plugins include a CDN tab or add-on to rewrite asset URLs automatically.
- Sign up with a CDN provider of your choice (for example, a reverse-proxy CDN or a pull-zone CDN).
- Configure your CDN to pull assets from your origin domain (e.g.,
https://example.com/). - In your caching plugin, find the CDN settings tab and enter your CDN URL (e.g.,
https://cdn.example.com/). - Enable CDN rewriting for asset types you want to serve via CDN (CSS, JS, images, fonts).
- Save settings and purge CDN cache to ensure fresh copies are stored at the edge.
Step 7: Test, troubleshoot, and monitor your cache
After enabling multiple caching layers, you should verify that your site is faster and still functions correctly. This is where many people stop too early; thorough testing avoids subtle bugs later.
Start with a basic functional test:
- Browse your site while logged out in an incognito window.
- Click through key templates: homepage, blog posts, category pages, contact forms.
- Fill in forms and run a test purchase (in sandbox mode) if you run eCommerce.
Then check whether caching headers are present. Most caching plugins add response headers like cache-control: max-age=... or custom headers such as x-cache: HIT. You can inspect these using your browser’s developer tools (Network tab).
If pages look broken or styles are missing:
- Disable CSS/JS minification and combination in your caching plugin and test again.
- Exclude problematic scripts or styles from minification/combination.
- Temporarily disable the CDN or switch it to “development mode” to isolate whether the CDN cache is causing the issue.
Finally, benchmark before and after using a performance tool (such as a lab test or your own timing measurements). Look for reduced Time to First Byte (TTFB), faster fully-loaded times, and fewer requests.
Locking in a reliable WordPress caching stack
By now, you’ve done more than just “install a caching plugin.” You’ve built a layered caching strategy that covers page cache, browser cache, object cache, and CDN delivery, all tuned for your specific WordPress site.
With this setup, your pages should load faster, your server should handle traffic spikes more gracefully, and your visitors should enjoy a smoother browsing experience. Keep an eye on logs and performance metrics, adjust TTLs and exclusions as your site evolves, and you’ll stay ahead of most performance problems.
As you grow, revisit your caching settings after major redesigns, plugin changes, or feature launches so your cache rules always reflect how your site actually works today.
Further Reading
- WordPress Performance Tuning: Beginner Guide
- Caching Plugin Comparisons for WordPress Performance
- How to Set Up a CDN for Your WordPress Blog
- How to Clear Cache in WordPress