If you want to learn how to make a website on WordPress but feel overwhelmed by hosting plans, settings, and themes, you are not alone. This step by step guide shows you exactly what to click and configure so you can go from a blank domain to a live WordPress site, even if this is your first time building anything online.
By the end of this tutorial you will have a fully working WordPress website with a custom homepage, essential pages, important plugins, and a simple launch checklist you can reuse for future projects.
What You Need to Start
- A domain name you can register or already own.
- A WordPress friendly hosting plan with control panel access.
- Thirty to sixty minutes of focused time without interruptions.
- A working email address for account and admin notifications.
- Basic computer and internet access so you can log in to your host and WordPress dashboard.
Step 1: Plan Your WordPress Website
Before installing anything, decide what you want your site to do. Clear goals help you choose the right theme, plugins, and layout, and they prevent you from getting stuck later.
- Decide what type of website you are building such as a personal blog, small business site, portfolio, online resume, or simple store.
- Write down three to five goals for your site for example getting email subscribers, generating leads, taking bookings, or publishing articles regularly.
- List the key pages you will need such as Home, About, Services, Blog, and Contact.
- Sketch a simple layout on paper or in a notes app showing which sections should appear on your homepage such as hero area, services, testimonials, and call to action.
To verify this step, you should have a short written plan that describes your website type, goals, and a list of pages you will set up in WordPress.
Step 2: Choose a Domain Name and Hosting
Your domain and hosting are the foundation of your WordPress Website. Choosing them carefully now will make your site faster, easier to manage, and more reliable over time.
For deeper comparisons, review Managed WordPress hosting guide and check shortlists like How to choose the best WordPress hosting before you buy anything.
- Brainstorm domain names that are short, easy to spell, and clearly related to your brand or topic. Prefer .com if it is available.
- On your chosen host or registrar, use the Domain Search tool to check if your domain is available and add it to your cart.
- Choose a beginner friendly WordPress hosting plan that supports PHP, MySQL, and offers a one click WordPress installer.
- Complete checkout and save your hosting login details, control panel URL, and any welcome emails in a safe place.
- If your domain is registered at a different company, update the Nameservers to point to your new host following their instructions.
To verify this step, confirm that your hosting account is active and that your domain shows some kind of default hosting or coming soon page when you visit it in your browser.
Step 3: Install WordPress for Your New Website
Now you will install the WordPress software on your hosting account. Most hosts include a one click installer that sets up the database and files automatically.
- Log in to your hosting control panel using the username and password provided in your welcome email.
- In the control panel dashboard, look for a section called Softaculous Apps Installer, One Click Install, or WordPress Manager.
- Select WordPress from the installer list, then choose your domain from the installation URL dropdown.
- Fill in the Site Name and Site Description fields. You can change these later in WordPress.
- Create an Admin Username, strong Password, and Admin Email that you can access easily.
- Leave advanced options at their defaults unless you know you need something specific, then click the Install button.
In your hosting account dashboard open the installer by clicking Softaculous Apps Installer then WordPress.

To verify this step, wait for the installer to finish, then open the Admin URL link from the success screen in a new tab. You should see the WordPress login page for your domain.
Step 4: Use Your WordPress Dashboard and Clean Up
With WordPress installed, it is time to log in, tweak basic settings, and remove demo content so your site starts clean and secure.
- Visit https://yourdomain.com/wp-admin in your browser, replacing yourdomain.com with your actual domain.
- Enter the Username and Password you created during installation, then click Log In.
- In the left menu go to Settings » General and set your Site Title, Tagline, Timezone, and Site Language. Click Save Changes.
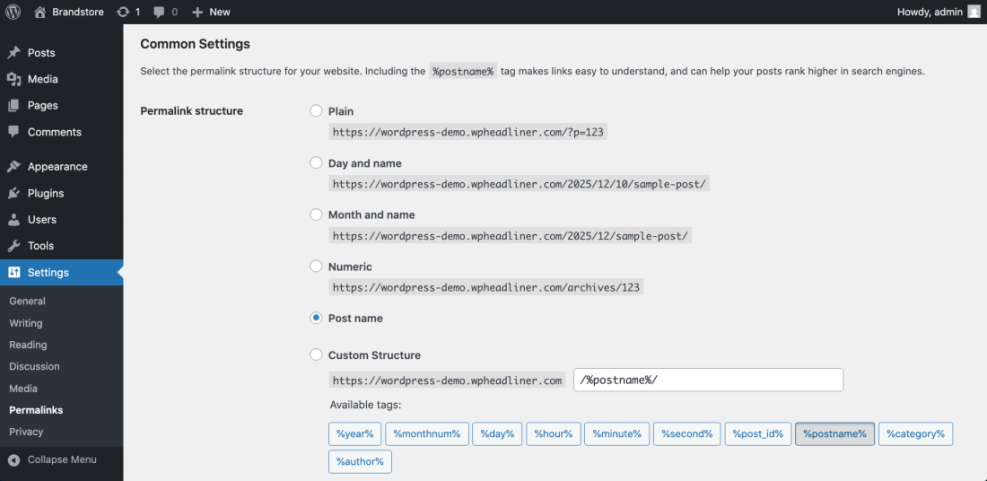
- Navigate to Settings » Permalinks and select the Post name option so your URLs are clean and SEO friendly. Click Save Changes.
- Go to Posts » All Posts, hover over the sample post called “Hello world”, and click Trash.
- Go to Pages » All Pages and delete any sample pages you do not plan to use.
- Visit Plugins » Installed Plugins and deactivate then delete any plugins you know you will not need.
From the dashboard menu choose Settings » Permalinks to change how your URLs look.
To verify this step, open your site homepage in a new tab and click the site title to visit a post. The URL should be using the post name format and the sample content should be gone.
Step 5: Choose and Install a Theme
Your theme controls how your site looks. You can start with a free theme from the WordPress directory and switch later once you are comfortable.
- In the WordPress dashboard, go to Appearance » Themes.
- Click the Add New button at the top to open the theme browser.
- Use the Feature Filter or search box to look for themes related to your niche such as “blog”, “business”, or “portfolio”.
- Hover over a theme you like and click Preview to see how it looks with demo content.
- When you find a theme that matches your goals, click Install and then click Activate.
- If you purchased a premium theme, click Upload Theme, choose the theme .zip file from your computer, then click Install Now and Activate.
Open the theme browser by going to Appearance » Themes and clicking Add New.

For layout ideas and inspiration, study examples in WordPress migration blog guide before finalizing your theme choice.
To verify this step, reload your site homepage in a new tab. You should see the new theme active with its default styles and demo structure.
Step 6: Create Core Pages for Your WordPress Website
Now you will create the main pages for your site and tell WordPress which one should be used as the homepage. This gives your website a clear structure.
- Go to Pages » Add New.
- Enter a title such as Home, then add a short welcome message and a simple call to action like “Contact us for a free quote”. Click Publish.
- Repeat the process to create pages for About, Services or Portfolio, and Contact.
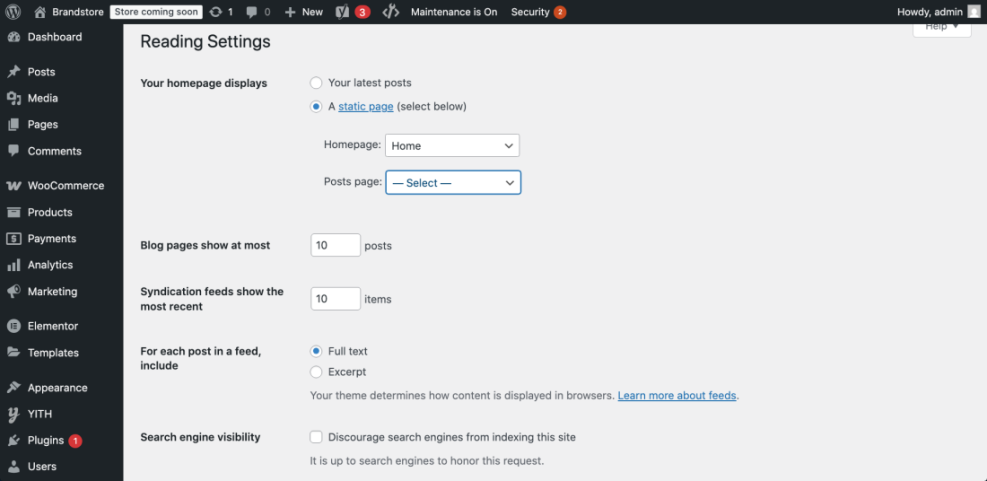
- After creating your pages, go to Settings » Reading.
- Under Your homepage displays, select A static page.
- Choose your new Home page as the Homepage, and if you plan to blog, create a page called Blog and set it as the Posts page. Click Save Changes.
From the dashboard open Settings » Reading to tell WordPress which page should be your homepage.
To verify this step, visit your domain in a new browser tab. You should see your custom Home page instead of the blog post list, and your Blog page should list posts when you start publishing.
Step 7: Customize Your Design
With your pages in place, you can refine your site branding by adjusting the logo, colors, fonts, and basic layout using the built in WordPress Customizer.
- Go to Appearance » Customize to open the Customizer.
- Click Site Identity to upload your logo, set your Site Title, and adjust the Tagline displayed in the header.
- Use the Colors or Typography sections to change your brand colors and font sizes if your theme supports them.
- Open the Homepage Settings panel to confirm that your static homepage and posts page are selected as configured earlier.
- Click Publish at the top of the Customizer to save your design changes.
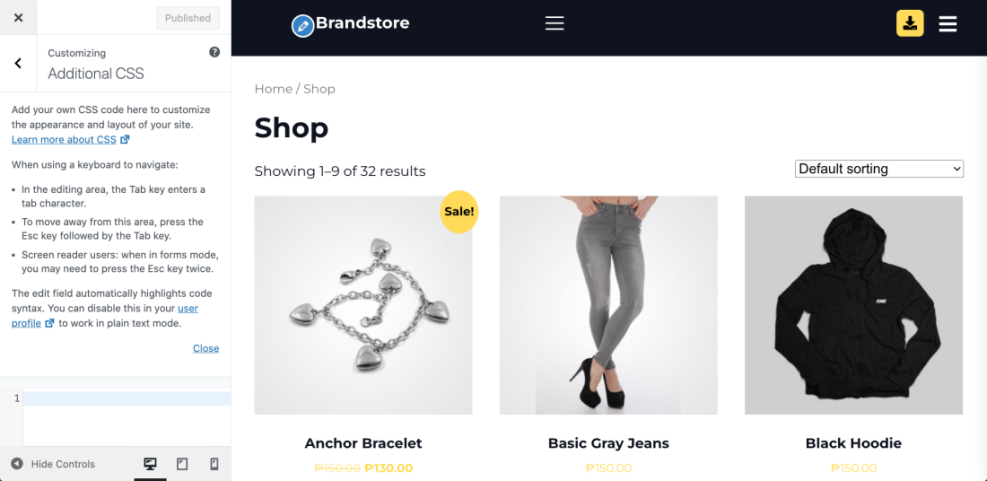
In the Customizer open Additional CSS if you want to add small style tweaks without editing theme files directly.
For example, you can paste this simple CSS to adjust your body font and link styles:
body {
  font-family: system-ui, -apple-system, BlinkMacSystemFont, "Segoe UI", sans-serif;
}

a {
  text-decoration: none;
}

a:hover {
  text-decoration: underline;
}
To verify this step, refresh your homepage in a new tab and confirm your logo, colors, and fonts match the brand look you planned in Step 1.
Step 8: Install Essential Plugins
Plugins add new features to your WordPress Website without writing code. Start with a small set of essentials for security, backups, SEO, contact forms, and performance.
- Go to Plugins » Add New.
- Use the search box to find a reliable SEO plugin such as “Yoast SEO” or “Rank Math”, then click Install Now and Activate.
- Search for a backup plugin such as “UpdraftPlus”, then click Install Now and Activate.
- Add a security plugin like “Wordfence Security” or “Sucuri Security” and activate it.
- Install a contact form plugin so visitors can reach you easily.
- Optionally install a caching plugin recommended by your host to improve performance.
Open the plugin installer by going to Plugins » Add New and using the search box to locate each plugin you need.

For a curated list of beginner friendly tools, check Best contact form plugins for WordPress and adapt it to your site type.
To verify this step, return to Plugins » Installed Plugins and confirm your chosen SEO, backup, security, and form plugins all show as active.
Step 9: Launch Your New WordPress Website
The final step is to create a clear navigation menu, double check your site on different devices, and make it ready for visitors and search engines.
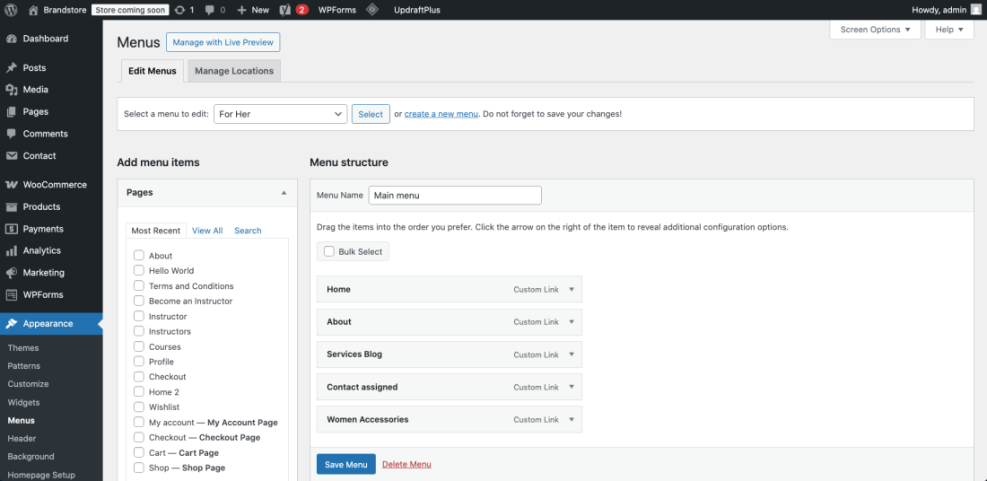
- Go to Appearance » Menus.
- Enter a menu name like “Main menu” and click Create Menu.
- In the Pages panel check the boxes for Home, About, Services, Blog, and Contact, then click Add to Menu.
- Drag and drop items to reorder them, then check the Primary Menu display location and click Save Menu.
- Open Settings » Reading and ensure the option Discourage search engines from indexing this site is unchecked when you are ready to be visible.
- View your site on a phone, tablet, and desktop to make sure the menu, buttons, and forms are easy to use.
From the dashboard open Appearance » Menus to connect your pages into a single main navigation.
To verify this step, click through every page from your main menu, submit a test contact form, and confirm that your homepage looks correct when opened in an incognito browser window.
Maintenance Methods for Your Site Compared
Once your new WordPress website is live, you still need to keep it healthy. There are several ways to handle updates, backups, security checks, and general maintenance depending on your budget and technical comfort. The table below compares the main approaches you can use on almost any WordPress hosting plan.
| Method | Where You Use It | Main Purpose |
|---|---|---|
| DIY Manual Maintenance | WordPress dashboard and hosting control panel | Maximum control over updates, backups, and checks for small or low-risk sites on inexpensive WordPress hosting. |
| Managed Hosting Tools | Your host’s control panel or custom dashboard | Simplify routine maintenance with one-click updates, built-in backups, and basic security from your WordPress hosting provider. |
| Maintenance & Security Plugins | Plugins section inside the WordPress dashboard | Automate repetitive work like backups, database cleanup, image optimization, security scans, and monitoring your popup plugin on any WordPress hosting plan. |
| WP-CLI and Developer Tools | SSH terminal with WP-CLI and deployment tools | Scriptable, fast maintenance for developers managing multiple or complex sites on advanced WordPress hosting. |
| Professional WordPress Care Plan | External provider, freelancer, or agency | Hands-off maintenance with proactive monitoring, fixes, and expert support, regardless of which WordPress hosting company you use. |
Pick the method that matches your current skill level. You can always start with manual checks and plugins, then move to managed hosting or a care plan as your site and business grow.
Conclusion You Are Ready to Grow
You have just built a complete WordPress Website from scratch. You chose a domain and host, installed WordPress, cleaned up the dashboard, selected a theme, created core pages, customized your design, added essential plugins, and prepared your site for visitors.
From here you can focus on publishing high quality content, collecting leads, and improving performance over time. Remember that WordPress is flexible, so you can always return to these steps to refine your layout, plugins, and settings as your site grows.
Further Reading and Next Steps
- How to build a website on WordPress
- Beginner checklist optimizing WordPress blog posts
- How to do on page seo in WordPress
- Beginner checklist optimizing WordPress blog posts
- WordPress speed optimization checklist


