If you want to activate WordPress theme on your site safely, this beginner friendly guide will walk you through each step so you can change designs without breaking anything.
By the end, you will know how to install a new theme, preview it, and activate WordPress theme from your dashboard with confidence, then customize the design so everything looks right for visitors.
What You Need to Start
- A working self hosted WordPress site with access to the /wp-admin dashboard so you can install and activate WordPress theme from the admin area.
- An Administrator user account so you can manage Appearance settings and handle theme activation.
- The name of the theme you want, or a .zip file downloaded from a trusted source and ready for WordPress theme activation.
- A recent backup of your site. If you have not created one yet, follow the steps in Beginner guide to WordPress speed optimization before you install and activate a new theme.
Step 1: Choose a WordPress Theme
Before you install anything, decide which theme fits your goals. A lightweight, well coded theme makes your site faster and easier to maintain, and it is much safer to activate WordPress theme that has a good reputation and regular updates.
- Log in to your WordPress dashboard at https://yourdomain.com/wp-admin.
- In the left menu, navigate to Appearance » Themes.
- Click the Add New button near the top of the page.
- Use the Search themes box to type a keyword like “blog” or the theme name you want.
- Use the Featured, Popular, or Latest filters to explore options before you install and activate your chosen WordPress theme.
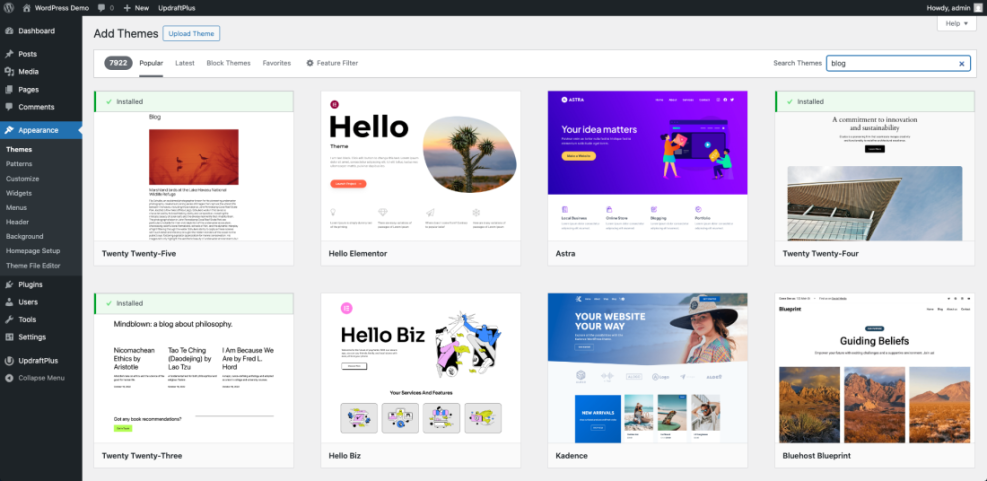
When you find a theme you like, hover over it and click Preview to see a live demo. This helps you confirm it supports the layout and features you need before you actually activate WordPress theme on your site.
Step 2: Install a Theme from the Dashboard
The easiest way to install a free theme is directly from the WordPress.org directory inside your dashboard. This method handles all files automatically and prepares the theme so you can activate WordPress theme with a single click.
- From Appearance » Themes, click Add New if you are not already on the theme browser.
- Search for your chosen theme using the Search themes field.
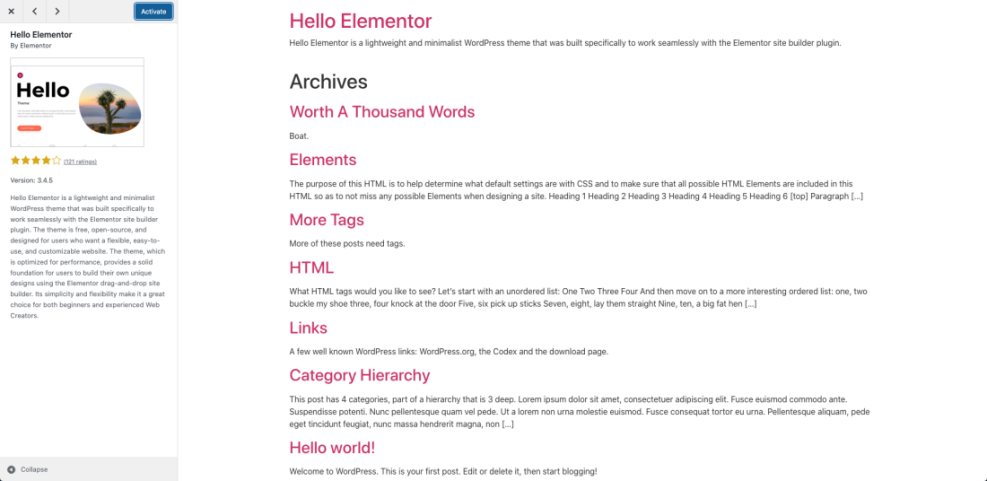
- Hover over the theme card and click the Install button.
- Wait until WordPress shows the message Installing… and then Installed. The theme is now ready for activation.
If you prefer the command line and your host supports WP-CLI, you can also install and activate a WordPress theme with simple commands:
wp theme install twentytwentyfive
wp theme activate twentytwentyfive
You will know the installation worked when you see an Activate button on the theme card and no error messages about missing files or failed downloads. At this point you are one click away from full WordPress theme activation.
Step 3: Upload a Theme Zip File
Premium or custom themes often come as a downloadable .zip file. You must upload this file manually through the dashboard before you can activate WordPress theme for your visitors.
- Download the theme .zip file from the developer or marketplace to your computer.
- In WordPress, go to Appearance » Themes and click Add New.
- Click the Upload Theme button at the top.
- Click Choose File, select your theme .zip, then click Open.
- Click the Install Now button and wait for the upload and installation to finish so the theme is ready for activation.
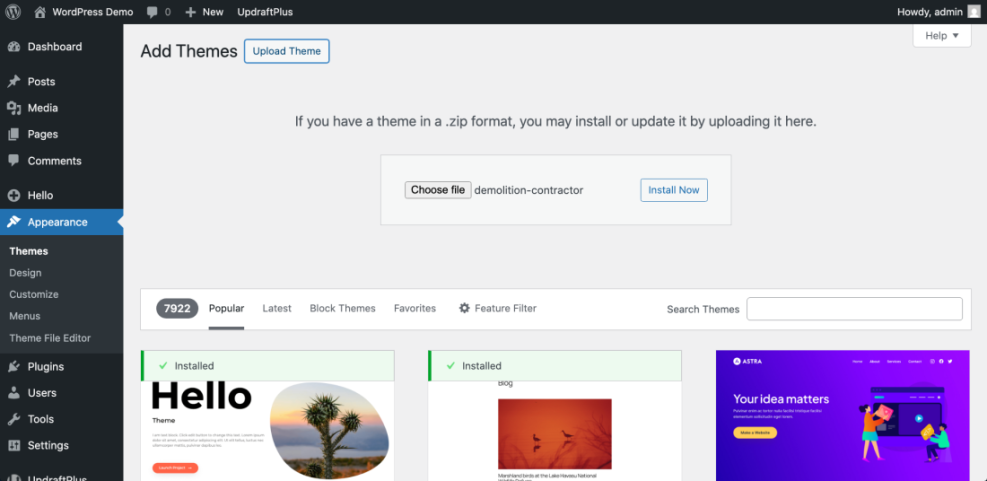
A successful upload ends with a message that the theme was installed and shows links labeled Activate and Live Preview. If you see an error about the stylesheet missing, make sure you uploaded the correct theme .zip and not a full package with documentation, otherwise you will not be able to activate your WordPress theme correctly.
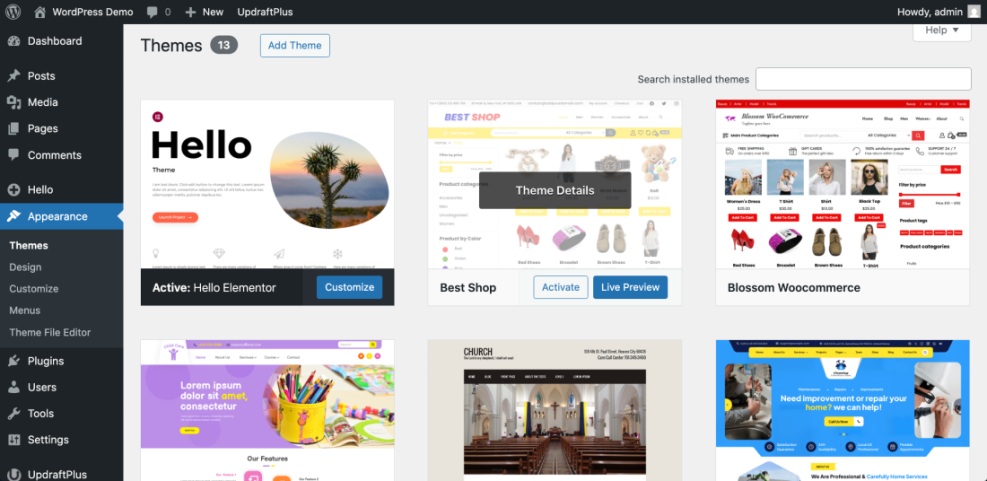
Step 4: Activate Your New WordPress Theme Safely
Installing a theme adds it to your site, but visitors still see the old design until you activate WordPress theme. Activating changes the front end instantly, so take a moment to preview first.
- Navigate to Appearance » Themes in your dashboard.
- Hover over the newly installed theme and click Live Preview.
- Use the preview panel to click through key pages such as Home, Blog, and Contact.
- If everything looks acceptable, click the Activate button in the preview panel, or click Activate on the theme card to complete WordPress theme activation.
For major redesigns or busy sites, consider using a staging environment so you can test changes privately. Follow the steps in Create WordPress blog if you want a safer workflow to install and activate WordPress theme without risking the live site.

To confirm activation, open your site in a new browser tab or incognito window. You should see the new design across all pages while your content (posts, pages, and menus) remains intact after you activate your WordPress theme.
Step 5: Customize and Test Your Activated Theme
After you activate WordPress theme, your site should work immediately, but it may not match your brand until you update settings such as colors, logo, and menus.
- Go to Appearance » Customize (for classic themes) or Appearance » Editor (for block themes).
- Set your Site Title, Tagline, and upload a Logo if your theme supports it.
- Adjust Colors, Typography, and Header options to match your branding.
- Open Appearance » Menus and assign menus to the correct Menu Locations so your navigation works with the newly activated theme.
- Visit Appearance » Widgets or the block based widget editor to tidy sidebars and footers.

When you are done, browse your site on both desktop and mobile devices. Check the homepage, blog archive, single posts, and important landing pages to ensure that headings, images, and buttons look correct and nothing overlaps or breaks.
Maintenance Methods for Managing a WordPress Site
After you install and activate WordPress theme, you still need a simple plan to keep your site healthy. There is more than one way to handle ongoing WordPress maintenance tasks, and each method fits slightly different skills, budgets, and site types. The table below compares the main methods so you can quickly choose the one that feels easiest and safest for your site.
| Method | Where You Use It | Main Purpose |
|---|---|---|
| DIY Manual Maintenance | WordPress dashboard and hosting control panel | Maximum control over updates, backups, theme changes, and checks for small or low-risk sites after you activate a WordPress theme. |
| Managed Hosting Tools | Your host’s control panel or custom dashboard | Simplify routine maintenance with one-click updates, built-in backups, and basic security so you can focus on content instead of technical work. |
| Maintenance & Security Plugins | Plugins section inside the WordPress dashboard | Automate repetitive work like backups, database cleanup, image optimization, and security scans so your activated WordPress theme keeps running smoothly. |
| WP-CLI and Developer Tools | SSH terminal with WP-CLI and deployment tools | Scriptable, fast maintenance for developers managing multiple or complex sites that frequently install and activate new WordPress themes. |
| Professional WordPress Care Plan | External provider, freelancer, or agency | Hands-off maintenance with proactive monitoring, fixes, and expert support, ideal if you want someone else to manage updates after you activate WordPress theme. |
Conclusion You Are Ready to Go
You have successfully learned how to choose a theme, install it from the directory or via a zip file, and activate WordPress theme safely without breaking your content. You also customized key settings so your new design matches your brand and works well on all devices.
From now on, you can repeat this process whenever you want to refresh your site design, experiment with a new layout, or switch to a more performance friendly theme. The steps to install and activate your WordPress theme will feel familiar every time you do it.
Further Reading
- How do you change your WordPress password
- How to change WordPress username
- Best ftp clients for WordPress users
- Best WordPress seo plugins and tools
- Beginner checklist optimizing WordPress blog posts