If your latest edits are not showing up, you need to clear cache on WordPress (also called purging cache or flushing cache) in the right order so you do not clear the wrong layer and think nothing changed.
This guide shows you how to clear WordPress cache across every layer: your caching plugin, hosting/server cache, CDN cache, and your browser cache—then how to confirm the cache purge worked.
If you want a quick walkthrough, see How to clear cache WordPress, then use this tutorial for the safe order and troubleshooting.
What You Need Before You Clear WordPress Cache
Before you clear cache in WordPress, make sure you can access the cache layer you need to purge (plugin, host, CDN, or browser).
- Admin access to your WordPress dashboard to clear WordPress plugin cache.
- Access to your hosting panel to purge server cache (Varnish, LiteSpeed, or managed hosting cache).
- Access to your CDN dashboard if you use one, so you can purge CDN cache.
- A browser you can hard refresh to clear browser cache and reload assets.
Step 1: Identify Where Your WordPress Cache Is Stored (Plugin, Host, CDN, Browser)
Key rule: if you clear cache on WordPress but changes still do not show, another cache layer is still serving an older version. First identify what needs a cache purge.
| Method | Where You Use It | Main Purpose |
|---|---|---|
| Block Editor | Pages or Posts » Edit screen | Update text, images, buttons, and layouts using blocks without code (then clear WordPress cache to see changes). |
| Theme Customizer | Appearance » Customize | Change logo, colors, typography, and basic header/footer settings sitewide (then purge cache if updates don’t show). |
| Site Editor (Block Themes) | Appearance » Editor | Edit templates and global styles for headers, footers, and layouts (then flush cache across layers). |
| Page Builder (Elementor, Divi, WPBakery) | Page editor » Builder interface | Adjust drag-and-drop sections with advanced design controls (often requires clearing cache and regenerating CSS). |
| Manual Code Edits | Child theme files or snippets plugin | Add custom styling or template changes (always clear cache on WordPress + CDN/browser afterward). |
- Open your site in a private window to bypass some browser cache.
- Look at the WordPress admin bar for a cache menu (Purge Cache / Clear Cache) to clear caching plugin cache.
- Check Plugins » Installed Plugins for a caching/performance plugin you can use to clear WordPress cache.
- Check your host panel for server caching (often called server cache, dynamic cache, Varnish, or LiteSpeed cache) to purge hosting cache.
- If you use a CDN, confirm you can purge CDN cache (by URL or full purge).
Verify success: You can name the exact cache layers you will clear (plugin cache, server cache, CDN cache, and browser cache).
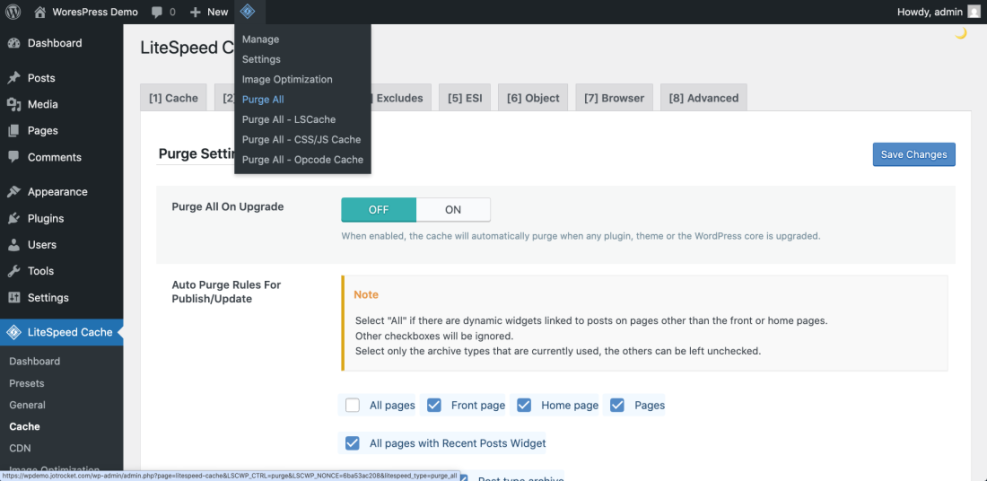
Step 2: Clear Cache in Your WordPress Caching Plugin
Clear Page Cache and Regenerate CSS/JS Files After a Cache Purge
Start here: your caching plugin is the most common place to clear cache in WordPress. If you do not purge this layer, you may keep seeing old HTML or minified files even after you purge other caches.
- In the WordPress admin bar, click your plugin option like Purge Cache or Clear Cache to clear WordPress cache.
- If there is no admin bar button, open the plugin settings page and select Clear Cache or Purge All.
- If the plugin has CSS/JS options, also regenerate assets (Clear CSS Cache / Regenerate Files) so your cached CSS updates.
- Reload the updated page in a private window to confirm the plugin cache purge worked.
Verify success: You see a “cache cleared” notice and your page looks updated after the cache purge.
Step 3: Purge Hosting Cache (Server Cache, Varnish, LiteSpeed)
Flush Full Page Cache and Dynamic Cache at the Host Level
After you clear cache in WordPress, purge the server layer. Many hosts add a separate hosting cache that can still serve an older version until you flush server cache.
- Log in to your hosting dashboard to purge hosting cache.
- Find the caching area (Performance / Speed / Caching).
- Click Purge, Flush Cache, or Clear Cache to clear the server cache for your site.
- If your host has separate toggles (dynamic cache vs object cache), purge the full page/server cache first.
Verify success: The host shows a successful purge and the updated page appears after the server cache purge.
Step 4: Purge CDN Cache (Cloudflare and Other CDNs)
Purge by URL vs Purge Everything for Faster Cache Refresh
If you use a CDN, you also need to purge CDN cache so edge servers stop serving cached HTML, CSS, and images. This step is essential when you clear cache on WordPress but visitors still see the old version.
- Log in to your CDN provider (for example Cloudflare) to clear CDN cache.
- Open the cache section and choose Purge by URL for the page you updated.
- If the issue is sitewide, use Purge Everything (only when necessary) to fully flush CDN cache.
- If you changed only an image or CSS file, purge those asset URLs to avoid a full CDN cache purge.
Verify success: The CDN confirms the purge request and your updated page loads after the CDN cache purge.
Step 5: Clear Browser Cache and Force a Hard Refresh
Confirm the Updated Page Loads Without Cached Files
Even after you clear WordPress cache and purge CDN cache, your local browser may still hold old CSS, JS, and images. Clear the browser cache and hard refresh so the browser downloads fresh files.
- Open the updated page.
- Hard refresh to bypass browser cache:
- Windows: Ctrl + F5
- Mac: Cmd + Shift + R
- If needed, clear your browser cache for “All time” and reload the page.
- Re-check in a private window to confirm the cache refresh is real.
Verify success: Your changes show after the browser cache clear and hard refresh.
Step 6: Flush Object Cache (Redis or Memcached) When Changes Still Don’t Show
Run WP-CLI Cache Flush to Clear Persistent Object Cache
If you already cleared cache on WordPress (plugin + host + CDN) and the issue persists, you may need to flush object cache. Redis or Memcached can keep database results cached until you clear them.
- If your host provides object cache controls, click Flush or Clear to purge object cache.
- If you use an object cache plugin, open its settings and use Flush Cache.
- If you have WP-CLI access, run a safe command to clear cache at the object layer.
wp cache flushVerify success: Reload the page and confirm the updated content shows after the object cache flush.
Step 7: Verify Your WordPress Cache Is Cleared (Live Page Checks)
Test the URL, Private Window, and Query String Cache Bypass
After you clear cache on WordPress, verify the live page is updated for real visitors. This ensures your cache purge worked across plugin, server, CDN, and browser cache layers.
- Open the page URL in a private window to avoid browser cache.
- Append a harmless query string like ?v=1 to force a cache refresh and test if a cached version is being served.
- Check from another device (mobile data is ideal) to confirm the cache clear is not just local.
- If still wrong, temporarily disable your caching plugin, then purge hosting cache again, and re-enable the plugin.
Verify success: The updated page appears on multiple devices after the full clear cache process.
Conclusion: Clear Cache on WordPress in the Correct Order
To clear cache on WordPress reliably, purge in this order: caching plugin cache → hosting/server cache → CDN cache → browser cache. This complete cache flush ensures your newest changes display everywhere.
Further Reading on WordPress Caching and Cache Purging
If you want deeper control over WordPress caching, these guides will help you fine-tune how you clear cache, purge cache, and optimize cache settings.
- Redis object cache WordPress beginner guide
- WordPress seo complete beginners guide
- Caching plugin comparisons WordPress performance
- Do you need hosting for WordPress
- Common WordPress backup errors and how to fix