Step by Step WordPress Maintenance Process
A practical beginner-friendly workflow for backing up, updating, securing, testing, and monitoring your WordPress website.
A reliable WordPress Maintenance Process keeps your website secure, fast, backed up, and ready for visitors. Without a clear routine, small issues like outdated plugins, broken forms, bloated databases, or missed security warnings can turn into expensive problems.
In this step-by-step guide, you will learn how to prepare your site, create a safe backup, update WordPress correctly, check security, test performance, review SEO basics, and document your recurring maintenance tasks. If you are new to site care, start with a strong WordPress backup workflow before making any changes.
Use this process for blogs, business websites, WooCommerce stores, and client sites. The goal is simple: make maintenance predictable, repeatable, and safer every time you log in.
Prerequisites
Before you begin, make sure you have the right access and tools. Maintenance should never start with guessing passwords, searching for hosting details, or updating plugins without a recovery plan.
- Administrator access to the WordPress dashboard.
- Hosting control panel access such as cPanel, Plesk, or your managed hosting dashboard.
- FTP, SFTP, or File Manager access in case the dashboard becomes unavailable.
- A trusted backup plugin or host-level backup system.
- Access to your DNS, CDN, analytics, and email delivery tools if your site depends on them.
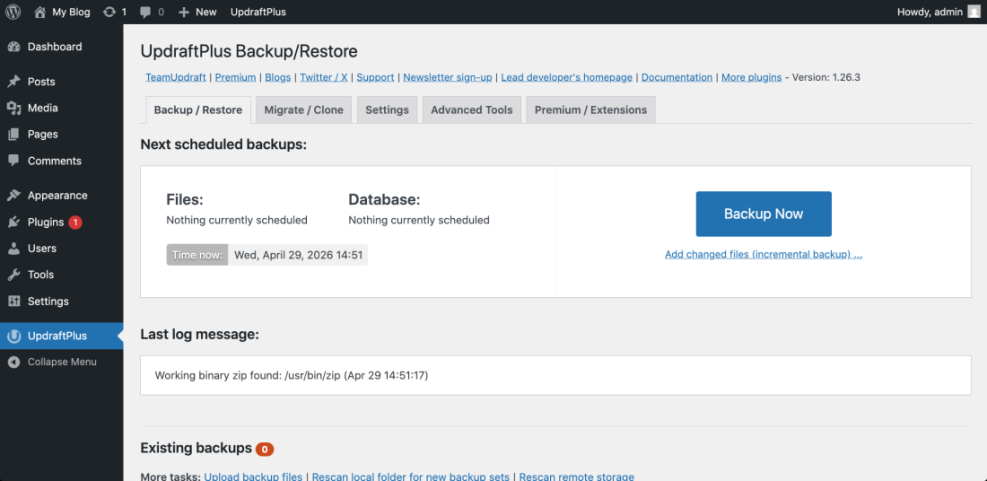
Step 1: Create a Full Website Backup
A full backup is the safety net for every maintenance session. It allows you to restore the site if an update causes a fatal error, layout issue, checkout problem, or missing content.
In your WordPress admin area, go to your backup plugin settings. Look for an option such as Backup Now, Create Backup, or Run Backup. Make sure the backup includes both the database and website files.
- Log in to WordPress Dashboard > Backup Plugin.
- Select a complete backup option that includes files and database tables.
- Start the backup and wait until the process finishes.
- Download a copy to cloud storage or your local computer if your plugin allows it.
- Confirm that the backup appears in the plugin history or hosting backup panel.
Checkpoint: You should see a completed backup entry with the correct date and time. The backup should not show failed, partial, or warning status.
Troubleshooting: If the backup fails, check available disk space, PHP memory limits, and plugin logs. Large sites may need server-level backups or split archive settings.
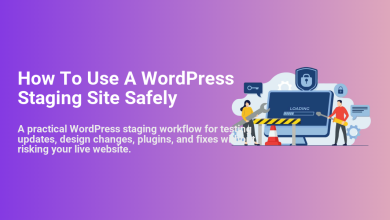
Step 2: Use a Staging Site for Risky Changes
A staging site is a private copy of your live website where you can test updates before visitors see them. It is especially important for WooCommerce stores, membership sites, LMS websites, and sites with custom code.
In your hosting dashboard, look for Sites, WordPress, Staging, or Create Staging. If your host does not provide staging, you can use a staging plugin or duplicate the site manually.
- Open your hosting dashboard.
- Select the WordPress site you want to maintain.
- Choose Create Staging or a similar option.
- Wait for the copy process to complete.
- Log in to the staging dashboard and confirm that pages, menus, forms, and key layouts load correctly.
Checkpoint: The staging site should look like the live website but should use a staging URL or temporary domain.
Troubleshooting: If the staging copy fails, disable heavy caching temporarily, check available storage, and confirm that your host supports database cloning.
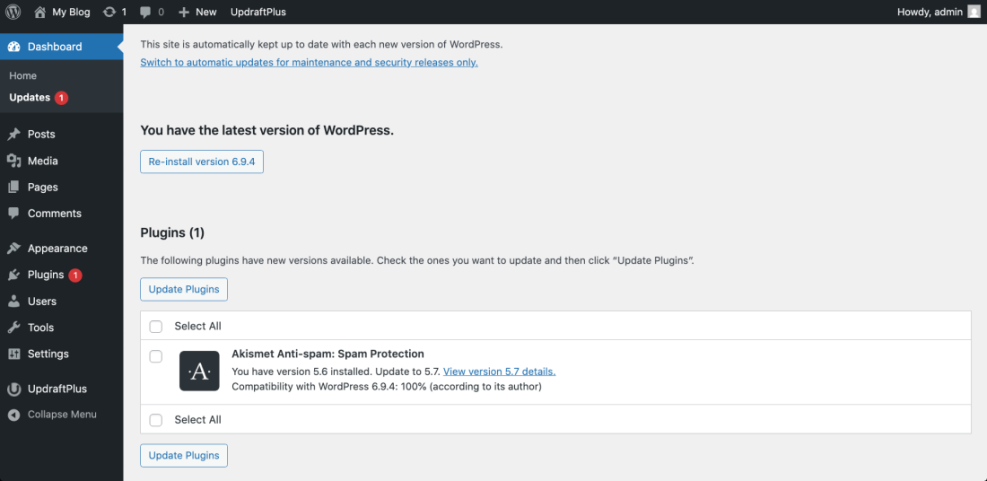
Step 3: Update WordPress Core, Themes, and Plugins
Updates fix bugs, improve compatibility, patch security vulnerabilities, and keep your website working with modern PHP and browser standards. The safest order is usually plugins first, then themes, then WordPress core, while testing between each group.
Go to Dashboard > Updates inside WordPress. Review all pending updates before clicking anything, and pay extra attention to page builders, SEO plugins, security plugins, caching plugins, and WooCommerce extensions.
- Go to Dashboard > Updates.
- Update one or two critical plugins first instead of updating everything at once.
- Open the front end of the site in a new browser tab and check key pages.
- Update the active theme if an update is available.
- Update WordPress core after plugin and theme compatibility looks stable.
- Clear your website cache and browser cache after updates finish.
Checkpoint: The Updates screen should show that WordPress core, plugins, and themes are current. Your homepage, blog posts, contact page, and important conversion pages should still display correctly.
Troubleshooting: If the site breaks after an update, deactivate the most recently updated plugin using the dashboard, hosting File Manager, or SFTP. Rename the plugin folder inside wp-content/plugins if the dashboard is unavailable.
For a deeper update workflow, review this guide on how to check whether WordPress plugins are up to date.
Step 4: Review Login, User, and Security Settings
Security maintenance reduces the risk of brute-force attacks, unauthorized users, malware injections, and preventable data loss. You should review access regularly, not only after something goes wrong.
Start in Users > All Users. Confirm that every administrator account belongs to a real person who still needs admin access. Remove inactive users or reduce their role to Editor, Author, Contributor, or Subscriber when full access is not required.
- Go to Users > All Users.
- Review all Administrator accounts.
- Remove unknown users after confirming they are not required.
- Force strong passwords for administrator and editor accounts.
- Enable two-factor authentication if your security plugin supports it.
- Check your security plugin dashboard for malware scans, firewall status, and login attempts.
Checkpoint: Only trusted users should have administrator access, and your security plugin should not show unresolved critical alerts.
Troubleshooting: If you find an unknown admin user, do not simply delete the account and move on. Change all admin passwords, scan the site, review recent file changes, check hosting logs, and rotate database and FTP credentials if compromise is suspected.
Step 5: Check Speed, Caching, and Core Web Vitals
Performance maintenance helps your website load faster and feel more stable for visitors. Slow pages can be caused by oversized images, too many plugins, expired cache settings, render-blocking scripts, database overhead, or weak hosting resources.
Start with your caching plugin. Go to its settings page and confirm that page caching, browser caching, minification, lazy loading, and CDN integration are working as expected. Avoid changing every optimization setting at once because aggressive settings can break layouts or scripts.
- Open your caching or performance plugin settings.
- Clear the site cache.
- Open your homepage, blog page, and a high-value landing page in an incognito browser window.
- Check whether images, menus, forms, sliders, and tracking scripts still work.
- Run a speed test using your preferred performance testing tool.
- Record key results such as load time, Largest Contentful Paint, Cumulative Layout Shift, and page size.
Checkpoint: Pages should load without broken styling, missing images, or delayed interaction. Your maintenance notes should include the date and the latest performance results.
Troubleshooting: If CSS or JavaScript breaks after clearing cache or enabling minification, turn off file optimization settings one at a time. Then clear cache again and retest the affected page.
Step 6: Review SEO, Forms, and Key Conversion Paths
Maintenance is not only technical. You also need to confirm that search visibility and lead generation elements still work after updates, plugin changes, or theme edits.
Open your most important pages and check the title tag, meta description, headings, internal links, schema settings, contact forms, buttons, and tracking scripts. If your site has a checkout, booking form, donation form, or lead magnet, submit a test entry when possible.
- Check that SEO plugin settings still appear on posts and pages.
- Confirm that XML sitemap settings are enabled.
- Test contact forms and verify that email notifications arrive.
- Click navigation menus, call-to-action buttons, and internal links.
- Review broken links or redirect warnings if your SEO plugin reports them.
Checkpoint: Important pages should be indexable when intended, forms should submit correctly, and conversion paths should not lead to errors.
Troubleshooting: If forms stop sending emails, test SMTP settings, spam filtering, reCAPTCHA configuration, and plugin conflicts. If SEO fields disappear, confirm that your SEO plugin is active and compatible with the current WordPress version.
Step 7: Clean the Database and Media Library Carefully
Over time, WordPress can accumulate post revisions, spam comments, trashed posts, expired transients, unused images, and plugin leftovers. Cleaning these items can improve organization and sometimes reduce database size.
Use a trusted optimization plugin or hosting database tool, but only after creating a fresh backup. Avoid deleting database tables manually unless you know exactly which plugin created them and whether the site still needs them.
- Go to your database optimization plugin settings.
- Review cleanup options before running them.
- Select safe items such as spam comments, trashed posts, and expired transients.
- Avoid deleting unknown tables or unattached media in bulk without review.
- Run the cleanup and check the site afterward.
Checkpoint: The cleanup should finish without errors, and the site should still load normally. Posts, pages, products, forms, and images should remain intact.
Troubleshooting: If images disappear after media cleanup, restore from backup and review whether the images were used in page builder modules, custom fields, widgets, or theme options that the cleanup tool could not detect.
Step 8: Set Up Uptime, Backup, and Security Monitoring
Monitoring helps you catch problems between maintenance sessions. A site can go down because of hosting issues, expired SSL certificates, plugin conflicts, traffic spikes, malware, or failed automatic updates.
Use uptime monitoring to receive alerts when the website is unavailable. Also enable notifications for failed backups, security scan results, plugin vulnerabilities, and form delivery issues.
- Uptime alerts for downtime and slow responses.
- Backup failure alerts from your backup plugin or host.
- Security scan alerts for malware or file changes.
- SSL expiration alerts from your host or monitoring tool.
- Analytics alerts for sudden traffic drops when available.
Checkpoint: You should receive alerts by email, SMS, Slack, or another channel that you actually monitor.
Troubleshooting: If alerts are not arriving, check spam folders, SMTP settings, notification email addresses, and whether your monitoring service has verified the site URL correctly.
Step 9: Document a Repeatable Maintenance Schedule
A written schedule turns maintenance from a random task into a reliable process. It also helps agencies, teams, and business owners prove what was checked and when.
Create a simple maintenance log in a spreadsheet, project management tool, or client report. Record the date, backup status, updates completed, issues found, fixes applied, performance notes, and next actions.
- Weekly: Backups, plugin updates, security alerts, uptime reports, and form tests.
- Monthly: Theme updates, performance tests, database cleanup, broken link checks, and user access review.
- Quarterly: Hosting review, PHP version review, full restore test, plugin audit, and SEO health check.
- Yearly: Domain renewal, SSL review, premium license audit, privacy policy review, and disaster recovery review.
Checkpoint: Anyone responsible for the website should know what was done during the last maintenance session and what needs attention next.
Troubleshooting: If maintenance keeps getting skipped, reduce the checklist to essentials first: backup, update, security scan, uptime check, and form test. Then expand the process once the habit is consistent.
Keep Your WordPress Site Healthy With a Repeatable Process
A strong WordPress Maintenance Process protects your site from avoidable downtime, security risks, performance issues, and broken user experiences. The key is to work in the right order: back up first, test carefully, update in stages, review security, verify speed, check SEO, and document the results.
You do not need a complicated system to maintain WordPress well. You need a consistent checklist, reliable backups, careful testing, and clear records so every maintenance session becomes safer than the last.
Further Reading
- Why Is WordPress Maintenance Important?
- WordPress Maintenance Plan Monthly
- WordPress Security Complete Overview
- WordPress Speed Optimization Checklist
- WordPress Maintenance Backup Plan