How to Secure WordPress Login with Two Factor
A step-by-step WordPress login security guide for enabling two-factor authentication, protecting admin accounts, and preventing common lockout issues.
Your WordPress login page is one of the most common targets for brute force attacks, password guessing, credential stuffing, and unauthorized admin access. A strong password helps, but it is not enough if that password is reused, leaked, or captured by malware.
In this tutorial, you will secure your WordPress login with two-factor authentication, test the setup safely, create backup access options, and apply practical hardening steps that reduce the chance of a lockout. If you are still learning where the login page is located, start with this guide on finding your WordPress login URL before enabling extra protection.
By the end, your admin account will require both your password and a second verification code from an authenticator app, making unauthorized access much harder even if someone knows your password.
Prerequisites
Before you enable two-factor authentication, make sure you can safely recover your site if a setting is misconfigured. Login security is important, but you should never make access changes without a fallback plan.
- Administrator access to your WordPress dashboard.
- A smartphone with an authenticator app such as Google Authenticator, Microsoft Authenticator, Authy, 1Password, or Bitwarden.
- A recent full-site backup, including files and database.
- Access to your hosting control panel, FTP/SFTP, or File Manager in case you need to disable a plugin manually.
- A second administrator account, if possible, for emergency access testing.
Step 1: Back Up Your WordPress Site First
This step matters because login security plugins can affect access to the dashboard. If something conflicts with another plugin, a caching layer, or your hosting firewall, a backup gives you a safe restore point.
- Log in to your WordPress dashboard.
- Go to your backup plugin or hosting backup panel.
- Create a complete backup that includes both website files and the database.
- Download a copy or confirm that the backup is stored off-site.
- Write down how to restore the backup from your host or plugin dashboard.
Checkpoint: you should see a completed backup entry with a current date and time. For a deeper backup workflow, review this WordPress site backup guide before changing login settings.
Troubleshooting: if your backup fails, check available disk space, PHP timeout limits, and whether your host blocks large archive creation. Fix the backup issue before continuing.
Step 2: Choose a Two-Factor Authentication Plugin
WordPress does not include full two-factor authentication in every standard installation, so most site owners use a trusted plugin. The best option is usually a security plugin that supports authenticator apps, backup codes, user-role controls, and recovery settings.
Look for these features when choosing a plugin:
- Support for time-based one-time passwords, often called TOTP.
- Backup codes for emergency access.
- Role-based enforcement for administrators, editors, authors, and customers.
- Clear setup screens for each user profile.
- Recent updates and good compatibility with your WordPress version.
- Minimal performance impact on login and dashboard pages.
Common plugin choices include dedicated two-factor plugins and larger security suites. If you are comparing broader security tools, this guide to the best WordPress security plugins can help you choose a plugin that fits your site.
Checkpoint: you should have selected a plugin that clearly supports authenticator app codes and backup recovery codes.
Troubleshooting: avoid installing several login security plugins at the same time. Overlapping firewall, CAPTCHA, login limit, and two-factor features can cause redirect loops or failed logins.
Step 3: Install and Activate the Plugin
Installing the plugin adds the two-factor controls to WordPress. Use the WordPress admin plugin installer unless your host or agency requires manual deployment.
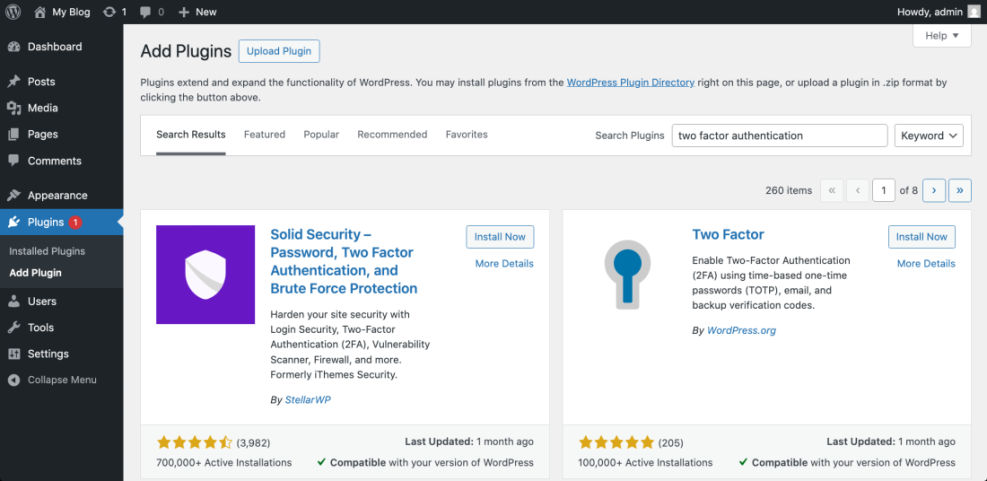
- From the WordPress dashboard, go to Plugins > Add New.
- Search for the two-factor authentication plugin you selected.
- Click Install Now.
- After installation finishes, click Activate.
- Open the plugin setup screen, usually under Settings, Users, or a dedicated Security menu.
Checkpoint: the plugin should appear as active under Plugins > Installed Plugins, and you should see its settings area in the dashboard menu.
Troubleshooting: if the dashboard shows a critical error after activation, access your hosting File Manager or SFTP, open wp-content/plugins/, and rename the plugin folder to disable it. Then reload wp-admin and review the plugin compatibility notes.
Step 4: Configure Two-Factor Settings for Admin Users
Start with administrator accounts because they have the most control over your site. Once admin access is protected and tested, you can decide whether to require two-factor authentication for editors, authors, shop managers, or customers.
- Go to the plugin settings page.
- Enable two-factor authentication for the Administrator role.
- Choose Authenticator App or TOTP as the primary method.
- Turn on backup codes if the plugin provides them.
- Disable weak recovery methods if they create unnecessary risk.
- Save your settings.
Checkpoint: your plugin settings should show that two-factor authentication is enabled for administrators and ready to be configured per user.
Troubleshooting: if your plugin has an enforcement deadline option, do not force all users immediately. Give admins time to enroll, save backup codes, and test access first.
Step 5: Connect Your Authenticator App
Enrollment links your WordPress account to your authenticator app. The app generates a short code that changes regularly, and WordPress asks for that code after you enter your password.
- Go to Users > Profile, or open the plugin’s two-factor setup page.
- Find the section for Two-Factor Authentication, Authenticator App, or TOTP.
- Open your authenticator app on your phone.
- Tap the option to add a new account.
- Scan the QR code shown in WordPress.
- Enter the current six-digit code from your app into WordPress.
- Click Verify, Activate, or Save Changes.
Checkpoint: WordPress should confirm that two-factor authentication is active for your user account. Your authenticator app should also show an entry for your website name or domain.
Troubleshooting: if the code fails, check that your phone time is set automatically. TOTP codes depend on accurate time, so a device clock that is out of sync can cause repeated verification failures.
Step 6: Save Backup Codes and Recovery Access
Backup codes protect you from lockouts if you lose your phone, replace your device, uninstall your authenticator app, or cannot receive a login code. Treat backup codes like passwords because each code can usually be used to access your account one time.
- Open the backup codes section in your two-factor plugin settings.
- Generate a fresh set of backup codes.
- Copy the codes into a password manager.
- Print a copy only if you can store it securely.
- Do not save backup codes in a public note, shared document, or email inbox.
Checkpoint: you should have at least one verified recovery method before logging out of WordPress.
Troubleshooting: if your plugin does not support backup codes, consider choosing a different two-factor plugin before enforcing 2FA across multiple accounts.
Step 7: Test the WordPress Login Flow
Testing confirms that two-factor authentication works before you roll it out to other users. Keep your current dashboard tab open during the test so you still have an active session if the login attempt fails.
- Open a private or incognito browser window.
- Visit your WordPress login URL.
- Enter your username or email address and password.
- When prompted, enter the current code from your authenticator app.
- Confirm that you can access the WordPress dashboard.
- Log out from the private window only after the test succeeds.
Checkpoint: you should reach the dashboard only after entering both your password and the two-factor code.
Troubleshooting: if the login page refreshes without an error, temporarily disable caching for the login page and wp-admin area. Security prompts should not be cached by page caching plugins or server cache rules.
Step 8: Add Extra Login Hardening Rules
Two-factor authentication is powerful, but it works best as part of a layered login security setup. After 2FA is confirmed, add a few extra controls to reduce automated attacks and suspicious login attempts.
- Use long, unique passwords for every administrator account.
- Remove unused admin accounts.
- Limit login attempts to slow brute force attacks.
- Enable login notifications for administrator accounts.
- Use HTTPS across the entire site.
- Keep WordPress core, themes, and plugins updated.
- Review user roles regularly and remove unnecessary privileges.
Checkpoint: your site should now require a password, a second factor, and sensible account hygiene before anyone can access sensitive admin areas.
Troubleshooting: if legitimate users report frequent login problems, review whether CAPTCHA, rate limiting, firewall rules, and two-factor prompts are all firing at once. Too many login challenges can create usability problems.
Step 9: Roll Out Two-Factor Authentication to Other Users
After your administrator account is protected and tested, decide which other roles need two-factor authentication. Editors, shop managers, membership managers, and support staff often have enough permissions to justify extra protection.
- List all users with dashboard access.
- Prioritize users with publishing, customer, order, file, or settings permissions.
- Notify users before enforcement begins.
- Share simple setup instructions and a deadline.
- Require backup codes during enrollment.
- Review enrollment status from the plugin dashboard.
Checkpoint: every high-privilege user should show as enrolled, verified, and protected by two-factor authentication.
Troubleshooting: if a user cannot complete setup, confirm they are using a supported authenticator app, their device time is automatic, and their user role is included in the plugin policy.
Your WordPress Login Is Now Much Safer
You have now added two-factor authentication to your WordPress login, connected an authenticator app, saved backup codes, tested the login flow, and added practical hardening rules. This makes your admin area much harder to compromise because an attacker needs more than a password to get in.
Your next step is to review all administrator accounts, remove users who no longer need access, and document your recovery process. Login security is strongest when it becomes part of your normal WordPress maintenance routine, not a one-time setup task.
Further Reading
- How to Protect Your WordPress Admin Area Using htaccess
- WordPress Security Complete Overview
- How to Secure a WordPress Website
- How Do You Change Your WordPress Password