Step by Step Guide to Secure WordPress Logins
A practical WordPress login security tutorial for protecting your admin area with stronger passwords, two-factor authentication, access controls, and monitoring.
Your WordPress login page is one of the most targeted parts of your website. Attackers often try weak passwords, reused credentials, exposed usernames, and automated brute-force attempts before they ever touch your theme, plugins, or hosting account.
In this step-by-step guide, you will secure WordPress logins by improving account hygiene, enabling two-factor authentication, limiting repeated attempts, hiding unnecessary login clues, and monitoring suspicious activity. If you are still learning the basics of accessing your dashboard, start with this guide on finding your WordPress login URL before applying the security steps below.
By the end, you should have a safer login workflow that is harder to guess, harder to automate against, and easier to recover if something goes wrong.
Prerequisites
Before changing login security settings, make sure you can recover access if a plugin conflict, lockout rule, or password change causes trouble.
- Administrator access to your WordPress dashboard.
- Access to your hosting control panel or file manager.
- A recent full-site backup, including files and database.
- A working email address for password resets and security alerts.
- Permission to install or configure a security plugin if your site does not already use one.
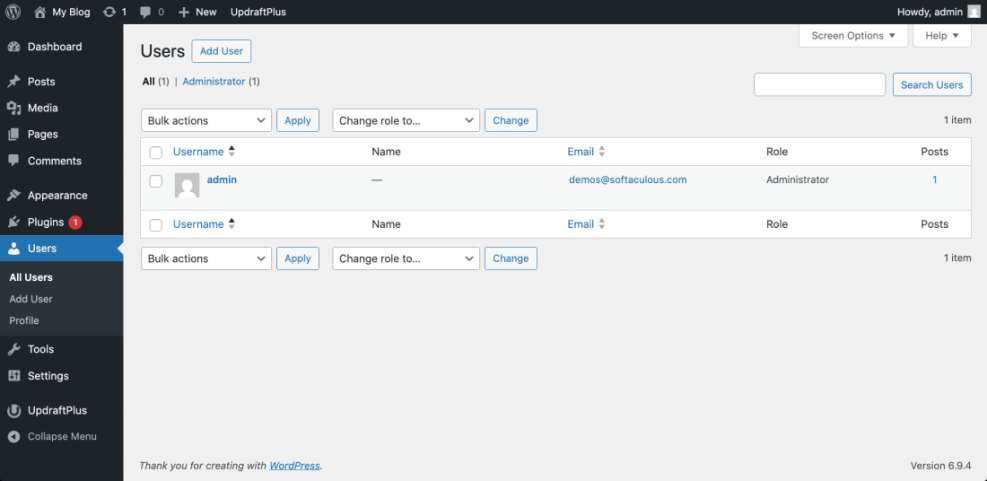
Step 1: Audit Every User Account
Login security starts with the users who can access your site. An old administrator account, shared login, or unnecessary editor account can become the easiest path into your dashboard.
- Log in to WordPress as an administrator.
- Go to Users > All Users.
- Review every account listed on the page.
- Remove accounts that are no longer needed.
- Downgrade users who do not need administrator access.
- Confirm that every active user has a recognizable name and email address.
Checkpoint: Your Users screen should show only active users with appropriate roles. Most writers should be Authors or Editors, while only trusted site owners or technical managers should be Administrators.
Troubleshooting: If you cannot delete a user because WordPress asks what to do with their content, choose the option to attribute their posts to another trusted user before deleting the account.
Step 2: Require Strong Passwords
Weak passwords remain one of the most common login security risks. A secure password should be long, unique, and stored in a password manager rather than reused across email, hosting, and WordPress.
- Go to Users > Profile for your own account.
- Scroll to Account Management.
- Click Set New Password.
- Use the generated password or paste a strong password from your password manager.
- Click Update Profile.
- Ask every active user to update their password as well.
If a user forgot their credentials or needs to rotate a compromised password, follow a safe reset process using this walkthrough on changing your WordPress password.
Checkpoint: WordPress should label the new password as strong before you save the profile. Users should not share passwords in email, chat apps, spreadsheets, or project management comments.
Troubleshooting: If a user does not receive a password reset email, check the spam folder, verify the email address under Users > All Users, and confirm that your site can send transactional email.
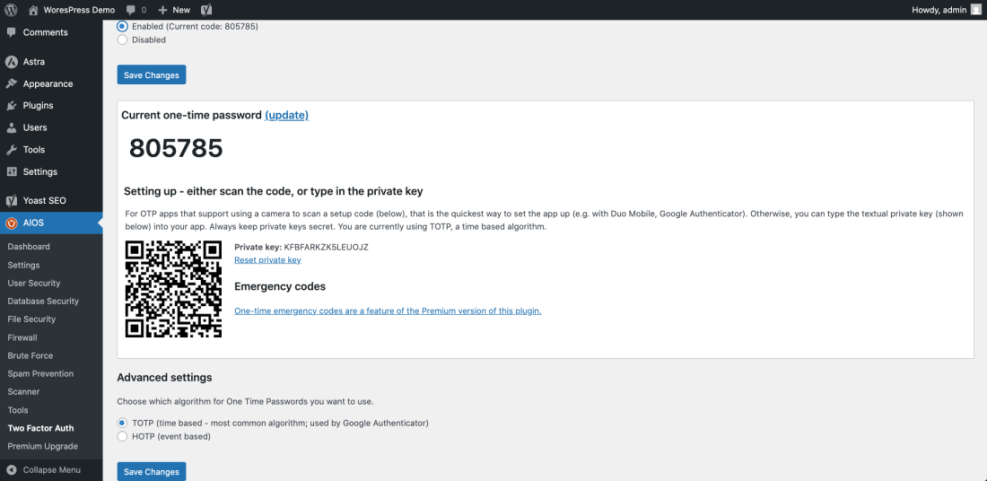
Step 3: Enable Two-Factor Authentication
Two-factor authentication adds a second verification step after the password. Even if someone guesses or steals a password, they still need the temporary code from the user’s authenticator app or approved method.
- Install a reputable WordPress security plugin that supports two-factor authentication.
- Go to the plugin’s security or login settings page.
- Enable SEO and UX, and where you will see it in daily work.”>Two-Factor Authentication for administrator accounts first.
- Scan the QR code with an authenticator app such as Google Authenticator, Microsoft Authenticator, or 1Password.
- Enter the verification code to confirm setup.
- Save backup codes in a secure password manager.
Checkpoint: When you log out and log back in, WordPress should ask for both your password and a temporary authentication code.
Troubleshooting: If the code fails, check the time settings on your phone, regenerate the 2FA setup, and verify that you are entering the newest code before it expires.
Step 4: Limit Failed Login Attempts
Automated bots often try hundreds or thousands of username and password combinations against WordPress login forms. Limiting failed attempts slows these attacks and can temporarily block suspicious IP addresses.
- Open your security plugin’s login protection settings.
- Find the option for Limit Login Attempts, Brute Force Protection, or similar wording.
- Set a reasonable failed-attempt limit, such as 3 to 5 attempts.
- Set a temporary lockout period, such as 15 to 30 minutes.
- Enable email alerts for repeated lockouts if your plugin supports them.
- Save the settings.
Checkpoint: Your security plugin should show that brute-force or login attempt protection is active. Some plugins also display a log of blocked attempts.
Troubleshooting: If legitimate users are locked out often, increase the attempt threshold slightly, shorten the lockout window, or whitelist trusted office IP addresses if your plugin and hosting environment support it.
Step 5: Remove Obvious Username Clues
Attackers need both a username and a password. WordPress sites often expose usernames through author archives, display names, REST API output, or old administrator accounts using names like admin.
- Go to Users > All Users.
- Check whether any administrator account uses
admin,administrator, the domain name, or a public brand name as the username. - Create a new administrator account with a unique username if needed.
- Log in with the new administrator account.
- Delete the old obvious administrator account and assign its content to the new account.
- Go to Users > Profile and set a public display name that does not reveal the login username.
Checkpoint: Your public author name should be different from the actual login username, and no administrator account should use a predictable username.
Troubleshooting: If WordPress does not let you change an existing username directly, create a new account with the correct role, log in as that account, then remove the old one carefully.
Step 6: Consider Changing the Default Login URL
Changing the default login URL is not a complete security strategy, but it can reduce automated noise against /wp-login.php and /wp-admin/. Use this step only after you have backups and hosting access, because a misconfigured login URL can lock you out.
- Install a trusted plugin that offers custom login URL functionality.
- Go to the plugin’s login URL settings.
- Choose a unique login path that is not easy to guess.
- Save the new URL in your password manager.
- Test the new login URL in a private browser window before logging out of your current session.
Checkpoint: The old default login URL should no longer show the standard login form, while the new private URL should load correctly.
Troubleshooting: If you lose the custom login URL, check your password manager, plugin settings documentation, or hosting file manager. In many cases, temporarily renaming the plugin folder can disable the custom login rule.
Step 7: Configure a Security Plugin Carefully
A good security plugin can combine several login protections in one place, including 2FA, lockouts, reCAPTCHA, user activity logs, malware scanning, and firewall rules. The key is to configure only the features you understand and test changes after saving them.
- Choose a plugin that matches your site size, hosting environment, and support needs.
- Enable login protection features one at a time.
- Test login, logout, password reset, and 2FA after each major change.
- Review alert settings so important warnings reach the correct email address.
- Document the settings in your site maintenance notes.
For help comparing options, review this guide to the best WordPress security plugins before installing multiple tools with overlapping features.
Checkpoint: Your security plugin should protect logins without blocking normal administrators, editors, customers, or form submissions.
Troubleshooting: If your site becomes slow or users report login problems, disable recently enabled security modules one at a time and check the plugin’s activity log for blocked requests.
Step 8: Add CAPTCHA or Bot Protection
CAPTCHA and bot protection can reduce automated login attempts, especially on sites that receive constant bot traffic. Use it carefully so real users can still log in without unnecessary frustration.
- Open your security plugin or CAPTCHA plugin settings.
- Connect the plugin to your CAPTCHA provider if required.
- Enable protection on the WordPress login form.
- Enable protection on password reset forms if available.
- Test the login form in a private browser window.
Checkpoint: Your login form should show a CAPTCHA challenge, invisible bot check, or provider badge depending on the method you selected.
Troubleshooting: If the CAPTCHA does not load, clear your cache, check for JavaScript optimization conflicts, and confirm that your site key and secret key were copied correctly.
Step 9: Force HTTPS for Logins
Login credentials should never travel over an unsecured connection. HTTPS encrypts traffic between the visitor’s browser and your server, which protects passwords, session cookies, and admin activity from unnecessary exposure.
- Confirm that your SSL certificate is active in your hosting control panel.
- Go to Settings > General in WordPress.
- Make sure both WordPress Address (URL) and Site Address (URL) use
https://. - Save changes if needed.
- Clear your cache and test the login page in a private browser window.
Checkpoint: Your browser should show the login page over HTTPS without security warnings or mixed content errors.
Troubleshooting: If you see redirect loops, mixed content warnings, or a broken dashboard, check your hosting SSL settings, caching plugin, and any hard-coded HTTP URLs in your database or theme files.
Step 10: Monitor Login Activity
Securing WordPress logins is not a one-time task. Monitoring helps you spot unusual patterns such as repeated failed attempts, logins from unexpected countries, password reset abuse, or administrator access at unusual times.
- Enable login activity logging in your security plugin.
- Review failed login attempts weekly.
- Check successful administrator logins for unfamiliar IP addresses or locations.
- Set alerts for new administrator accounts, plugin changes, and repeated lockouts.
- Investigate suspicious activity immediately.
Checkpoint: You should know where your login logs are stored and how to identify normal versus suspicious activity.
Troubleshooting: If logs are empty, confirm that logging is enabled, check whether caching or firewall rules bypass the plugin, and verify that your server time zone is correct.
Step 11: Prepare a Login Recovery Plan
Strong login protection can occasionally lock out legitimate users. A recovery plan helps you regain access without panic or risky shortcuts.
- Keep hosting control panel access separate from WordPress access.
- Store administrator credentials and 2FA backup codes in a secure password manager.
- Document how to disable a security plugin through file manager or FTP.
- Maintain a recent backup before changing login rules.
- Make sure at least two trusted people know the recovery process for business-critical sites.
Checkpoint: You should be able to explain how to recover access if 2FA fails, a plugin blocks your IP, or the custom login URL is forgotten.
Troubleshooting: If you are locked out after enabling a plugin, use your hosting file manager to rename the plugin folder temporarily, log back in, then restore the folder name and adjust the plugin settings.
Your WordPress Login Is Now Much Harder to Break Into
You have secured the most common WordPress login weaknesses by reviewing user accounts, strengthening passwords, enabling two-factor authentication, limiting failed attempts, reducing username exposure, adding bot protection, enforcing HTTPS, and monitoring activity.
The best next step is to turn these settings into a recurring maintenance routine. Review users, passwords, plugin settings, logs, and backups regularly so your login security stays strong as your site grows.
Further Reading
- WordPress Security Complete Overview
- Beginner WordPress Security Best Practices Guide
- How to Protect Your WordPress Admin Area Using htaccess
- How to Secure a WordPress Website