Speed Up WordPress Guide
A step-by-step roadmap to make your WordPress site load fast and pass Core Web Vitals.

Visitors expect your WordPress site to load in a couple of seconds. If pages feel sluggish, bounce rates climb, conversions drop, and Google’s Core Web Vitals reports start flashing red. The good news: with a structured plan, you can speed up WordPress without being a full-time developer.
This guide gives you a practical roadmap to speed up WordPress from the ground up: fast hosting, smart caching, lightweight images, optimized CSS/JS, and a simple maintenance routine. If you want a more theory-focused overview, you can pair this tutorial with our beginner guide to WordPress speed optimization.
Whether you’re running a small business site, a blog using the Classic Editor, or a Jannah theme-powered magazine, you’ll finish this guide with a faster site and a repeatable process you can use every month.
Prerequisites
Before you change performance settings, make sure you can safely test and roll back your site. You don’t need deep technical skills, but you do need basic access.
- WordPress admin access: your username and password for
/wp-admin. - Hosting access: cPanel, Plesk, or your host’s dashboard (for backups, PHP version, and caching).
- Recent backup: use your host or a backup plugin so you can restore if anything breaks.
- A staging site (recommended): test speed changes on staging before pushing to live, especially on busy sites.
Step 1: Choose Fast WordPress Hosting
Your hosting is the foundation of WordPress speed. No amount of caching or image optimization can fully hide an overloaded or outdated server.
What to look for in a hosting plan
- PHP 8.x support and regular server updates.
- WordPress-optimized stack (LiteSpeed, Nginx, or well-tuned Apache).
- Built-in caching (object cache, page cache) or at least compatibility with popular caching plugins.
- SSD or NVMe storage instead of old HDDs.
- Data center close to your main audience if you’re not using a CDN yet.
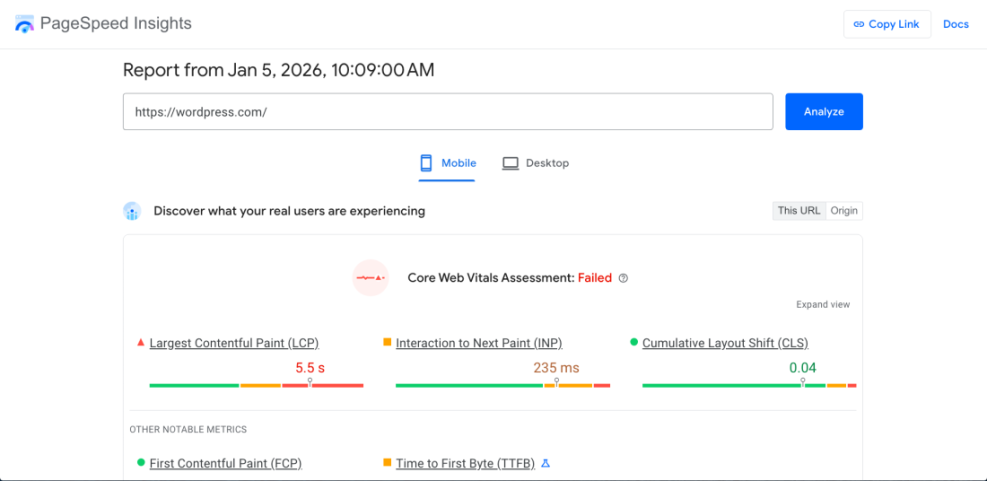
Step 2: Benchmark Your Current WordPress Speed
Before optimizing, you need a baseline. This tells you which changes make a real difference and helps you avoid “optimizing” what isn’t actually slow.
- Open an incognito/private browser window so you aren’t logged in to WordPress.
- Run tests on tools like PageSpeed Insights, GTmetrix, or WebPageTest.
- Test your homepage and at least one important content page (blog post, product page, landing page).
- Record key metrics: Largest Contentful Paint (LCP), Cumulative Layout Shift (CLS), and total load time.
Step 3: Enable Page Caching in WordPress
Page caching saves a static copy of your pages so the server doesn’t rebuild them on every request. It’s one of the highest-impact changes you can make.
Set up a caching plugin
- In WordPress admin, go to Plugins > Add New.
- Search for a caching plugin such as WP Rocket, W3 Total Cache, LiteSpeed Cache, or another recommended by your host.
- Click Install, then Activate.
- Open the plugin’s settings (usually under Settings or its own menu item) and enable:
- Page caching for desktop and mobile.
- Browser caching (cache static files in visitor browsers).
- Compression (GZIP or Brotli) if your host hasn’t already enabled it.
- Save settings and click any available button to clear/flush cache.
Flush cache with WP-CLI (optional)
If you use SEO and UX, and where you will see it in daily work.”>WP-CLI, you can clear the cache after big changes.
wp cache flushRun this command in your hosting account’s SSH terminal or local WP-CLI connection targeting your WordPress installation.
Step 4: Optimize WordPress Images the Right Way
Unoptimized images are one of the most common reasons WordPress pages load slowly. Large hero images and background sliders can easily add several megabytes to a single page.
For a detailed checklist, see our image optimization checklist for WordPress websites, then follow the quick-start version below.
- Install an image optimization plugin (e.g., ShortPixel, Imagify, Smush) from Plugins > Add New.
- Set default compression to “lossy” or “smart” for most blogs and business sites; use “lossless” only for design-critical images.
- Enable WebP or AVIF output if available, so modern browsers load smaller next-gen formats.
- Resize uploads by configuring a max width (e.g., 1920px) so users can’t upload 6000px-wide photos directly from a camera.
- Bulk optimize existing images via the plugin’s tools, then re-test your key pages in PageSpeed Insights.
Step 5: Minify and Defer CSS & JavaScript
Every extra CSS or JavaScript file adds requests and can delay rendering. Minifying and deferring these files reduces file size and helps the browser focus on what matters first: visible content.
Use your caching plugin’s optimization features
- In your caching plugin settings, find the File Optimization or CSS/JS tab.
- Enable CSS minification and JavaScript minification.
- Enable combine CSS/JS files only if recommended; some modern setups perform better with HTTP/2 without combining.
- Turn on defer or delay JavaScript execution so non-critical scripts load after initial rendering.
- Save settings and test your homepage and a key post for layout issues.
Fixing common layout issues
- If your menu or sliders stop working, exclude their JS files from deferral in the caching plugin’s “exclude” list.
- If fonts flash or change late (FOIT/FOUT), preload your main font files and avoid loading unnecessary font weights.
- For Jannah theme or other magazine themes, avoid loading every widget and carousel on the homepage; keep above-the-fold sections lean.
Step 6: Clean Up Your Database and Autoloaded Options
Over time, your WordPress database accumulates post revisions, transients, spam comments, and unused plugin data. Cleaning this up reduces query overhead and can improve backend and frontend performance.
Clean up safely with a plugin
- Back up your database using your host or a backup plugin.
- Install a database cleanup plugin like WP-Optimize or Advanced Database Cleaner.
- In the plugin settings, select safe items such as post revisions, trashed posts, spam comments, and expired transients.
- Run a cleanup, then verify that your site still behaves as expected.
Optimize via WP-CLI (advanced)
If you’re comfortable with the command line, you can optimize tables directly.
wp db optimizeRun this command in your server’s SSH terminal with WP-CLI installed and pointed at your WordPress root. It will run the OPTIMIZE TABLE command on your database tables.
Step 7: Use a CDN for Global Visitors
A Content Delivery Network (CDN) caches your static files (images, CSS, JS) on servers around the world. Visitors load these assets from a location near them, which significantly reduces latency.
To walk through a full configuration, you can follow our WordPress CDN setup guide. Here’s the quick version:
- Sign up with a CDN provider (for example, Cloudflare, BunnyCDN, or a host-integrated CDN).
- Add your domain to the CDN and follow their instructions to update DNS or connect via a plugin.
- In WordPress, install the CDN provider’s plugin or configure CDN settings in your caching plugin.
- Ensure that images, CSS, and JS are served from the CDN URL (check via DevTools or your speed testing tools).
- Test your site from different locations using tools like GTmetrix or WebPageTest to confirm faster global load times.
Step 8: Fix Mobile and Core Web Vitals Issues
Google primarily indexes the mobile version of your site. A WordPress site that feels fine on desktop can still fail Core Web Vitals on mobile screens.
Tune your theme and layout
- Reduce or remove heavy sliders, autoplay videos, and large hero images on mobile.
- For Jannah theme layouts, limit the number of blocks and widgets above the fold on your homepage.
- Use Appearance > Customize or your theme options to disable non-essential elements on smaller screens.
- Keep your typography readable without forcing users to zoom or scroll horizontally.
Use Core Web Vitals reports
- Open your Core Web Vitals report in Search Console and identify URLs with poor LCP or CLS.
- Match these URLs to specific templates (single post, category archive, homepage) and optimize those templates first.
- Re-test after each round of changes and wait for field data to update before declaring victory.
Step 9: Create an Ongoing WordPress Speed Maintenance Routine
Speed optimization is not a one-time task. New plugins, themes, and content can slowly drag performance down again. A simple recurring checklist keeps your site fast.
- Monthly: run speed tests on your homepage and top 3–5 landing pages.
- Monthly: audit plugins and remove anything unused or duplicated in functionality.
- Quarterly: run a database cleanup and check for oversized images on recent posts.
- Before each redesign: measure current performance so you can compare before/after results.
Keep Your WordPress Site Fast Over the Long Term
Speeding up WordPress isn’t about a single magic plugin. It’s the combination of fast hosting, solid caching, lightweight images, optimized CSS/JS, and a regular maintenance routine that keeps your site lean.
By working through the steps in this guide, you’ve built a performance foundation that supports better SEO, higher conversions, and a smoother experience for your visitors. Revisit your tests regularly, refine your setup as your site grows, and treat performance as an ongoing part of your WordPress workflow.
Further Reading
- WordPress Speed Optimization Step by Step
- Fast WordPress Hosting
- Caching Plugin Comparisons for WordPress Performance
- WordPress Speed Test Checklist
- Redis Object Cache for WordPress: Beginner Guide