How to Install WordPress (Step by Step)
Launch your site quickly with a clean, safe setup
If you want to install WordPress and launch your first website, this step by step guide will show you exactly what to do. Instead of guessing what your host expects or which button to click, you follow a clear process that works on almost any standard hosting plan.
This step by step guide walks you through choosing hosting, preparing your domain, creating a database, uploading the files, and running the installer. By the end, you will understand each part of the process so you can repeat it, fix common errors, and feel in control of your WordPress installation.
Quick Steps to Install WordPress on Your Hosting
You can install WordPress in a few clear stages. First, you prepare your hosting and domain. Next, you create a database, upload the WordPress files, and run the built in installer. Finally, you log in to the dashboard, change core settings, and secure your new site.
What Are the Core Steps to Install WordPress?
The core steps are always the same, no matter which host you use. You secure a domain and hosting, create a MySQL database, upload the WordPress files, and start the installer in your browser. Then you choose a username, a strong password, and basic settings before logging in to your dashboard.
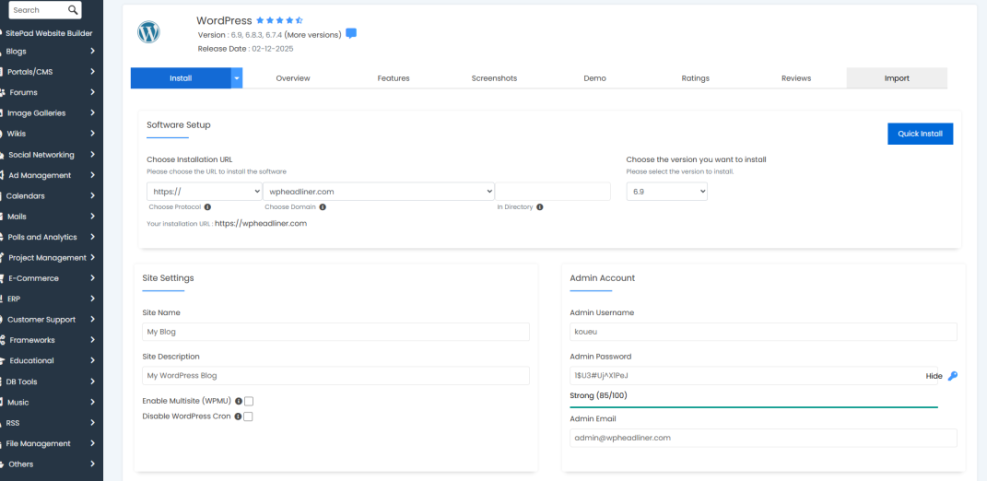
Manual WordPress Installation vs. One-Click Installers
Most hosts offer both a manual installation and a one click installer through tools like Softaculous. Manual installation gives you more control and teaches you how WordPress works. Auto installers are faster but can add extra plugins or set odd defaults, which you may later need to clean up.
Before you go deeper into each section, it helps to compare the main installation options side by side.
| Method | Best For | Main Notes |
|---|---|---|
| Manual Install | Control and learning | More steps, but clear control over files and database. |
| One Click Installer | Speed | Very fast, sometimes adds extra themes or plugins. |
| Managed WordPress Hosting | Hands off setup | Host often preinstalls WordPress and handles updates. |
This table helps you decide quickly whether you want to learn the manual process now or rely on your host’s tools and come back to manual installation later.
- Domain name registered and pointing to your hosting
- Shared, VPS, or managed hosting account with a control panel
- Login details for your hosting control panel and FTP
- Latest WordPress package downloaded from WordPress.org
This quick checklist keeps you organized so you do not stop halfway through the installation because a login or file is missing.
Preparing Your Hosting and Domain to Install WordPress
Before you install anything, you need a place for WordPress to live. That means a hosting account that supports PHP and MySQL, and a domain that points to that hosting. Most budget friendly shared hosting plans already meet the official WordPress requirements.
Choose Reliable WordPress Hosting Before You Install WordPress
Start by picking a host that supports automatic backups, SSL certificates, and current PHP versions. Shared hosting works for most new sites, while managed WordPress hosting trades some flexibility for convenience. In addition, look for clear support channels so you can get help if your installation shows errors.
How Much Does WordPress Hosting Cost to Set Up WordPress?
Most shared hosting plans that run WordPress cost around $5–15 per month when billed yearly. Managed WordPress hosting usually costs more but includes features like automatic updates and staging. Because your site is your home on the web, it makes sense to choose reliability over the absolute lowest price.
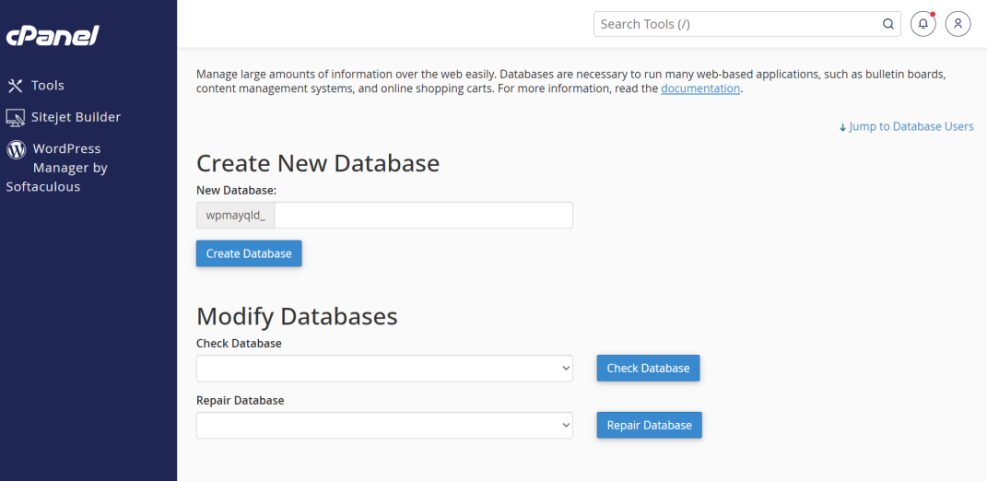
Creating the Database and User for Your WordPress Installation
WordPress stores posts, pages, settings, and user accounts in a MySQL or MariaDB database. Therefore, you need to create a database, a database user, and a secure password before your installer can connect. Most cPanel style hosts make this part straightforward.
Create a Database in cPanel for Your WordPress Install
- Log in to your hosting control panel.
- Open the MySQL Databases or MySQL Database Wizard tool.
- Create a new database with a short, clear name.
- Create a new database user with a strong password.
- Assign the user to the database with ALL PRIVILEGES enabled.
This process gives WordPress full permission to create and update tables inside your database without touching other databases on the same server.
Key Database Details to Note for WordPress Installation
Write down the database name, database username, and password in a safe place so you can copy them into the installer. In most shared hosting setups, the database host is simply “localhost.” You can also keep the default table prefix, or change it if you prefer more customized table names.
Uploading WordPress Files Safely for a Clean WordPress Install
Once the database is ready, you upload the WordPress core files to your hosting account. You can either use your host’s file manager or an FTP client that connects to the server. The goal is the same in both cases: place WordPress in the folder your domain loads.
Use the Hosting File Manager to Upload WordPress
- Download the latest WordPress.zip from the WordPress.org download page.
- Open your hosting control panel and start the File Manager.
- Navigate to the public_html folder or the document root for your domain.
- Upload the WordPress.zip file to that folder.
- Use the Extract option to unpack all files into the folder.
After extraction, you may see a wordpress folder. You can move its contents up one level if you want WordPress to load directly at your domain instead of at a subfolder.

Upload WordPress Files with an FTP Client
- Install an FTP client such as FileZilla.
- Connect using your FTP host, username, password, and port from your hosting panel.
- On your computer, unzip the WordPress package you downloaded.
- In the FTP client, open the public_html or domain root folder.
- Upload all files and folders from the local wordpress directory to the server.
This method is slower but very flexible, and it works even when the web based file manager is limited or times out during large uploads.
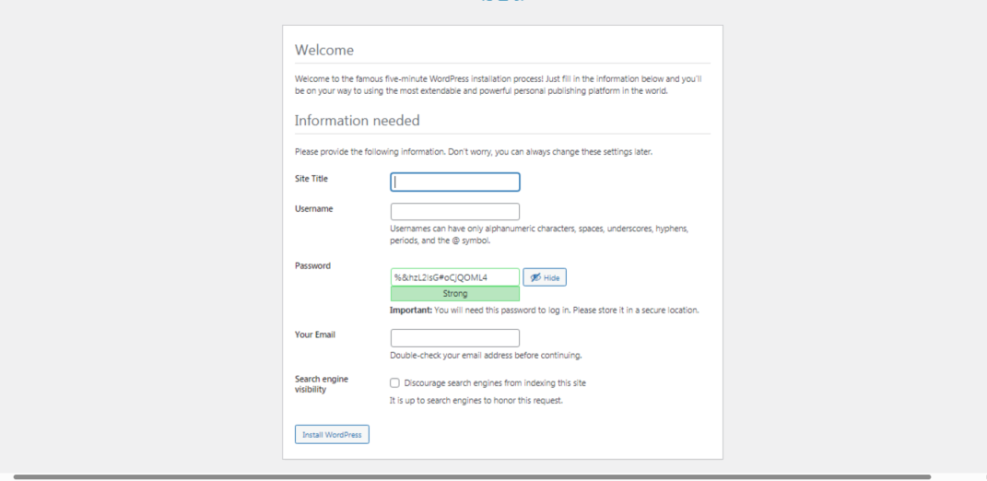
Running the WordPress Installer to Finish the Setup
After the files and database are ready, you connect everything through the installer. Open your domain in a browser. If WordPress is in the correct folder, you will see the setup screen that guides you through language choice, database details, and your new admin account.
Enter Database Connection Settings in the WordPress Installer
- Choose your language and continue to the database setup screen.
- Enter the database name, database username, and password you created.
- Confirm the database host, usually “localhost,” unless your host says otherwise.
- Keep the table prefix as wp_ or change it if you prefer.
- Run the connection test and continue if no error appears.
If you see a database connection error, double check each field carefully. Sometimes a tiny typo in the username or a missing character in the password prevents WordPress from creating its tables.
Create Your Admin User Account After You Install WordPress
- On the next screen, enter your site title.
- Choose a unique admin username that is not “admin.”
- Generate a strong password and store it in a password manager.
- Provide a valid email address for password resets and alerts.
- Decide whether to discourage search engines until your site is ready.
Use a strong admin password and a non obvious username to reduce the risk of automated login attempts. Later, you can follow a detailed Beginner WordPress security best practices guide to harden your site further.
Essential Settings After You Install WordPress
When the installer finishes, you can log in to your new WordPress dashboard. Now you tune basic settings so your site loads cleanly, looks trustworthy, and stays easier to manage. Small changes here save a lot of time later.
Set Clean SEO Friendly Permalinks in Your New WordPress Install
From your dashboard, go to Settings > Permalinks and choose the Post name option. This structure uses readable URLs that include your page or post title. Search engines and visitors both understand these links better than numeric or dated URLs, and it is hard to change them later without redirects.
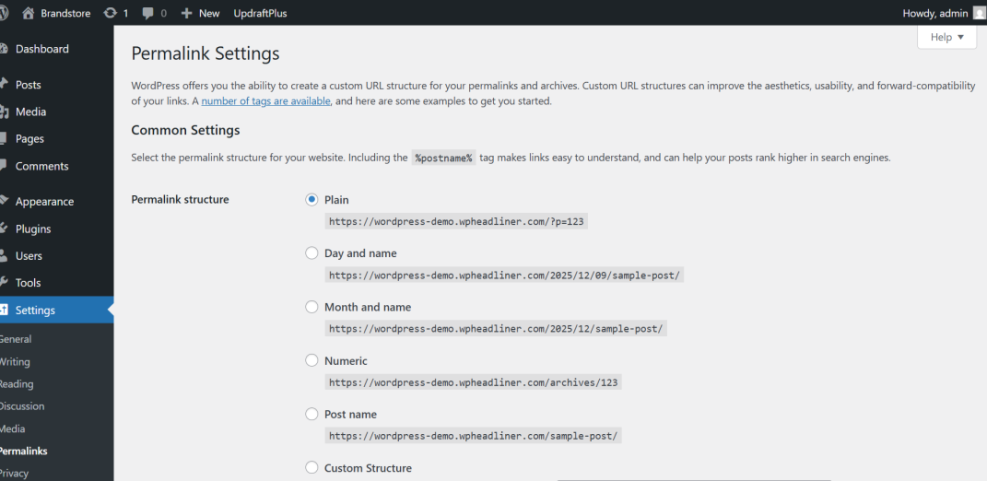
Configure your WordPress site’s URL structure on the Permalink Settings page for better SEO and user experience.
Configure General Site Settings After Installing WordPress
Next, open Settings > General and confirm your site title, tagline, and administration email. Set the correct time zone and date format so scheduled posts go live when you expect. You can also update your site language if needed, which helps matching plugins and themes to local settings.
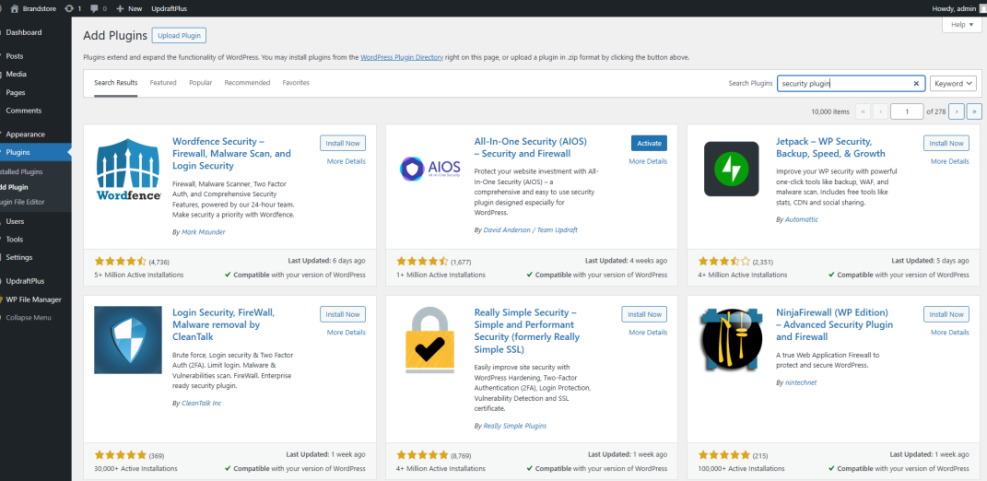
Install Basic Security and Backup Plugins on Your Fresh WordPress Site
After core settings, add at least one security plugin and one backup plugin. A backup tool lets you save your site to cloud storage on a schedule, and a security plugin can block brute force logins and scan for malware. You can later follow a deeper Beginner guide to WordPress speed optimization for more advanced strategies.
Troubleshooting Common WordPress Installation Errors
Even a careful installation can run into errors, especially on crowded shared servers. Fortunately, most common problems follow a few simple patterns. When you know where to look, you can fix them quickly or hand the right details to your hosting support team.
What If You See a Database Error During WordPress Installation?
A message that says “Error establishing a database connection” usually means WordPress cannot log in to your database. Check the database name, username, password, and host in wp-config.php. If they are correct, confirm through your hosting panel that the user still has full privileges on the database.
How Do You Fix 500 Errors After a WordPress Install?
A 500 Internal Server Error often comes from a bad .htaccess file or a PHP limit problem. You can temporarily rename .htaccess and try loading the site again. If that works, let WordPress rebuild it from Settings > Permalinks. Otherwise, ask your host to review your PHP error logs.
When Should You Contact Hosting Support About WordPress Installation Issues?
If you followed the steps carefully and still cannot complete the installer, it is time to contact support. Share the exact error message, the steps you took, and the time the error appeared. That context helps support staff find server side issues faster and adjust settings safely for you.
Install WordPress Conclusion and Next Steps
Once you install WordPress manually a few times, the process feels simple and repeatable. You start to understand how your files, database, and domain work together.
With that knowledge, you can move hosts or clone sites with far more confidence. Then you can focus on choosing a theme, adding content, and following a Beginner guide to WordPress speed optimization plan so visitors enjoy a fast, secure website.
More WordPress Guides to Help You After Installation
After your first successful installation, you may want deeper, topic specific guides. The following planned articles will help you grow and protect your site as it gains more visitors and content.
- How to choose the best WordPress hosting
- WordPress security complete overview
- How to speed up a WordPress site
- Developer hooks for optimizing WordPress plugins with code
- Step by Step WooCommerce Store Setup
Use these resources as a roadmap so you improve performance, tighten security, and build a feature rich site without losing the simple structure you created during the installation.