How to Use WordPress to Make a Website
A beginner-friendly, click-by-click guide to building your first WordPress website without code.

Want a professional website but not excited about learning to code? WordPress makes it possible to build a full website with pages, menus, and contact forms using a visual interface inside your browser.
This guide walks you through how to use WordPress itself to make a website, step by step. We’ll assume WordPress is already installed and focus on what happens next: logging in, choosing a theme (like Jannah), creating pages with the Classic Editor, and getting everything ready for visitors.
If you’re still not sure what WordPress is, you can first review what WordPress actually is, then come back here to build your site.
Prerequisites
Before you start using WordPress to make a website, make sure you have a few basics ready. You do not need any coding knowledge, but you do need access to a working WordPress install.
- A registered domain name (for example,
yourbusiness.com). - A WordPress-ready hosting account with WordPress installed.
- Your WordPress admin login URL, username, and password.
- Optional but recommended: the Classic Editor plugin if you prefer a simpler editing experience.
- Optional: the Jannah theme (installed or ready to upload) if you want a flexible, magazine-style layout.
- Some basic content ideas: a short business description, services list, and contact details.
If WordPress is not yet installed on your server, you can follow your host’s one-click installer or use the detailed step-by-step WordPress installation guide before continuing.
Step 1: Log In to Your WordPress Dashboard
Everything you build in WordPress starts from the dashboard. This is your control center where you manage pages, themes, plugins, and settings.
- Open your browser and go to your login URL, usually
https://yourdomain.com/wp-adminorhttps://yourdomain.com/wp-login.php. - Enter your Username or Email Address and Password.
- Click Log In. You should see the WordPress Dashboard with a left-hand menu (Posts, Media, Pages, Appearance, Plugins, etc.).
Checkpoint: You’re logged in if you can see the black admin bar at the top of the site and the main menu on the left.
/wp-admin.Step 2: Configure Your Basic Site Settings
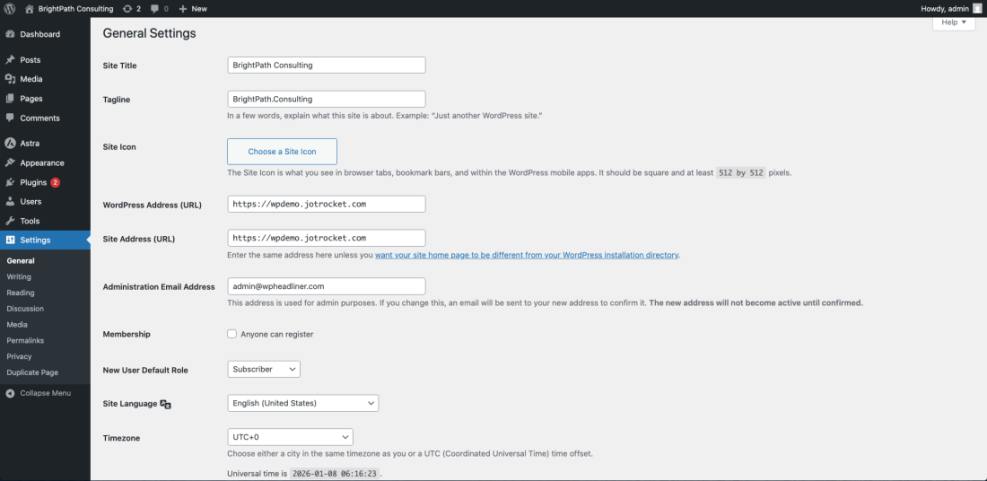
Before you design anything, tell WordPress the correct name, URL, and basic behavior of your website. These settings affect how your site appears to visitors and search engines.
- In the left-hand menu, go to Settings → General.
- Set Site Title (e.g., “BrightPath Consulting”) and Tagline (a short description, or leave blank).
- Confirm your WordPress Address (URL) and Site Address (URL) match your final domain.
- Choose your Timezone, Date Format, and Time Format.
- Click Save Changes.
Next, set how your homepage behaves:
- Go to Settings → Reading.
- Under Your homepage displays, choose:
- A static page – best for business/portfolio sites.
- Your latest posts – best for a blog-style homepage.
- Leave the default for now; you’ll pick the actual homepage in Step 4.
- Click Save Changes.
Finally, configure your URLs (permalinks):
- Go to Settings → Permalinks.
- Select Post name for cleaner URLs like
/about/instead of?p=123. - Click Save Changes.
Step 3: Choose and Configure Your Theme
Your WordPress theme controls the visual design of your website: colors, typography, layout, and sometimes extra features. For Jannah theme users, you’ll get powerful layout options and ready-made demos.
- Go to Appearance → Themes in the left-hand menu.
- To use Jannah:
- Click Add New, then Upload Theme if you have a ZIP file.
- Click Choose File, select the Jannah ZIP, then click Install Now.
- After installation, click Activate.
- To use a free theme instead:
- In Appearance → Themes, click Add New.
- Use the search box or filters (Popular, Latest, Feature Filter) to find a theme.
- Hover over a theme and click Install, then Activate.
- Click Customize under the active theme to open the Customizer.
- Adjust basic options: logo, site title, colors, typography, and layout choices.
Checkpoint: Visit your homepage in a new tab. You should see the new theme applied, even if the content is still default.
Step 4: Create the Core Pages for Your Site
A typical WordPress website has a handful of “static” pages (Home, About, Services, Contact) that tell visitors who you are and how to work with you. Pages are different from posts: they’re not tied to dates or blog categories.
If you prefer a simple writing experience, install the Classic Editor before creating pages:
- Go to Plugins → Add New.
- Search for Classic Editor.
- Click Install Now, then Activate.
Now create your key pages:
- Go to Pages → Add New.
- Enter a Title such as “Home” or “About”.
- In the editor, add your content:
- For Home: a short headline, a one–two sentence summary, and main call-to-action.
- For About: who you are, what you do, and why visitors should trust you.
- For Services: list what you offer and include brief descriptions.
- For Contact: contact form, email, phone, and location if relevant.
- On the right side, set a Featured Image if your theme uses it for page headers.
- Click Publish (or Save Draft if you’re still writing).
Checkpoint: Go to Pages → All Pages and confirm you have at least Home, About, Services (or equivalent), and Contact created.
Step 5: Build Your Navigation Menu
Your navigation menu helps visitors move around your website. A confusing menu is one of the fastest ways to lose people.
- Go to Appearance → Menus.
- If this is your first menu, enter a Menu Name like “Main Menu” and click Create Menu.
- Under Add menu items, check the pages you created (Home, About, Services, Contact) and click Add to Menu.
- Drag and drop items to reorder them. Put Home first.
- Under Menu Settings or Display location, check the location that corresponds to your main header (often “Primary Menu” or “Main Navigation”).
- Click Save Menu.
Checkpoint: Visit your site’s frontend. You should see your new menu in the header, with links to your main pages.
Step 6: Add Essential Plugins
Plugins extend what WordPress can do without requiring custom code. Start with the essentials, then add more only when you have a clear need.
- Go to Plugins → Add New.
- Use the search box to find plugins you need.
- Click Install Now, then Activate for each plugin.
For a new WordPress website, consider these plugin types:
- Contact form plugin – to add a form to your Contact page.
- SEO plugin – to manage meta titles, descriptions, and sitemaps.
- Caching plugin – to speed up your site for visitors.
- Backup plugin – to create automatic backups of your site.
- Security plugin – to protect against common attacks.
Checkpoint: Go to Plugins → Installed Plugins and ensure only the plugins you truly need are active.
Step 7: Test and Launch Your WordPress Website
With pages, menus, theme, and key plugins in place, it’s time to test everything before you send real traffic to your site.
- Test your pages: Visit Home, About, Services, and Contact. Check for typos, broken images, and layout issues.
- Test your forms: Submit your contact form and confirm the email reaches your inbox.
- Test on mobile: View your site on a phone or use your browser’s responsive preview tools.
- Check your homepage setting:
- Go to Settings → Reading.
- Set Your homepage displays to A static page.
- Choose your new “Home” page as Homepage and, if you have a blog, select a Posts page.
- Click Save Changes.
- Turn off maintenance/coming soon mode if you enabled it earlier (often in a plugin or theme setting).
Checkpoint: Your site should now be fully visible to the public, with a working homepage, clear navigation, and a way for visitors to contact you.
From First Login to Finished Website
By now, you’ve logged into WordPress, configured core settings, activated a theme (such as Jannah), created your main pages using the Classic Editor, built a clean navigation menu, and installed essential plugins.
You have a solid, professional WordPress website that you can continue to refine over time. As you get more comfortable, you can experiment with additional page layouts, blog posts, and advanced features like e-commerce, memberships, or online courses.
The key is to keep your site fast, simple, and focused on what your visitors need. WordPress gives you the tools; now you know how to use them to build something real.
Further Reading
- Make a WordPress Website for Beginners
- How to Choose a WordPress Theme
- Beginner Guide to WordPress Menus and Navigation
- WordPress Speed Optimization Step by Step
- WordPress Security Complete Overview