Using a CDN in WordPress is one of the easiest ways to speed up your website for visitors around the world. Instead of forcing every user to download your images, CSS, and JavaScript from a single server, a CDN copies them to edge locations closer to your audience.
In this tutorial you will choose a CDN provider, connect it to your domain, integrate it with a WordPress caching or performance plugin, and confirm that your static files are really loading from the CDN without breaking logins, carts, or other dynamic pages.
What You Need to Start
- A working WordPress site with administrator access.
- Access to your domain DNS settings at your registrar or hosting control panel.
- A reliable backup plugin and at least one recent full site backup.
- Login details for your hosting control panel if you need to view DNS or SSL settings.
- Basic familiarity with installing and configuring WordPress plugins.
- Optional but recommended a staging site where you can test CDN settings safely before changing your live site.
Step 1: Choose a CDN Provider
Before you can use a CDN in WordPress, you must decide which provider will serve your static files. Most small sites use either a full proxy CDN that sits in front of the whole site or a pull zone CDN that serves only static files from a special CDN hostname.
- List your main needs such as free plan, global coverage, HTTP/2 or HTTP/3 support, and easy WordPress integration.
- Compare at least two providers and check their documentation for WordPress compatibility.
- Create a new account with your chosen CDN provider using a strong password.
- In the CDN dashboard create a new Site, Zone, or Pull Zone and set the Origin URL to your WordPress site address.
Confirm that the CDN now shows your WordPress domain as the origin and that the zone status is active or online before moving on.
Step 2: Create a CDN Subdomain in DNS
Most WordPress friendly CDNs let you use a custom subdomain such as cdn.yoursite.com so your branding stays consistent. You create this with a CNAME record in your DNS settings that points to the CDN hostname given in Step 1.
- Log in to your domain registrar or hosting control panel.
- Open the DNS or Zone Editor section for your domain.
- Click Add Record and choose a CNAME record type.
- Set the Name or Host to cdn (or another short label you prefer).
- Paste the CDN hostname from your provider into the Target or Points to field.
- Save the record and note that DNS changes may take a few minutes to propagate.
Save your DNS changes and wait a few minutes for the CNAME to become active.
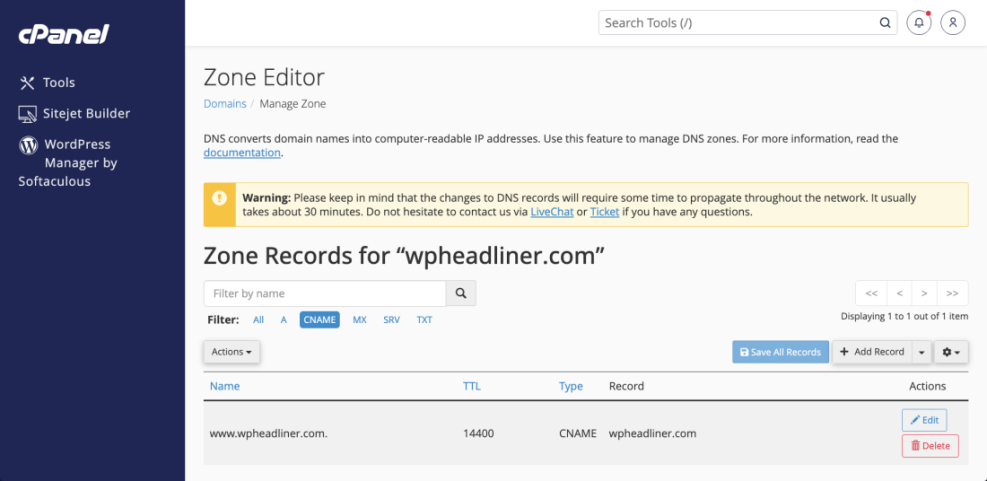
To verify success, open a browser and visit https://cdn.yoursite.com. You should see either a simple CDN test page or a directory listing and no SSL warnings.
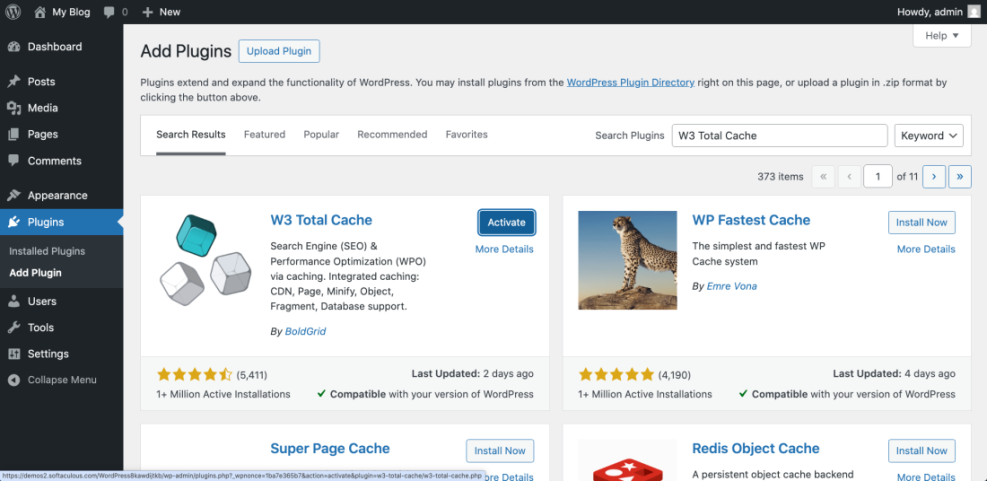
Step 3: Install a Caching or CDN Plugin in WordPress
Your WordPress site needs a way to rewrite static file URLs to use the new CDN subdomain. The easiest method is to install a caching or performance plugin that supports CDN integration.
- Log in to your WordPress dashboard as an administrator.
- Navigate to Plugins » Add New.
- In the search field type the name of your preferred caching plugin for example W3 Total Cache or WP Super Cache.
- Click Install Now on your chosen plugin, then click Activate.
After activation navigate to the plugin settings screen from Settings or Performance in the sidebar depending on the plugin.
Confirm that the plugin adds a new settings page and that you can see sections for Cache, CDN, or Performance.
If you want to review performance options in more depth, combine this guide with the WordPress seo complete beginners guide and the Beginner guide to WordPress speed optimization.
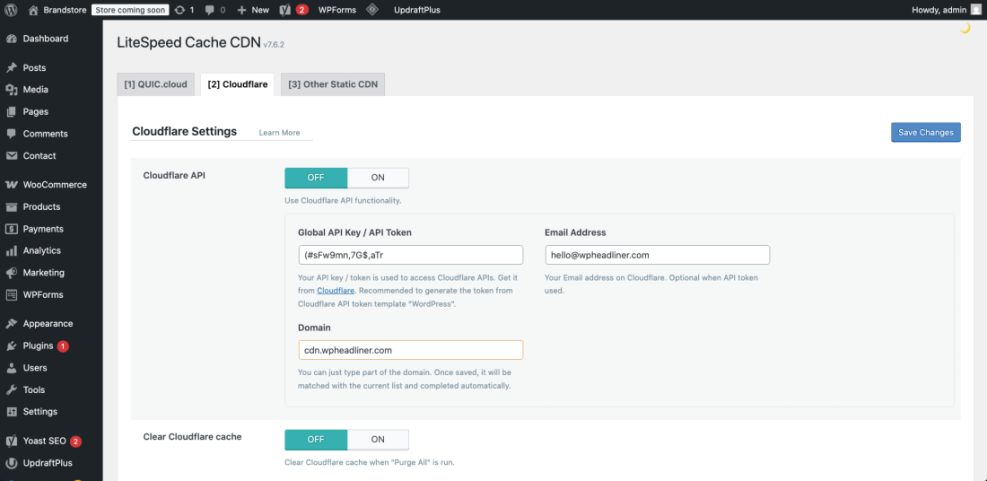
Step 4: Configure CDN URLs in the Plugin
Now you will tell the plugin which CDN hostname to use for images, CSS, JavaScript, and other static assets. This is where the cdn.yoursite.com CNAME you created becomes useful.
- Open the caching or performance plugin settings page from your WordPress dashboard.
- Find the CDN, Content Delivery Network, or Static Files section.
- Enable the CDN feature by checking Enable CDN or a similar option.
- In the CDN URL or Hostname field enter https://cdn.yoursite.com.
- Select which file types should use the CDN such as Images, CSS, JavaScript, and Theme Files.
- Save or Update Settings at the bottom of the page.
Click Save Settings or Save All Settings in your plugin to apply the CDN configuration.
Visit any page on your site, view the page source, and confirm that image URLs and CSS or JS files now start with https://cdn.yoursite.com instead of your main domain.
Step 5: Test That the CDN in WordPress Is Working
After enabling the CDN in your plugin, you must verify that files are actually being served from the CDN edge servers and not still from your origin. Proper testing helps you catch mixed content errors or broken links early.
- Clear your site cache using the plugin button such as Purge All Caches or Clear Cache.
- Open a private or incognito browser window and visit your homepage.
- Right click anywhere on the page and click Inspect, then open the Network tab.
- Refresh the page and filter the list by Img or JS to see image or script requests.
- Check the Domain or Name column and confirm that static files are loading from cdn.yoursite.com.
Use your browser developer tools to watch static file requests while you reload the page.
Finally run a speed test from a remote location and confirm that your first byte time and overall load time have improved compared to running without the CDN.
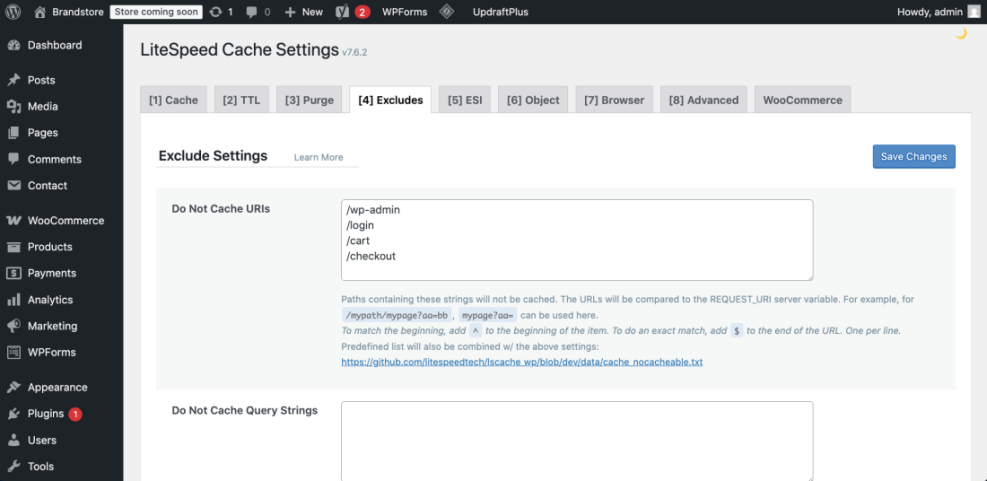
Step 6: Exclude Dynamic Pages from CDN Caching
WordPress pages that change per user such as carts, checkouts, dashboards, or membership content should never be served from a cached CDN copy. You must explicitly exclude these paths to avoid login issues and stale content.
- Open your caching plugin settings and go to the Exclude, Do Not Cache, or Advanced tab.
- Add URL patterns such as /wp-admin/* and /wp-login.php to the excluded list.
- For ecommerce or membership sites also exclude /cart/*, /checkout/*, and /my-account/* or the equivalent page slugs.
- Save your exclusion rules and clear the cache again.
Update the exclusion list and then save or apply the caching rules in your plugin.
If your plugin or host supports custom code, you can also add a safeguard that sends no cache headers on sensitive pages.
add_action( 'template_redirect', function () {
    if ( is_user_logged_in() || is_cart() || is_checkout() ) {
        nocache_headers();
    }
} );
Revisit your cart, checkout, and account pages while logged in and confirm that URLs still use your main domain and that actions like adding to cart work correctly.
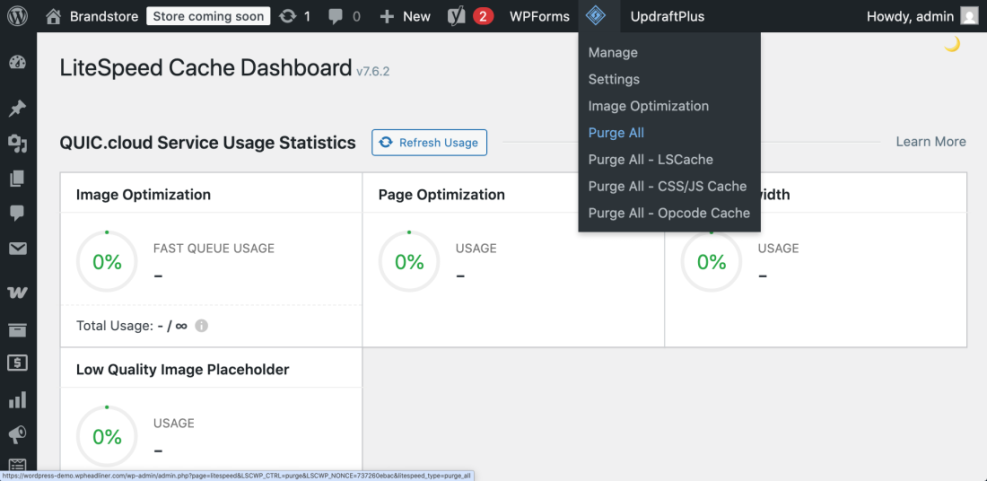
Step 7: Keep CDN and WordPress Cache in Sync
Once your CDN in WordPress is live, you must maintain it. When you change themes, update CSS or JavaScript, or move images, you should clear both your WordPress cache and the CDN cache so visitors always see the latest version.
- After major design or layout changes, click Purge All Caches in your caching plugin.
- Log in to your CDN dashboard and open the Cache or Purge section.
- Use Purge All or purge specific paths that you recently changed.
- In the CDN settings set a reasonable TTL such as a few hours for static assets so they refresh regularly.
- Periodically review CDN analytics for errors, high origin pulls, or slow regions.
Use the purge or clear buttons in both WordPress and your CDN panel whenever you deploy big changes.
Verify that new styles and scripts appear correctly on a private browser session and from a different device to ensure your changes propagated throughout the CDN.
Conclusion You Are Ready to Go
You have now learned how to use CDN in WordPress from start to finish. You chose a provider, created a custom CDN subdomain, installed a compatible caching plugin, configured CDN URLs, tested that files load from the edge network, and protected dynamic pages from being cached.
From here you can fine tune cache lifetimes, explore image compression, and combine your CDN with broader optimization so your WordPress site stays fast and stable even as traffic grows.
Further Reading
- Beginner guide to WordPress speed optimization
- WordPress cdn blog setup
- WordPress migration checklist for blogs
- How to protect your WordPress admin area using
- WordPress speed optimization step by step