How to Start WordPress Blog
A step-by-step beginner’s guide to launching your first WordPress blog
Starting a WordPress blog can feel overwhelming at first. There are new terms, technical steps, and a lot of conflicting advice about hosting, themes, and plugins. The good news is that you can get a professional-looking WordPress blog online without knowing how to code.
In this guide, you will go from “no website” to a fully working WordPress blog: you will clarify your blog idea, choose a domain and hosting, install WordPress, configure important settings, pick a theme, add essential plugins, and publish your first post. If you are not yet sure what WordPress actually is, you may want to quickly review what WordPress is and how it works before you start.
This tutorial focuses on self-hosted WordPress.org, which gives you full control over your blog, your domain name, and your ability to grow and monetize over time.
Prerequisites
Before you dive into the technical steps, it helps to have a few basics ready. You do not need any programming experience, but you should prepare the following:
- A clear idea of your blog’s topic (for example: travel, tech tutorials, parenting, food, or personal finance).
- 30–60 minutes of focused time to work through this guide.
- A payment method (credit/debit card or PayPal) for your domain name and hosting plan.
- An email address you check regularly for account verifications and WordPress notifications.
Step 1: Define Your Blog’s Niche and Goals
Many new bloggers skip straight to design and plugins. However, deciding what your blog is about and who it is for will make every later decision easier, from your domain name to your content strategy.
- Choose a niche: Write down 3–5 topics you enjoy and know something about. Narrow this down to one main focus so readers clearly understand what your blog is about.
- Identify your ideal reader: Ask yourself who you are writing for (age, interests, problems). This helps you choose the right tone and topics.
- Clarify your goals: Decide if your main goal is to build a portfolio, earn ad/affiliate income, promote a business, or simply share your ideas.
- Brainstorm 10–20 post ideas: List specific article titles you could write. If you struggle to reach 10 ideas, your niche may be too narrow or not interesting enough to you.
Step 2: Choose a Domain Name and Hosting
Your domain name is your blog’s address on the web (for example, yourblogname.com), and your hosting is the server where your WordPress blog lives. Choosing them carefully is important because changing them later can be painful.
Pick a blog-friendly domain name
- Keep it short, easy to spell, and easy to remember.
- Avoid numbers, hyphens, and unusual spellings where possible.
- Choose a .com extension if available, or a relevant alternative like .blog if not.
- Make sure it doesn’t conflict with existing brands or trademarks.
Choose reliable WordPress hosting
Look for hosting providers that mention WordPress specifically. At a minimum, your hosting plan should include:
- One-click WordPress installation.
- SSL certificate support (for https:// and the padlock icon).
- Good uptime and performance.
- Basic security features and regular backups.
- Responsive customer support.
For help comparing providers and features, see this detailed guide on how to choose WordPress hosting before you buy anything.
Register your domain and hosting
- Visit your chosen hosting provider’s website.
- Select a basic shared or managed WordPress plan suitable for beginners.
- Enter your chosen domain name when prompted and check availability.
- Fill in your personal and payment details and complete your order.
- Check your email for login details to your hosting control panel.
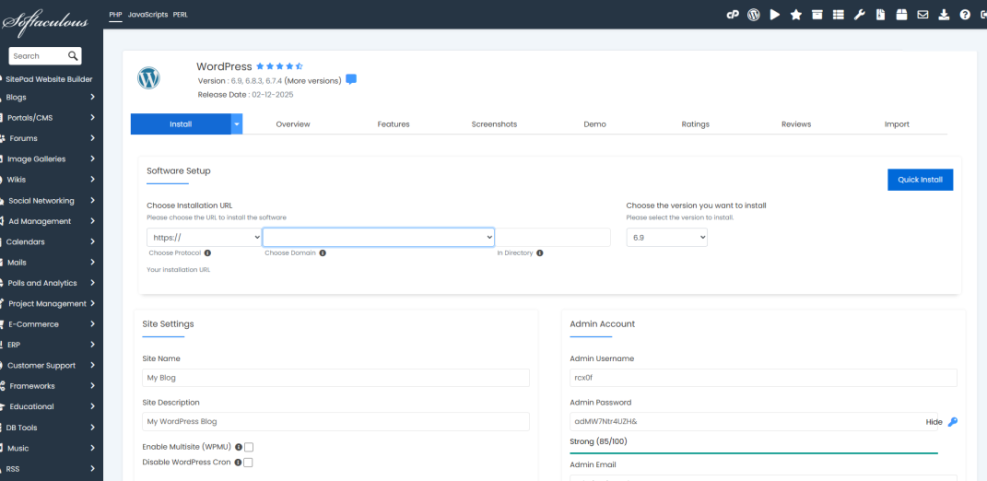
Step 3: Install WordPress on Your Hosting Account
Most hosting providers include a one-click installer that makes WordPress setup simple, even for complete beginners. You’ll use this to install the core files and create your initial admin account.
- Log in to your hosting control panel (often called cPanel, Plesk, or a custom dashboard).
- Look for an option like WordPress, WordPress Installer, or Softaculous Apps Installer.
- Click Install or Set Up under the WordPress icon.
- Select your domain from the dropdown (for example, yourblogname.com).
- Fill in basic details:
- Site Name: Your blog’s name.
- Site Description: A short tagline for your blog.
- Admin Username: Avoid “admin” — choose something unique.
- Admin Password: Use a strong, unique password.
- Admin Email: Use an address you check regularly.
- Click Install and wait for the installer to finish.
When the installation completes, you’ll see a success message with your new WordPress admin URL, usually https://yourblogname.com/wp-admin/. Bookmark this link—you’ll use it every time you log in.
Step 4: Configure Essential WordPress Settings
After installing WordPress, you should adjust a few default settings before you start publishing. This will help with usability, SEO, and avoiding common beginner mistakes.
Log in to your WordPress dashboard
- Go to https://yourblogname.com/wp-admin/ in your browser.
- Enter the admin username and password you created during installation.
- You’ll see the WordPress Dashboard with a left-hand menu.
Set your site title, tagline, and timezone
- In the left menu, go to Settings → General.
- Update the Site Title and Tagline to match your blog brand.
- Check your WordPress Address (URL) and Site Address (URL) are using https:// if SSL is installed.
- Set your Timezone to your local time so scheduled posts publish correctly.
- Click Save Changes.
Use SEO-friendly permalinks
- Go to Settings → Permalinks.
- Select the Post name option (for example, https://yourblogname.com/my-first-post/).
- Click Save Changes.
Configure discussion and reading settings
- Go to Settings → Discussion to control comments:
- Decide whether to allow comments on new posts by default.
- Enable moderation so you must approve comments before they appear.
- Go to Settings → Reading:
- Choose whether your homepage shows your latest posts or a static page (you can change this after creating pages).
- Set how many posts display on blog and feed pages.
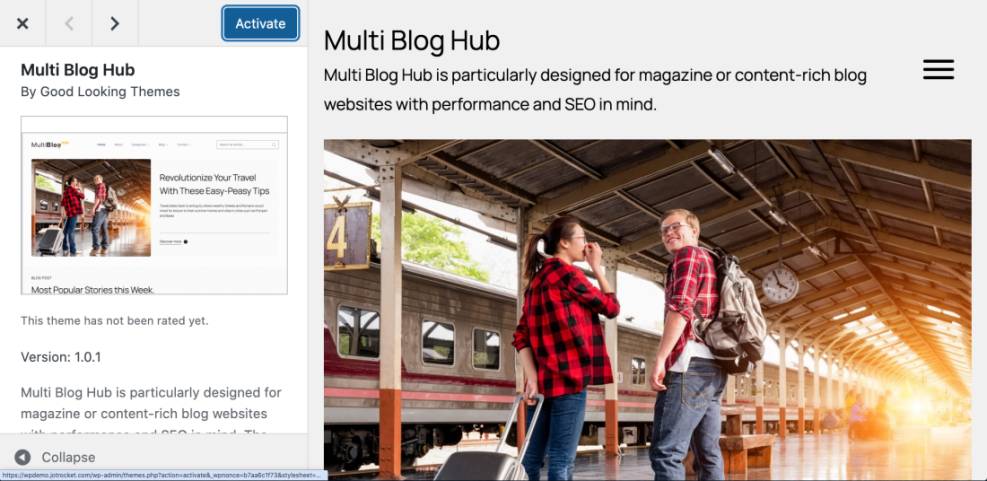
Step 5: Choose and Customize a Blog Theme
Your theme controls how your WordPress blog looks—layout, fonts, colors, and more. You can start with a free theme and upgrade later if needed.
Install a theme
- In the dashboard, go to Appearance → Themes.
- Click Add New to browse the theme directory.
- Use the Feature Filter or search box to look for “blog” themes.
- Hover over a theme to Preview it, and click Install when you find one you like.
- Click Activate to make it live on your site.
Customize your theme
- Go to Appearance → Customize to open the WordPress Customizer.
- Update your Site Identity (logo, site title, tagline, and site icon).
- Adjust Colors and Typography to match your brand (keep it simple and readable).
- Configure Header and Menu settings so visitors can navigate your main pages.
- Set your Blog/Archive Layout if your theme offers options like list vs grid.
Step 6: Install Essential Blogging Plugins
Plugins extend WordPress with extra features. For a new blog, you only need a few essential plugins to keep your site fast and easy to manage.
How to install a plugin
- In the dashboard, go to Plugins → Add New.
- Search for the plugin name or feature you need (for example, “SEO,” “contact form,” or “backup”).
- Click Install Now next to the plugin, then click Activate.
Recommended plugin types for new blogs
- SEO plugin: Helps you optimize titles, meta descriptions, and content for search engines.
- Backup plugin: Creates regular backups so you can restore your site if something goes wrong.
- Caching/performance plugin: Speeds up your blog by serving cached pages.
- Security plugin: Blocks common attacks and helps harden your site.
- Contact form plugin: Lets visitors contact you without exposing your email address.
For example, once you install an SEO plugin, follow a detailed setup tutorial like the Yoast SEO setup guide so your WordPress blog is ready to be found in search engines.
Step 7: Create Your First Pages and Blog Post
With your design and plugins in place, it’s time to add content. Start with a few key pages and then publish your first blog post so your site doesn’t look empty.
Create essential pages
- About page:
- Go to Pages → Add New.
- Enter a title like “About” or “About Me.”
- Write a short story about who you are, what your blog is about, and what readers can expect.
- Click Publish.
- Contact page:
- Create a new page called “Contact.”
- Use your contact form plugin to insert a form into the page.
- Add a short paragraph explaining how quickly you usually respond.
- Publish the page and test the form yourself.
- Privacy Policy:
- Many WordPress installs include a starter privacy policy. Go to Pages and look for “Privacy Policy.”
- Edit it to reflect your blog and legal requirements in your region.
- Publish or update the page.
Write and publish your first blog post
- Go to Posts → Add New.
- Enter a descriptive title, such as “Why I Started This Blog” or a helpful how-to guide.
- Use headings (H2, H3), short paragraphs, and bullet points to keep the post readable.
- Add at least one relevant image to break up the text and illustrate your point.
- On the right-hand side, assign the post to a Category and add relevant Tags.
- Set a Featured Image so your post has a thumbnail on archive pages.
- Click Preview to check formatting, then click Publish when you’re satisfied.
Step 8: Launch and Promote Your WordPress Blog
Once your first content is live, you’re ready to officially “launch” your WordPress blog. A quick pre-launch checklist will help you avoid embarrassing mistakes.
Run a quick launch checklist
- Visit your homepage and click through your main menu links to ensure there are no broken links.
- Check your blog on a phone and tablet to confirm it looks good on smaller screens.
- Test your contact form to make sure messages arrive in your inbox.
- Confirm your site is using https:// and the browser shows a padlock icon.
Tell people about your new blog
- Share your first post with friends and family and ask for feedback.
- Post your blog launch announcement on your social media accounts.
- Join a few relevant communities (Facebook groups, forums, subreddits) where your target readers hang out—share your posts where allowed and be helpful.
- Consider setting up an email list so visitors can subscribe and get notified of new posts.
You Just Launched Your WordPress Blog—What’s Next?
You’ve chosen a niche, registered a domain name, set up hosting, installed WordPress, configured important settings, picked a theme, installed essential plugins, and published your first post. That means you now have a working WordPress blog that is ready for visitors.
The next step is to keep going: publish new content regularly, refine your design as you learn what readers like, and gradually improve your SEO, speed, and security. Treat this guide as your starting checklist, and revisit it whenever you create a new blog or help someone else launch theirs.
Further Reading
- WordPress SEO: Complete Beginner’s Guide
- WordPress Speed Optimization for New Bloggers
- Content Planning Workflow for WordPress Blogs
- Best Free WordPress Blog Themes
- Beginner-Friendly WordPress Backup Strategy