How to Speed up WordPress Site
Quick, low-risk performance wins any WordPress site owner can apply in one afternoon
Is your WordPress site taking more than a few seconds to load? Slow pages scare away visitors, hurt conversions, and drag down your search rankings. The good news is that most speed problems come from a few predictable areas that you can fix without touching complex code.
In this guide, you’ll walk through a focused, low-risk workflow to speed up your WordPress site in a single afternoon. You’ll benchmark your current performance, remove bloat, optimize images, configure caching, improve hosting settings, and set up a simple maintenance routine that keeps your Core Web Vitals healthy over time. If you want a deeper background on why speed matters, you can also review the beginner’s guide to WordPress speed and Core Web Vitals later.
We’ll assume you’re using the standard WordPress dashboard (Classic Editor is fine) and a modern theme like Jannah or another well-coded option. Even on basic shared hosting, these steps can dramatically improve your load times.
Prerequisites
Before you start changing performance settings, make sure your site is safe and easy to roll back if something goes wrong.
- Administrator access to your WordPress dashboard.
- Access to your hosting control panel (cPanel, Plesk, or a custom panel).
- A recent full backup of your site (files + database).
- Optional but recommended: a staging site where you can test changes first.
Step 1: Benchmark Your Current WordPress Speed
You can’t improve what you don’t measure. Start by understanding how fast (or slow) your site is right now, especially on mobile, and what your biggest bottlenecks are.
- Open Google PageSpeed Insights and test your homepage and one important inner page (for example, a blog post or product page).
- Repeat the test with tools like GTmetrix or WebPageTest for a second opinion.
- Record your mobile and desktop scores, Largest Contentful Paint (LCP), and Total Blocking Time (TBT) so you can compare after each optimization.
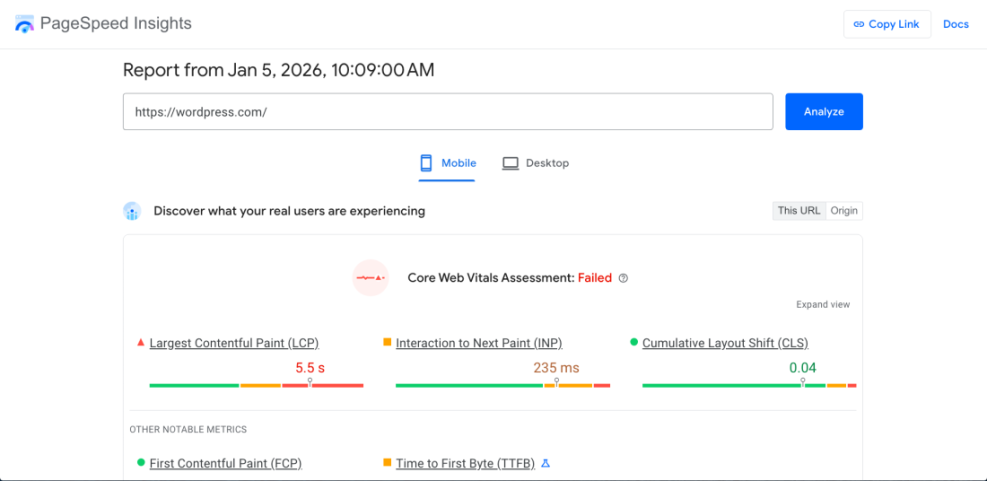
Your checkpoint: you have a simple table or notes with your current scores, page load time, and the top opportunities (e.g., “serve images in next-gen formats”, “reduce unused JavaScript”).
Step 2: Remove Bloat in Plugins, Themes, and Content
Too many plugins, leftover themes, and heavy page builder layouts are common reasons a WordPress site feels sluggish. Cleaning up bloat often gives you the biggest speed boost with the least effort.
- In your WordPress dashboard, go to Plugins > Installed Plugins. Deactivate any plugin you no longer need, then delete it completely.
- Look for plugins that overlap in features (e.g., multiple form builders or SEO plugins) and standardize on a single tool per category.
- Go to Appearance > Themes and delete unused themes, keeping only your active theme and one default WordPress theme as a fallback.
- Review your homepage: if it loads many large sliders, carousels, or auto-playing videos, simplify the layout to a more static, lightweight design.
Your checkpoint: your plugins list is trimmed to essentials, unused themes are removed, and your homepage design is simpler and less script-heavy.
Step 3: Compress and Resize Images for Faster Loads
Oversized images are often the single biggest cause of slow WordPress sites. The goal is to serve images that are both compressed and sized appropriately for their containers.
- Identify large images using your speed reports (they will often appear under “Serve images in next-gen formats” or “Properly size images”).
- Install a reputable image optimization plugin from the WordPress repository that supports bulk compression and WebP generation.
- Run a bulk optimization to compress existing images and generate WebP versions where supported.
- For future uploads, resize images before uploading (e.g., 1200px wide for blog content) and avoid uploading raw camera files.
Your checkpoint: page weight (in MB) drops noticeably, especially on image-heavy pages, and your PageSpeed reports show fewer image-related warnings.
Step 4: Configure Caching for Instant Speed Wins
Caching lets WordPress serve static HTML versions of your pages instead of rebuilding them on every request. This usually delivers one of the biggest improvements in load time.
- Install a well-maintained caching plugin that’s compatible with your theme and hosting environment.
- Enable page caching for all public pages (home, posts, categories, WooCommerce products, etc.).
- Turn on browser caching so visitors’ browsers reuse static assets instead of re-downloading them.
- Carefully enable CSS and JS minification/combination; test your site after toggling each option to ensure layouts and interactive elements still work.
Your checkpoint: first-page load time drops, and repeat visits feel much faster thanks to browser cache and optimized static files.
Step 5: Use a CDN to Serve Static Files Faster
A Content Delivery Network (CDN) stores copies of your static content (images, CSS, JavaScript) on servers around the world. This shortens the distance between your visitors and your files, improving speed globally.
- Choose a CDN provider (many hosts include a CDN; you may already have access in your hosting dashboard).
- Connect your WordPress site to the CDN using either your host’s integration or the CDN’s official plugin.
- Configure the CDN to cache images, CSS, JavaScript, and fonts, but not your dynamic pages (those should be handled by your WordPress caching plugin or host).
- Flush your cache and test your site from different locations using a tool like GTmetrix or WebPageTest.
Your checkpoint: static assets are loading from CDN subdomains or the CDN’s URL, and time-to-first-byte for those assets is lower in your tests.
Step 6: Optimize Your Hosting and PHP Configuration
At some point, optimization can’t compensate for slow or overcrowded servers. It’s important to make sure your hosting and PHP configuration are not bottlenecks.
- In your hosting control panel, ensure you’re running a supported, modern PHP version (e.g., PHP 8.x). Upgrade if necessary.
- Check whether your host offers built-in server caching (e.g., NGINX cache, LiteSpeed cache) and follow their documentation to enable it.
- If your site is resource-intensive (e.g., WooCommerce, LMS, membership), consider upgrading from basic shared hosting to a managed WordPress plan. You can compare options using a guide like fast WordPress hosting providers.
- Monitor CPU and memory usage in your hosting panel to ensure you’re not regularly hitting limits.
Your checkpoint: your site is running on modern PHP, your host’s performance features are turned on, and you have a clear plan if you’ve outgrown your current plan.
Step 7: Clean and Optimize Your Database
Over time, your WordPress database accumulates post revisions, transients, spam comments, and temporary data that can slow down queries and backups.
- Install a database optimization plugin that can safely remove post revisions, trashed posts, spam comments, and expired transients.
- Run a dry-run or preview if available to see what will be deleted.
- Perform the cleanup during a low-traffic period and take a database backup first.
- If you’re comfortable with SSH and WP-CLI, you can clear transients with:
# Run in SSH with WP-CLI installed and pointed at your WordPress install
wp transient delete --all
Your checkpoint: database size drops, dashboard actions feel snappier, and backup/restore operations complete faster.
Step 8: Optimize JavaScript, CSS, and Fonts
Heavy JavaScript, CSS, and too many font files can delay rendering and make your site feel sluggish, even if basic caching is in place.
- Use your speed reports to identify large JavaScript files and unused CSS. Many will come from page builders, sliders, or third-party embeds.
- In your caching or optimization plugin, enable options like “defer JavaScript”, “delay JavaScript execution”, or “load CSS asynchronously”, then test carefully.
- Limit the number of web fonts you load. Use system fonts where possible, and reduce font weights (for example, regular and bold instead of 5–6 weights).
- Remove unused third-party scripts (old chat widgets, tracking pixels, or social feed plugins you no longer need).
Your checkpoint: your Total Blocking Time (TBT) and First Input Delay (or Interaction to Next Paint) improve, and PageSpeed shows fewer warnings about render-blocking resources.
Step 9: Monitor, Test, and Maintain Your Site Speed
Speed optimization is not a one-time project. Theme updates, new plugins, and content changes can slowly reintroduce performance issues.
- Schedule a monthly speed check on your key pages using the same tools you used in Step 1.
- After installing new plugins or making major design changes, run a quick PageSpeed Insights test to catch regressions early.
- Create a simple recurring task list, or use a checklist like the WordPress speed optimization checklist for busy site owners to stay consistent.
- Keep WordPress core, themes, and plugins updated, and remove anything you no longer use.
Your checkpoint: you have a simple maintenance routine, and speed checks become part of how you manage your WordPress site.
Keep Your WordPress Site Fast Over Time
Speeding up your WordPress site doesn’t require a full rebuild or advanced development skills. By trimming bloat, optimizing images, enabling caching and a CDN, tuning your hosting, and cleaning up your database, you can often cut load times dramatically in a single afternoon.
The key is to work methodically: benchmark, change one group of settings at a time, test, and then move on to the next step. With a simple maintenance routine in place, your WordPress site will stay fast, user-friendly, and ready to convert visitors long after this initial optimization session.
Further Reading
- Complete WordPress Caching Setup Guide
- Fastest WordPress Hosting Providers Compared
- WordPress Speed Test Checklist
- Beginner’s Guide to Redis Object Cache in WordPress
- Caching Plugin Comparisons for WordPress Performance