How to Install WordPress
A beginner-friendly, step-by-step guide to installing WordPress on typical shared hosting.
Installing WordPress is the first real step toward owning your website, blog, or online store. The process can look intimidating if you have never logged into a hosting control panel before, but in practice you can get a fresh WordPress site running in minutes.
This guide walks you through installing WordPress using the most common methods you’ll see on shared hosting: a one-click installer in your hosting dashboard, and a manual install using cPanel or FTP. You’ll also learn how to run the setup wizard and what to configure immediately after installation.
If you are still unsure what WordPress actually is, you may want to review this quick overview of what WordPress is and how it works before you begin.
Prerequisites
Before you install WordPress, make sure you have the basic pieces ready. Skipping these will often lead to installation errors or a site that appears offline.
- A domain name you control (for example, yourname.com).
- A hosting account that supports PHP and MySQL/MariaDB (most shared “WordPress hosting” plans do).
- Login details for your hosting control panel (cPanel, Plesk, or a custom dashboard).
- Access to a file manager or FTP client (for manual installation).
- An email address you check regularly for admin notifications.
If you have not picked a host yet, walk through this guide on how to choose the best WordPress hosting so you start with a solid foundation.
Step 1: Decide How You Will Install WordPress
Most hosting companies now offer more than one way to install WordPress. Choosing the right method saves time and makes troubleshooting easier later.
- One-click installer: The easiest option. Common tools include Softaculous, Installatron, or a custom “WordPress Installer” in your dashboard.
- Manual install: You upload the WordPress files yourself, create a database, and connect them with a configuration file.
- WP-CLI (advanced): A command-line tool for installing and managing WordPress via SSH.
Step 2: Install WordPress with a One-Click Installer
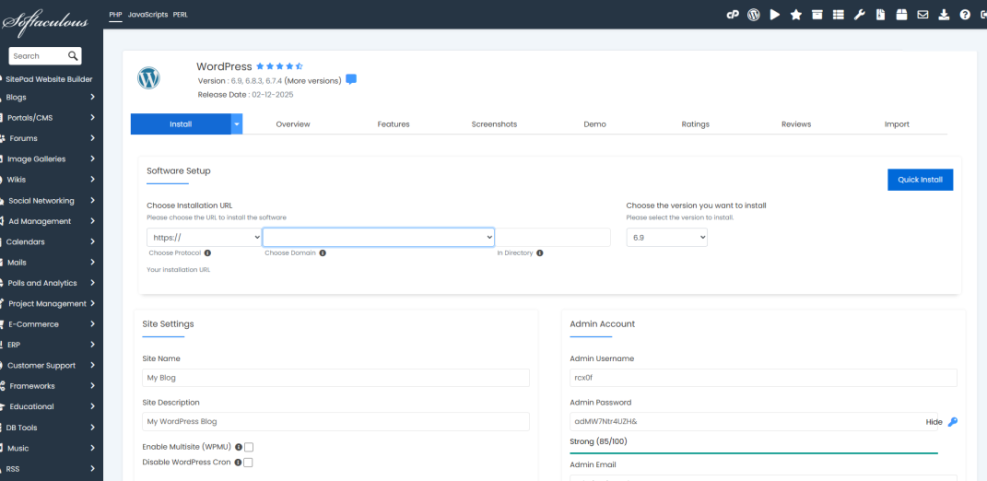
The exact labels differ by host, but the process for one-click installers is very similar. These steps assume a cPanel-style dashboard with Softaculous, but you can map them to your own host’s interface.
- Log into your hosting control panel and locate the WordPress or Softaculous Apps Installer section (often under “Software” or “Website”).
- Click the WordPress icon, then choose Install or New Installation.
- Select the installation URL:
- Choose https:// if your host provides SSL (recommended).
- Select the correct domain from the dropdown.
- Leave the “directory” field empty if you want WordPress at yourdomain.com. Use something like blog if you want yourdomain.com/blog.
- Enter your site information:
- Site Name and Site Description (you can change these later).
- Admin Username: avoid “admin” or your email address.
- Admin Password: use a long, unique password.
- Admin Email: where login and update notices are sent.
- Review advanced options (if shown):
- Database name and table prefix (you can keep defaults unless you manage many sites).
- Automatic updates (it’s usually safe to auto-update minor versions).
- Click Install and wait for the installer to finish. You should see links to your site URL and the admin URL (usually /wp-admin).
Once the installer completes, visit https://yourdomain.com/wp-admin/ and log in with the admin username and password you just created to confirm the site is working.
Step 3: Install WordPress Manually via cPanel or FTP
If your host does not offer a one-click installer, or you want full control over the files and database, a manual installation is the next best option.
3.1 Download and upload WordPress
- Download the latest WordPress package from wordpress.org (see this guide on downloading WordPress safely if you need help).
- Log into your hosting control panel and open File Manager (or connect with an FTP client).
- Navigate to your web root:
- Usually public_html for the main domain.
- A subfolder (for example, public_html/blog) if you are installing in a subdirectory.
- Upload the WordPress .zip file to that folder.
- Use Extract to unpack the files. If they are inside a wordpress folder, move everything from that folder into the actual web root directory you chose.

3.2 Create a database and user
- In cPanel, open MySQL® Databases.
- Create a new database (for example, wp_site).
- Create a new database user with a strong password.
- Add that user to the database with All Privileges enabled.
- Write down:
- Database name
- Database username
- Database password
- Database host (often localhost)
3.3 Connect WordPress to the database
- In File Manager or your FTP client, locate wp-config-sample.php in your WordPress folder.
- Make a copy named wp-config.php.
- Edit wp-config.php and update these lines with your database details:
// Where to edit: in wp-config.php via File Manager or FTP
define( 'DB_NAME', 'your_db_name_here' );
define( 'DB_USER', 'your_db_user_here' );
define( 'DB_PASSWORD', 'your_db_password_here' );
define( 'DB_HOST', 'localhost' );
- Save the file and close the editor.
wp-config.php file publicly. It contains your database password and other sensitive keys.3.4 (Advanced) Install WordPress with WP-CLI
If your host provides SSH access and WP-CLI, you can install WordPress with a few commands instead of using File Manager.
# Run these in your site directory via SSH
wp core download
wp config create --dbname=your_db_name --dbuser=your_db_user --dbpass=your_db_password --dbhost=localhost
wp core install --url="https://yourdomain.com" --title="Site Title" --admin_user="youradmin" --admin_password="StrongPassword123!" --admin_email="you@example.com"
After the wp core install command finishes, you can log in at /wp-admin/ exactly as with the other methods.
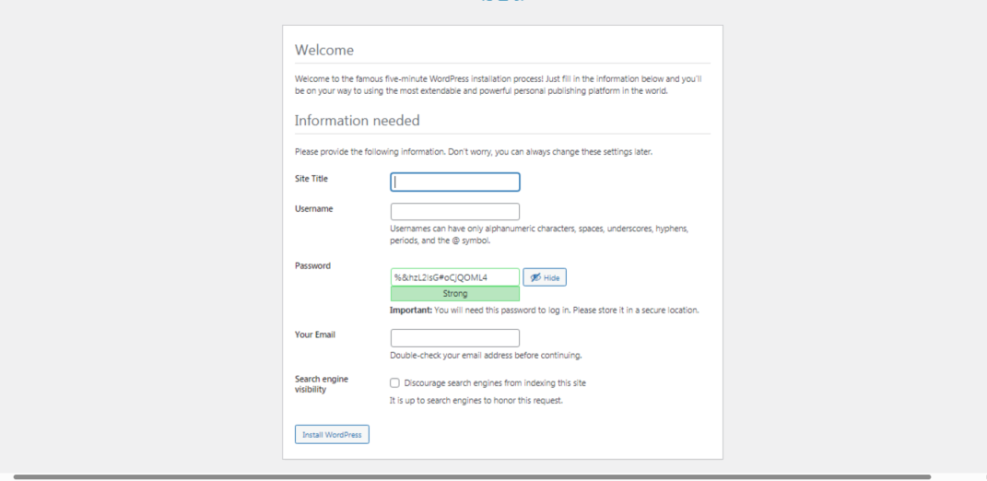
Step 4: Run the WordPress Setup Wizard
Whether you used a one-click installer or a manual install, the setup wizard finalizes your site configuration the first time you visit it in a browser.
- Go to your domain in a browser:
- If the wizard appears, choose your language and click Continue.
- Fill in the Site Title (you can change this later in Settings → General).
- Create your admin login:
- Username: choose something unique that is not your email and not “admin”.
- Password: use the strong password generator or a password manager.
- Your Email: double-check spelling; password resets go here.
- Optionally uncheck “Discourage search engines from indexing this site” if you are ready for the site to be visible. If you are still building, you can leave it checked and change it later.
- Click Install WordPress. When it completes, click the Log In button and sign in with your new credentials.
Step 5: Secure and Configure Your New Site
After your first login, a few quick configuration steps will make WordPress safer and more pleasant to use.
5.1 Tidy up default content
- In the WordPress dashboard, go to Posts → All Posts and delete the default “Hello world!” post.
- Go to Pages → All Pages and delete any sample pages you do not need.
- Empty the Trash for both posts and pages so they are fully removed.
5.2 Adjust key settings
- Navigate to Settings → General:
- Check your Site Title and Tagline.
- Confirm the WordPress Address (URL) and Site Address (URL) are correct (usually both are your domain).
- Set your timezone, date format, and time format.
- Go to Settings → Permalinks and choose Post name for cleaner URLs, then click Save Changes.
5.3 Basic security and backups
- Store your admin username and password in a secure password manager instead of your browser’s default storage.
- Enable two-factor authentication (2FA) on your hosting and WordPress admin accounts where possible.
- Set up regular backups with your hosting provider or a reputable backup plugin so you can restore the site if something goes wrong.
Installation Troubleshooting Tips
If something does not work right away, it usually comes down to a handful of common issues. Work through these checks before you panic.
- White screen or 500 error after install: Check that all WordPress files were uploaded and that
wp-config.phphas the correct database credentials. - Cannot connect to database: In cPanel → MySQL® Databases, verify the database user has All Privileges on the database and that DB_NAME, DB_USER, and DB_PASSWORD match exactly in
wp-config.php. - Installer stuck at 0% or timeouts: Wait a few minutes and refresh; if it persists, try a manual install or contact your host’s support.
- Domain not showing your new site: Clear your browser cache and DNS cache, or wait for DNS propagation if you recently pointed your domain to a new host.
- Mixed content / not fully secure: Make sure you installed SSL with your host and that the WordPress and Site Address URLs use https:// in Settings → General.
Your WordPress Installation Is Ready to Go
At this point, you have a working WordPress installation on your own hosting, reachable at your domain and ready for content. You have seen how to use a one-click installer for speed, and a manual method for full control.
From here, you can choose and customize a theme, install only the plugins you need, and start publishing pages and posts. As you get comfortable, you can refine performance, security, and SEO without ever having to reinstall WordPress from scratch.
Further Reading
- How to Start a WordPress Website
- WordPress Hosting Explained
- Beginner WordPress Security Best Practices Guide
- WordPress Hosting Backups
Frequently Asked Questions
Do I need a domain name before I install WordPress?
For a typical live website, yes—you should have a domain name that points to your hosting account before installing WordPress so visitors can reach it easily. Some hosts let you install to a temporary subdomain or preview URL, but you will still want to connect a proper domain as soon as possible.
Why do I get a database connection error after installing WordPress?
wp-config.php exactly match the values in your hosting control panel. Also confirm the database user has full privileges on that database.