If you’re starting from scratch and wondering how to design a WordPress website, it can feel a bit overwhelming. There are themes, plugins, page builders, and a thousand design options competing for your attention.
The good news? You don’t need to be a developer or professional designer. With a clear plan, a good theme, and a few smart tools, you can design a clean, modern WordPress site that looks great on any device.
In this guide, you’ll learn how to design a WordPress website step by step: from planning your layout and choosing a theme, to customizing colors, typography, and key pages so your site actually matches your brand.
What You Need Before You Design a WordPress Website
- A working WordPress install (on a live domain or local server).
- Admin access to your WordPress dashboard.
- A basic brand idea: logo (or text logo), colors, and preferred fonts.
- Rough content outline for your main pages (Home, About, Services, Contact, Blog).
- Optional: A page builder plugin (like Elementor, Spectra, or Gutenberg block library) if you want more design control.
Step 1: Plan Your WordPress Website Structure and Goals
Before you dive into colors and fonts, clarify what your site should do. Good design starts with a clear structure.
- Define your primary goal (e.g., get leads, sell products, build an audience, show portfolio).
- List the core pages you need: Home, About, Services/Products, Blog, Contact.
- Sketch a simple sitemap on paper or in a note app.
- Decide what you want visitors to do on each page (click a button, fill a form, read more, subscribe).
- Collect your assets (logo files, brand colors, images, copy) in one folder.
When you know your structure, it becomes much easier to decide how to design a WordPress website that supports your goals instead of just looking pretty.
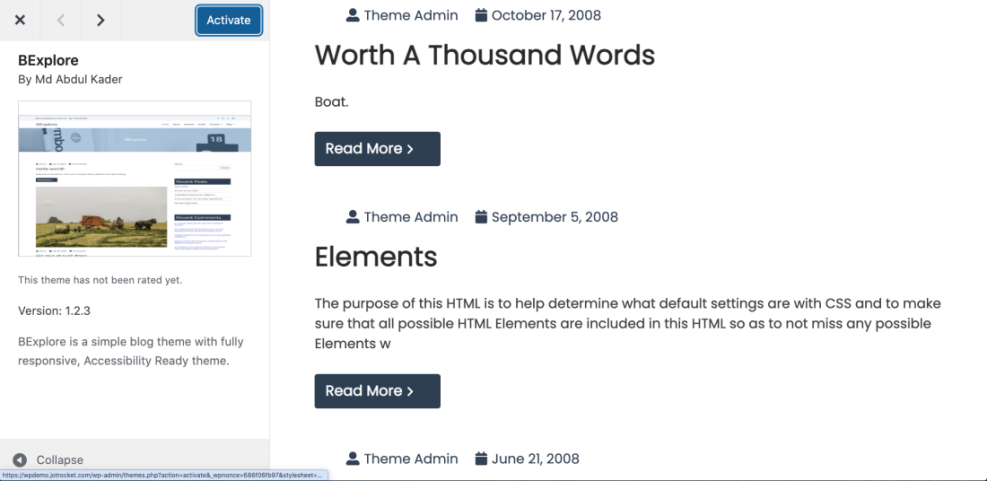
Step 2: Pick a Modern Theme for Your WordPress Website Design
Your theme controls much of the visual design and layout options in WordPress. Choosing the right one is a big step in learning how to design a WordPress website that’s fast and flexible.
- In your dashboard, go to Appearance » Themes » Add New.
- Use the search and filter tools to look for themes tagged with Block Theme, Responsive, or Accessibility Ready.
- Preview themes that are:
- Clean and minimal (no cluttered design).
- Regularly updated and well rated.
- Compatible with Gutenberg or your chosen page builder.
- Click Install and then Activate on your chosen theme.
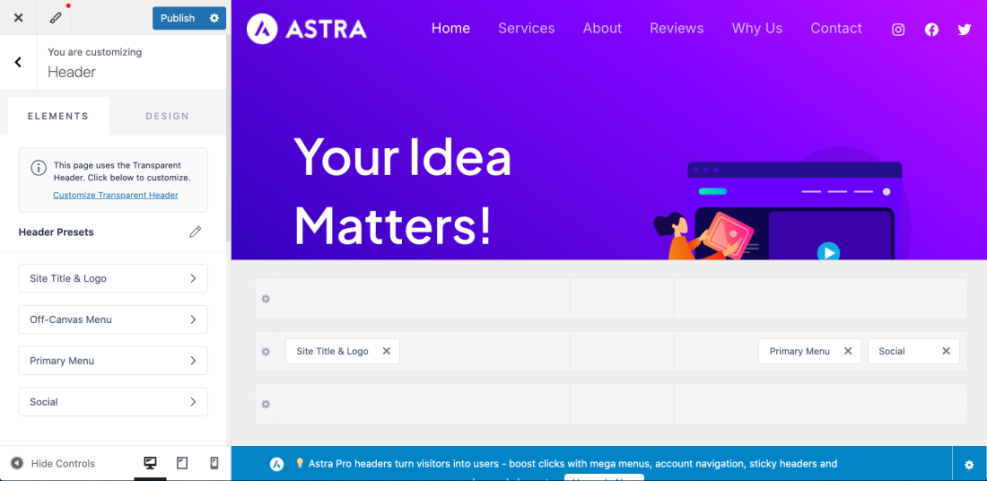
Step 3: Add Your Branding and Site Identity
Next, put your brand visuals in place so every page feels consistent.
- Go to Appearance » Customize (or Appearance » Editor for block themes).
- Find the Site Identity section.
- Upload your logo (SVG or PNG works best) and set your Site Title and Tagline.
- Upload a Site Icon (favicon) for browser tabs.
- Save or publish your changes.
If you don’t have a logo yet, you can simply use a text logo with a bold font. You can always refine it later—don’t let logo design block you from learning how to design a WordPress website in the first place.
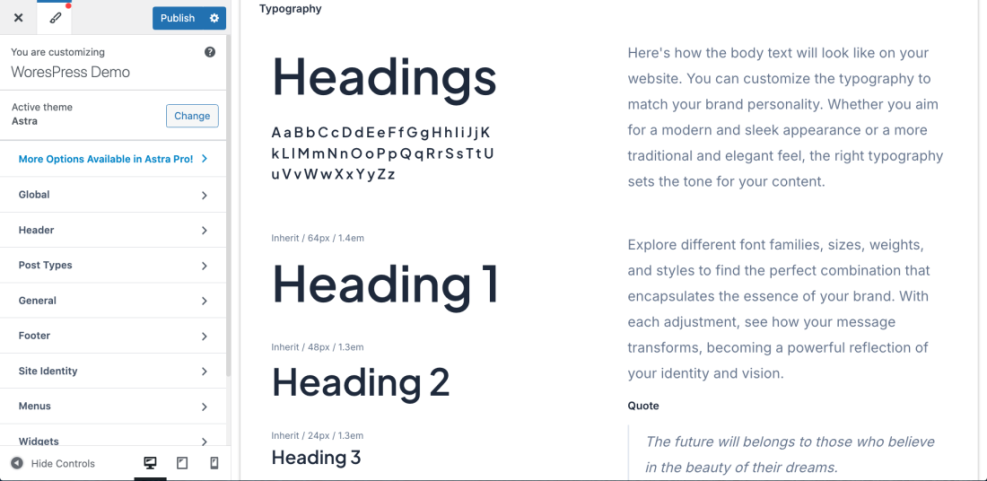
Step 4: Set Colors and Typography for Your WordPress Website
Colors and fonts are the backbone of your visual design. They should feel on-brand and be easy to read.
- In the Customizer or Site Editor, locate the Colors and Typography panels.
- Set:
- Primary color (links, buttons)
- Secondary or accent color (highlights, badges)
- Background and text colors (ensure good contrast)
- Choose your fonts:
- Heading font (strong and clear).
- Body font (simple, easy to read).
- Adjust font sizes for headings (H1–H3) and body text so content is readable on mobile and desktop.
Step 5 Create Your Core WordPress Website Pages
Now you’re ready to structure your content. For anyone learning how to design a WordPress website, getting the core pages right is more important than fancy animations.
- Go to Pages » Add New.
- Create pages for:
- Home
- About
- Services or Products
- Blog (if you’ll publish articles)
- Contact
- Save them as drafts if you don’t have content ready yet.
Later you’ll design each page’s layout, but starting with a clear list of pages keeps your navigation simple and user-friendly.
Step 6: Design a Simple, Effective WordPress Homepage
Recommended homepage layout for your WordPress site
Your homepage often gets the most traffic, so spend time designing it well.
- Edit your Home page in the block editor or page builder.
- Use a simple structure like:
- Hero section: headline, subheading, main call-to-action button.
- Short benefits/features section.
- Services or product overview.
- Testimonials or social proof.
- Final call-to-action or contact section.
- Use columns and spacer blocks for clean layout and breathing room.
- Keep text brief and scannable with bullet points and clear headings.
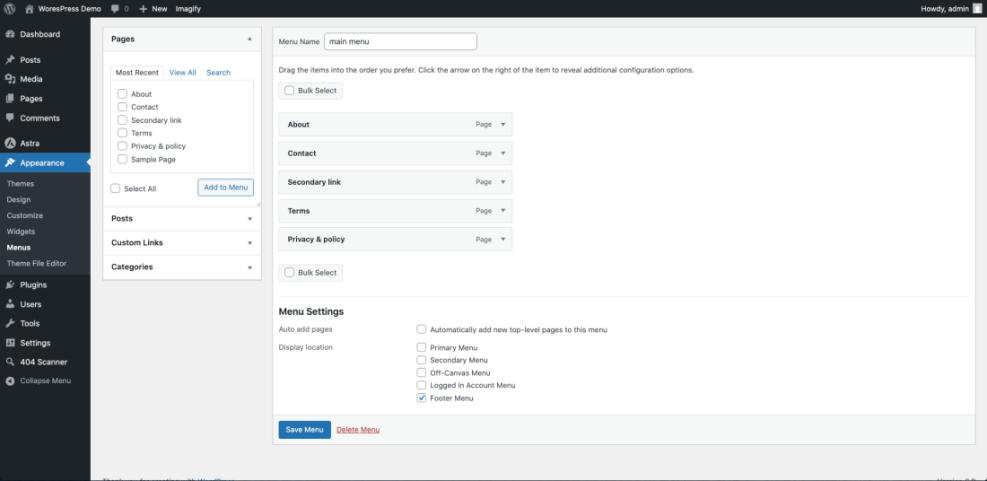
Step 7: Build a Clear Navigation Menu
Good navigation makes your design feel professional and helps visitors find what they need.
- Go to Appearance » Menus (or Appearance » Editor » Templates for block themes).
- Create a new menu called Main Menu.
- Add your key pages: Home, About, Services, Blog, Contact.
- Assign it to your theme’s Primary or Header menu location.
- For longer sites, create a Footer Menu with privacy policy, terms, and secondary links.
Step 8: Use Blocks or a Page Builder for Layouts
If you want more control over your design, blocks and page builders help you create custom layouts without code.
- Stick with the built-in block editor (Gutenberg) or install a popular page builder if your theme supports it.
- Use layout blocks like Columns, Group, Cover, and Buttons to structure your content.
- Save reusable blocks for section patterns you use often (e.g., testimonials, pricing tables).
- Preview your pages on tablet and mobile views in the editor (where available).
Step 9: Focus on User Experience (UX) in Your WordPress Website Design
Beautiful design is useless if visitors can’t find what they need. UX ensures your design actually works.
- Use clear headings and short paragraphs.
- Ensure buttons look clickable and use action verbs (e.g., “Get a Quote”, “Book a Call”).
- Keep plenty of white space between sections so the design can breathe.
- Use consistent styles for links, buttons, and cards across your site.
- Check that important information is available within 1–2 clicks from the homepage.
Learning how to design a WordPress website isn’t just about looks—it’s about guiding visitors smoothly toward the actions that matter.
Step 10: Make Sure Your Site Looks Good on Mobile
More and more visitors browse on phones, so you must design with mobile in mind.
- Use your browser’s responsive preview (or your page builder’s device preview) to check each page.
- Ensure text is large enough to read without zooming.
- Check that buttons are big enough to tap and not too close together.
- Remove or minimize heavy background videos and large images on mobile if they slow down the site.
Step 11: Keep Your Website Fast and Lightweight
A slow site feels badly designed, even if it looks beautiful.
- Compress images before uploading (use JPG/WebP for photos, SVG for simple graphics).
- Limit the number of heavy plugins, sliders, and animations.
- Use a caching plugin if your host doesn’t provide built-in caching.
- Test your site with tools like PageSpeed Insights or GTmetrix and fix major issues.
Quick Comparison of Popular WordPress Design Approaches
Use this table to decide which approach fits how you like to design.
| Method | Where You Use It | Main Purpose |
|---|---|---|
| Block Theme + Site Editor | Appearance » Editor (Site Editor) | Design the entire site (headers, footers, templates) visually with blocks and patterns. |
| Classic Theme + Customizer | Appearance » Customize | Control global styles (logo, colors, typography) with simpler layout options. |
| Block Editor Only | Pages/Posts » Block editor | Design page content layouts using core blocks and layouts without extra plugins. |
| Page Builder Plugin | Page builder interface (Elementor, etc.) | Create highly custom layouts with drag-and-drop widgets and fine control. |
| Starter Templates / Demos | Theme or plugin import tools | Import a complete pre-designed site, then customize text, images, and colors. |
Step 12: Review, Test, and Launch Your Site
Before you show your new design to the world, do a quick quality check.
- Click through all main pages and menus to check for broken links.
- Test all forms (contact, signup, booking) and confirm emails are delivered.
- Check your site on at least one phone and one tablet.
- Ask a friend or colleague to navigate your site and see if anything confuses them.
- Once you’re happy, remove “Coming Soon” or maintenance mode (if enabled) and share your site.
At this point, you’ve learned the fundamentals of how to design a WordPress website that’s both attractive and functional.
Conclusion: You Now Know How to Design a WordPress Website
You’ve planned your structure, chosen a modern theme, set your branding, designed key pages, and optimized for UX, mobile, and speed. That’s the core of how to design a WordPress website that feels cohesive and professional.
From here, you can keep refining: experiment with new layouts, improve copy, add conversion-focused sections, and test different calls to action. Treat your design as something you iterate on, not a one-time project.
The more you build and tweak, the better you’ll get at spotting what works—and what doesn’t—for your audience.