How to Create a Searchable Database in WordPress
Advanced WordPress development patterns
How to Create a Searchable Database in WordPress
If you want to create a searchable database in WordPress, you’re really building a structured collection of records that visitors can search and filter quickly. Instead of scrolling through endless blog posts, people can jump straight to the exact item they need.
This tutorial shows you how to create searchable database in WordPress step by step using a custom post type, custom fields, and a front end search form. By the end, you’ll have a dedicated page where visitors can search, filter, and browse your searchable database without writing any custom code.
A searchable database is simply a structured collection of posts that visitors can search and filter. When you create a searchable database in WordPress, you turn plain content into organized records that are easy to browse. The same searchable database structure can power a small internal tool or a public directory, and because the searchable database lives inside WordPress, you can still use your normal themes, plugins, and SEO tools.
What You Need to Create a Searchable Database in WordPress
- An existing WordPress site with administrator access.
- The ability to install and activate plugins on your site.
- A clear idea of what your “records” are, such as staff, documents, or listings that will live in your searchable database.
- A recent full site backup, including your database.
Step 1: Plan Your Searchable Database Structure
Before you touch any settings, plan what information each searchable database record needs to store and how visitors should be able to filter it. Good planning makes it much easier to create a searchable database in WordPress that’s simple to manage long term.
- Write down the real world thing you are storing, for example “staff member” or “resource”. This becomes your record type inside the searchable database.
- List the fields you want to save for each record, such as Name, Role, Location, or Category.
- Mark which fields visitors should be able to filter by, such as Location or Department.
- Decide which field will be the main title shown in the search results. Usually this is the name of the person or item in the searchable database.
Verify that your list of fields is complete but not overloaded. If you have many optional fields that almost never get used, consider removing them so your searchable database stays quick to fill out and easy to scan.
Step 2: Install the Required Plugins to Create a Searchable Database in WordPress
The easiest way to create a searchable database in WordPress is to lean on mature, well supported plugins. One plugin will register the custom post type, another will store custom fields, and a third will build the front end search form that powers your searchable database.
- In the WordPress dashboard, go to Plugins » Add New.
- In the search box, type Custom Post Type UI, then click Install Now and Activate.
- Search for Advanced Custom Fields, then click Install Now and Activate.
- Search for Search & Filter, then click Install Now and Activate.
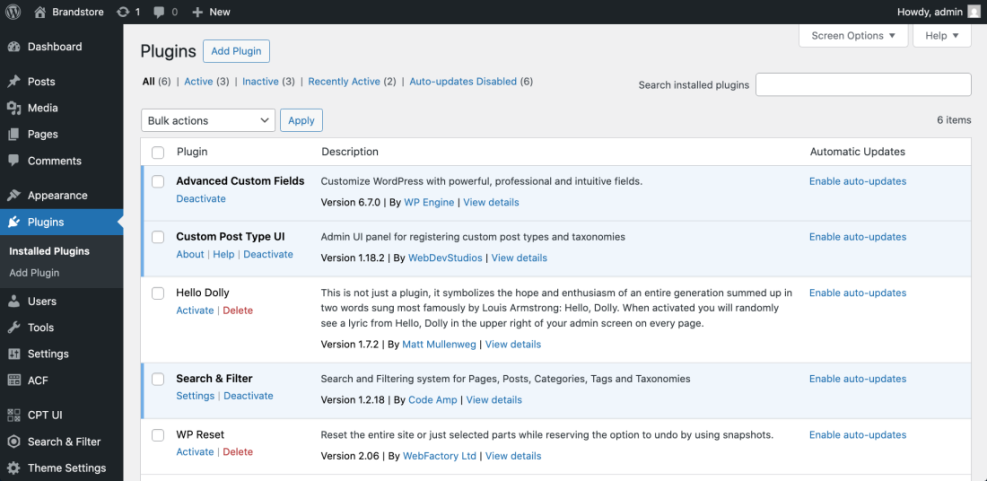
After activation, confirm that you see new menu items such as CPT UI, Custom Fields, and Search & Filter on the left side of your dashboard. These tools are the backbone of your searchable database in WordPress setup.
Step 3: Create a Custom Post Type for Your Searchable Database Records
A custom post type separates your searchable database records from regular posts and pages. This keeps the data organized and lets you query only those records when building your searchable database and its search form.
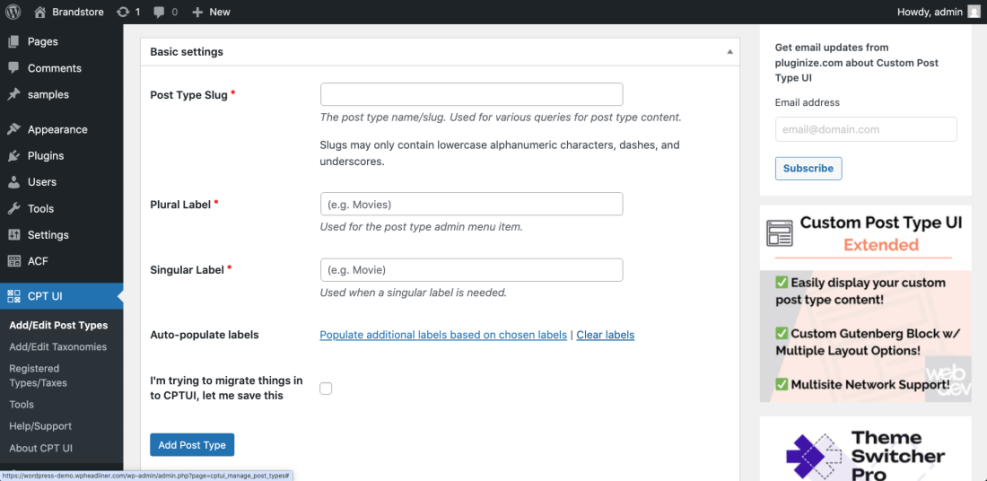
- Go to CPT UI » Add / Edit Post Types.
- Under Add New Post Type, enter a slug in Post Type Slug, for example record. Use only lowercase letters and no spaces.
- Set Plural Label to something like Records and Singular Label to Record.
- Scroll down and make sure Has Archive and Public are enabled so the records can be listed and searched.
- Click Add Post Type to save.
If you prefer code, add this snippet using a safe snippets plugin or your child theme’s functions.php file instead of editing a parent theme directly.
// Register "record" custom post type for the searchable database.
function wph_register_record_cpt() {
    $labels = array(
        'name'               => 'Records',
        'singular_name'      => 'Record',
        'menu_name'          => 'Records',
        'name_admin_bar'     => 'Record',
        'add_new'            => 'Add New',
        'add_new_item'       => 'Add New Record',
        'edit_item'          => 'Edit Record',
        'new_item'           => 'New Record',
        'view_item'          => 'View Record',
        'all_items'          => 'All Records',
        'search_items'       => 'Search Records',
        'not_found'          => 'No records found',
        'not_found_in_trash' => 'No records found in Trash',
    );

    $args = array(
        'labels'        => $labels,
        'public'        => true,
        'has_archive'   => true,
        'show_in_rest'  => true,
        'supports'      => array( 'title', 'editor', 'thumbnail' ),
        'menu_position' => 20,
    );

    register_post_type( 'record', $args );
}
add_action( 'init', 'wph_register_record_cpt' );
To verify the custom post type, look for a new Records menu item in your dashboard. Optionally visit Settings » Permalinks and click Save Changes once to refresh permalink rules so your searchable database in WordPress archive works correctly.
Step 4: Add Custom Fields to Your Searchable Database
Custom fields let you attach structured data to each record, such as phone number, location, or category. These fields are what visitors will filter and search by later when they use your searchable database.
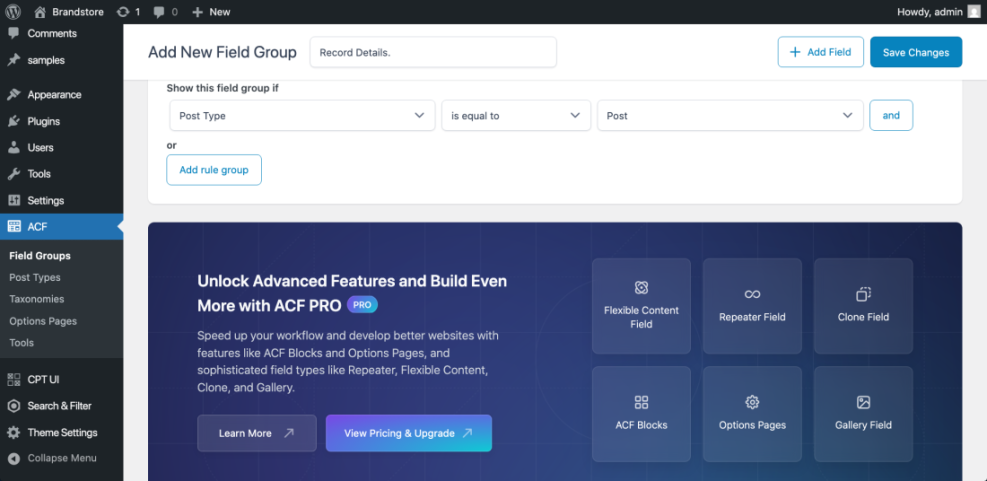
- Go to Custom Fields » Add New.
- Enter a Field Group Title, for example Record Details.
- Click Add Field and create a field for each item from your plan, such as Location, Category, or Phone.
- For each field, set a descriptive Field Label and an appropriate Field Type like Text, Select, or URL.
- In the Location rules box, set Post Type to equal to and choose your Record post type.
- Click Publish to save the field group.
Open Records » Add New and confirm that your custom fields now appear below the main editor. If you see them, your searchable database in WordPress structure is ready for content.
Step 5: Enter Sample Records into the Searchable Database
Before you finish the process to create a searchable database in WordPress, add real sample data. This makes it easier to test filters and spot mistakes in your structure.
- Go to Records » Add New.
- Enter a clear title in the Add title field, such as the person’s name or document title.
- Fill in each custom field in the Record Details group, using consistent formats for things like phone numbers and locations.
- Optionally add a description in the main content editor to show in the single record view.
- Click Publish and repeat for at least 10 sample records so you can properly test filters.
Visit Records » All Records and confirm that your sample records appear in a list. Check that none of the custom fields you need in your searchable database are missing or obviously misnamed.
Step 6: Build the Front End Search and Filter Form for Your Searchable Database
Now you will create a search form that lets visitors filter your records by the fields you planned earlier. This is the part where you turn your custom post type into a working searchable database in WordPress that people can actually use.
- Go to Search & Filter in your dashboard menu.
- Create a new search form and give it a name like Record Search.
- Add a Search field so visitors can search by keyword in record titles and content.
- Add filter fields that match your database, such as a dropdown for Location or Category, and connect them to the correct taxonomy or meta data.
- Set the form to query only the Record post type so regular posts are not included.
- Save the form and copy the shortcode that the plugin provides, for example [searchandfilter id=”123″].
Check that the form’s preview shows your dropdown options and that the post type restriction is set to your custom Record type. If the plugin provides a separate results shortcode, copy that as well so your searchable database can display results on the same page.
Step 7: Publish and Test Your Searchable Database Page in WordPress
The final step to create a searchable database in WordPress is to place the search form on a public page and confirm that filtering works properly. You can use a simple page template so searchable database results stay readable and easy to browse.
- Go to Pages » Add New and create a page called Record Search or similar.
- In the content area, paste your search form shortcode, such as [searchandfilter id=”123″].
- If the plugin uses a separate results shortcode, paste it below the form shortcode on the same page.
- Click Publish to make the page live.
- Open the page in a new browser tab and try filtering by different fields and keywords.
Verify the searchable database in WordPress by running several test searches, including cases where filters should return no results. Fix any misspellings or inconsistent field values you notice in your sample records.
Step 8: Compare Maintenance Options for Your Searchable Database
Once your searchable database is live, you still need a plan to keep WordPress, your plugins, and your content healthy. Here’s a quick comparison of common maintenance methods and where they fit into your workflow:
| Method | Where You Use It | Main Purpose |
|---|---|---|
| DIY Manual Maintenance | WordPress dashboard and hosting control panel | Maximum control over updates, theme and plugin changes, and manual checks for title issues on small or low-risk sites. |
| Managed Hosting Tools | Your host’s control panel or custom dashboard | Simplify routine maintenance with one-click updates, built-in backups, and basic monitoring so template problems are less likely to appear. |
| SEO, Maintenance & Security Plugins | Plugins section inside the WordPress dashboard | Automate repetitive tasks like backups, database cleanup, image optimization, and security scans, while also running periodic audits of titles and meta tags. |
| WP-CLI and Developer Tools | SSH terminal with WP-CLI and deployment tools | Scriptable, fast maintenance for developers managing multiple or complex sites, including scanning themes for legacy header.php markup. |
| Professional WordPress Care Plan | External provider, freelancer, or agency | Hands-off maintenance with proactive monitoring, regular audits, and expert fixes so problems like duplicate titles are caught early. |
Pick the approach that matches your skills and risk level. Even a simple site with a small searchable database benefits from regular updates, backups, and basic monitoring.
Conclusion: Your WordPress Searchable Database Is Ready to Go
You have learned how to create a searchable database in WordPress using a custom post type, structured custom fields, and a front end search form. Visitors can now filter your records by the fields that matter and quickly find what they need.
From here, you can extend the searchable database into a full directory, knowledge base, or resource library. Because your data lives in standard WordPress post types and fields, it stays portable and can be optimized or redesigned without rebuilding from scratch.
Further Reading on WordPress Searchable Databases
- How to create a website with WordPress
- Internal linking WordPress beginners
- Is WordPress good for seo
- Beginner guide WordPress speed core web vitals