Changing the favicon in WordPress, often called the site icon, makes your site easier to recognize in browser tabs, bookmarks, and on mobile home screens. This small image helps your brand stay visible even when visitors have many tabs open at once.
In this guide you will prepare a properly sized icon, change it from the newer Settings screen, use the classic Customizer if needed, and update it inside the Site Editor for block themes. You will also see how to verify that the new favicon in WordPress appears correctly everywhere and how to override it with code when necessary.
What You Need to Change the Favicon in WordPress
- Access to your WordPress dashboard with an account that can change Settings and Appearance for managing the favicon in WordPress.
- A square favicon image, ideally 512 × 512 px in PNG format, to use as your WordPress site icon.
- Basic ability to navigate the WordPress admin menu on desktop so you can reach the favicon in WordPress settings.
- Optional access to your theme’s functions.php file or a child theme if you plan to use the code method to override the default WordPress favicon.
Step 1: Prepare Your Favicon Image File
Before you open any settings, make sure the image you want to use as the favicon in WordPress is ready. Because WordPress expects a square image, it will generate all the small icons it needs from this single file.
- Create a new square canvas in your design tool of choice, at least 512 × 512 px.
- Place a simple version of your logo or initials in the center with strong contrast so it is readable at tiny sizes for your WordPress favicon.
- Export the image as a PNG file with a transparent background if possible, which keeps the edges of the site icon in WordPress looking clean.
- Log in to your WordPress dashboard, go to Media » Add New, and upload the favicon image so it is available in the media library when you change the favicon in WordPress.
After the image is uploaded and visible in your media library, you can connect it to the Site Icon setting and finish updating the favicon in WordPress.
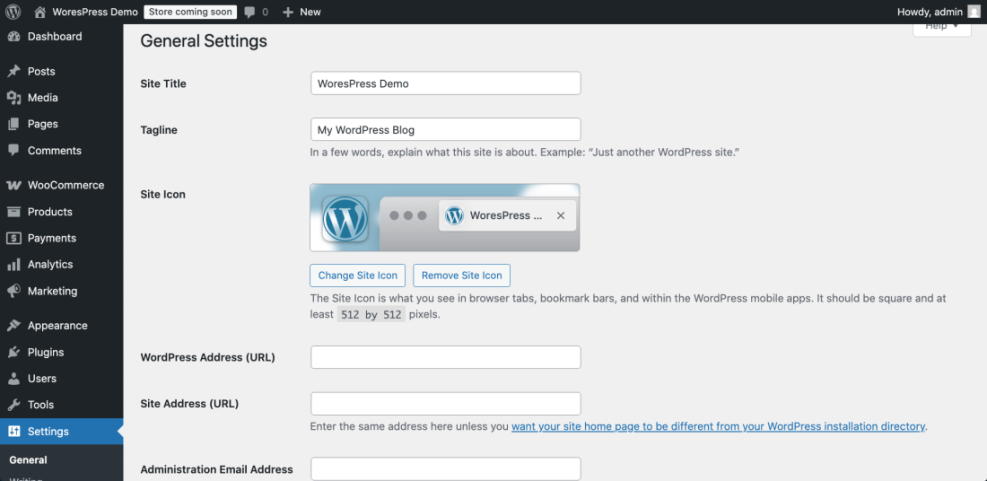
Step 2: Change Favicon in WordPress from General Settings
Modern versions of WordPress (6.5 and later) promote the Site Icon field inside the main Settings screen. Using this method keeps your favicon in WordPress easy to manage across themes.
- Log in to your WordPress dashboard at yourdomain.com/wp-admin.
- In the left menu, click Settings » General to access the site identity and favicon in WordPress controls.
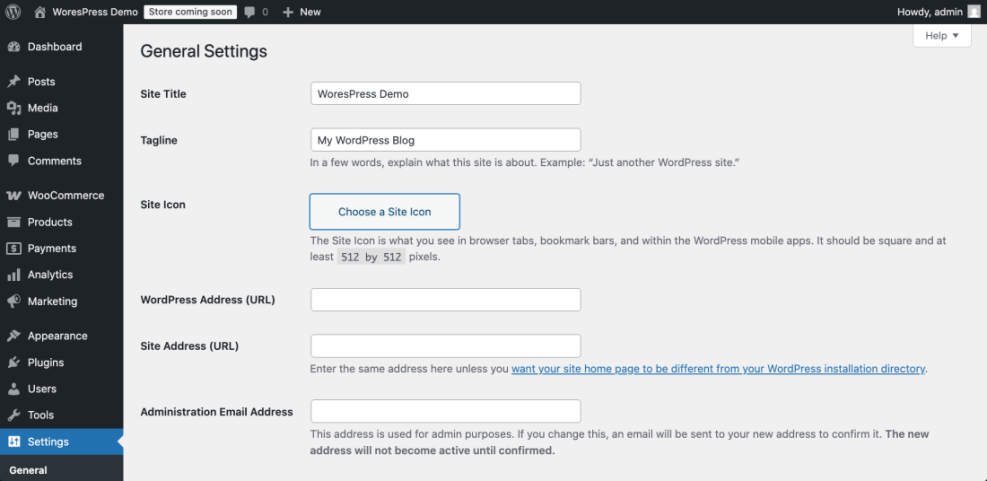
- Scroll down until you find the Site Icon section that shows a preview or a placeholder image of the current favicon in WordPress.
- Click Choose a Site Icon (or Change Site Icon if one already exists).
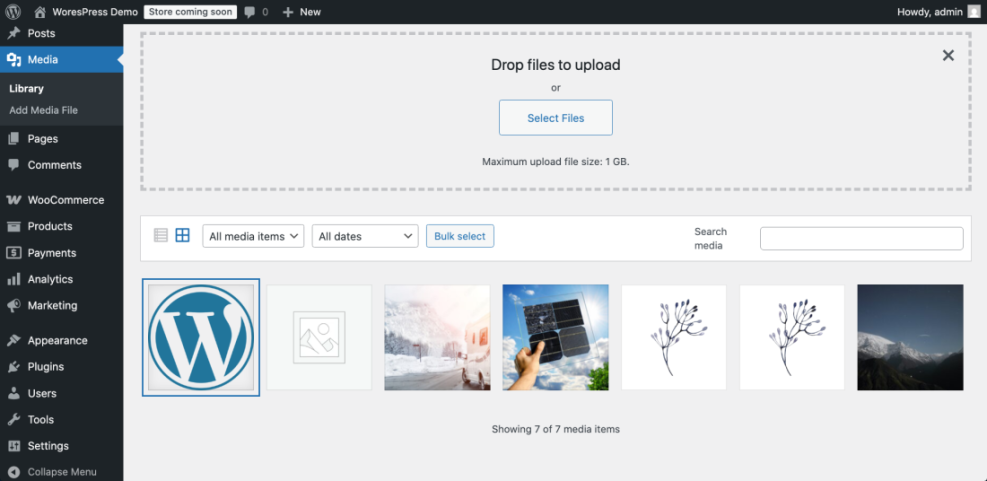
- In the Media Library tab, select the favicon image you uploaded earlier, or use Upload Files to upload it now.
- Press Select. When WordPress asks you to crop the image, adjust the crop box so your icon is centered and then click Crop Image.
- Return to the General Settings page, scroll to the bottom, and hit Save Changes to store the updated favicon in WordPress.
Next, open your site’s homepage in a new browser tab. The tab should now display your new WordPress favicon next to the site title; if it does not appear immediately, refresh the page or try a private window.
Step 3: Change Favicon in WordPress Using the Customizer
Many classic themes and slightly older sites still manage the favicon in WordPress through the Customizer. The relevant controls usually live under Site Identity, alongside the logo and site title fields.
- From the WordPress dashboard, go to Appearance » Customize.
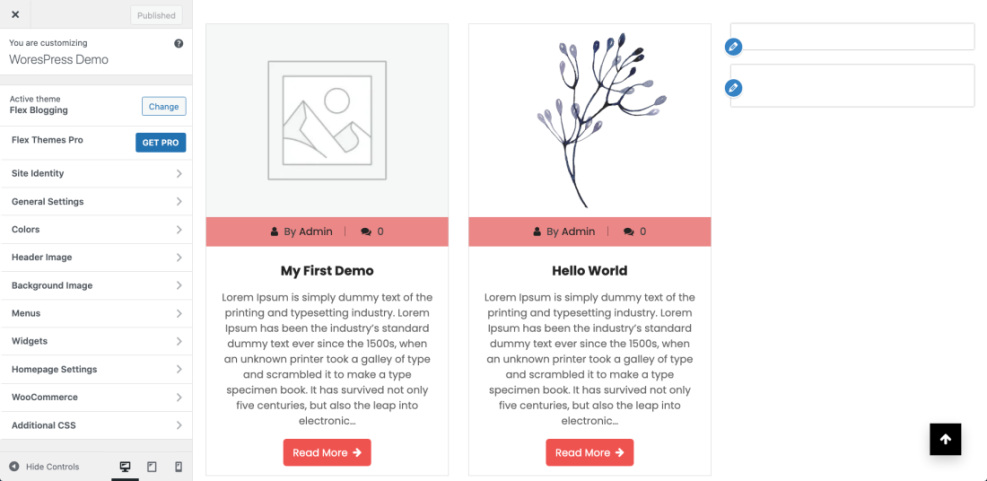
- In the Customizer sidebar, click Site Identity to access the logo and favicon in WordPress options.
- Locate the Site Icon section and choose Select site icon or Change image to update the WordPress favicon.
- Pick your favicon image from the Media Library or upload it, then click Select.
- Use the cropping tool if prompted so the main part of your icon fits nicely inside the square preview.
- Finish by clicking the top Publish button, which saves the new favicon in WordPress and applies it to the front end.
After publishing, open your site in another tab and confirm that the browser tab now shows the new WordPress favicon. Checking a couple of different pages helps you confirm the change appears consistently.
Step 4: Change Favicon in WordPress Block Themes (Site Editor)
Block themes rely on the Site Editor instead of the classic Customizer. Even in this newer interface, you can still control the favicon in WordPress by working with the Site Logo block and its site icon option.
- In your dashboard, navigate to Appearance » Editor.
- Open the template that holds your main header, usually the Home or Header template.
- Click the Site Logo block in the header area so its settings appear in the right-hand sidebar.
- Look for a toggle labeled Use as site icon or a link to Site Icon settings. Turning on this option connects your site logo to the favicon in WordPress.
- When the Site Icon panel opens, select or upload your favicon image and confirm your choice.
- Click Save in the top-right corner and confirm all template changes so the new WordPress favicon is stored.
Finally, visit the front of your site in a new tab. Both the logo in the header and the favicon in WordPress shown in the browser tab should now use the correct image.
Step 5: Clear Cache and Verify the Favicon Everywhere
Browsers and caching plugins are stubborn about favicons, so changes are not always visible instantly. After updating the favicon in WordPress, you may need a few extra steps to see the new icon.
- Perform a hard refresh on your site by pressing Ctrl + F5 (Windows) or Cmd + Shift + R (Mac) on the page where you want to see the new WordPress favicon.
- Open your site in a private or incognito window and check the browser tab icon there.
- Clear any caching plugins or CDN cache from their settings pages, then reload the site to update how the favicon in WordPress is served.
- On a mobile device, add the site to the home screen so you can confirm that the site icon in WordPress looks crisp at app icon size.
In stubborn cases where the old favicon keeps showing, allow some time for remote caches to expire or follow How to clear cache WordPress for a deeper cleanup after changing the favicon in WordPress.
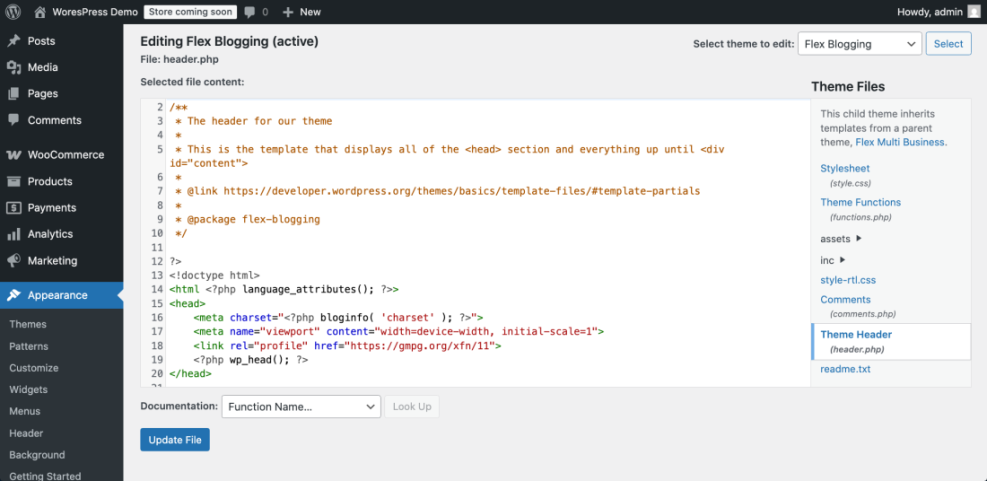
Step 6: Override the Favicon in WordPress with Code Snippets
Most sites can rely entirely on the built-in site icon feature, but some owners prefer extra control. A custom function lets you override the default favicon in WordPress and declare multiple icon sizes for different devices.
- Use FTP or your hosting file manager to open your child theme folder, usually wp-content/themes/your-child-theme.
- Edit the functions.php file in that folder.
- Paste the following code at the end of the file, after any existing code.
function wph_custom_favicon() {
    ?>
    <link rel="icon" href="<?php echo esc_url( get_stylesheet_directory_uri() . '/favicon-32x32.png' ); ?>" sizes="32x32" />
    <link rel="icon" href="<?php echo esc_url( get_stylesheet_directory_uri() . '/favicon-192x192.png' ); ?>" sizes="192x192" />
    <link rel="apple-touch-icon" href="<?php echo esc_url( get_stylesheet_directory_uri() . '/apple-touch-icon.png' ); ?>" />
    <meta name="msapplication-TileImage" content="<?php echo esc_url( get_stylesheet_directory_uri() . '/mstile-270x270.png' ); ?>" />
    <?php
}
add_action( 'wp_head', 'wph_custom_favicon' );
add_action( 'admin_head', 'wph_custom_favicon' );
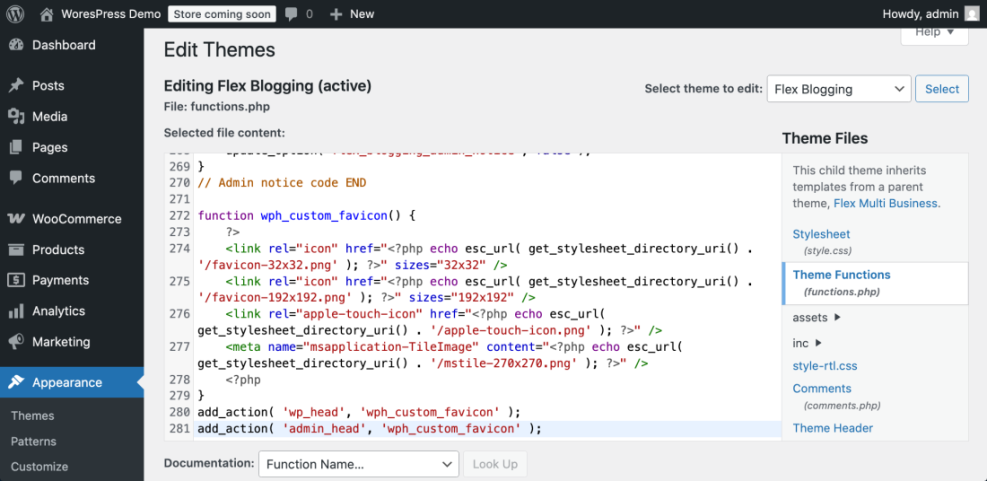
Once the function is in place, upload the icon files mentioned in the code to your child theme folder. The browser tab and WordPress admin screens should then use your custom WordPress favicon even if the theme does not expose a site icon setting.
Maintenance Methods for Managing a WordPress Site
Ongoing maintenance keeps your site healthy, fast, and secure, and that includes refreshing your favicon in WordPress when you rebrand. Different owners prefer different workflows, so it helps to compare the main options before you decide how to handle routine tasks.
| Method | Where You Use It | Main Purpose |
|---|---|---|
| DIY Manual Maintenance | WordPress dashboard and hosting control panel | Maximum control over updates, backups, favicon changes in WordPress, and checks for small or low-risk sites. |
| Managed Hosting Tools | Your host’s control panel or custom dashboard | Simplify routine maintenance with one-click updates, built-in backups, and basic security so you have more time to work on design changes like the favicon in WordPress. |
| Maintenance & Security Plugins | Plugins section inside the WordPress dashboard | Automate repetitive work such as backups, database cleanup, image optimization, and security scans while you manually update the WordPress favicon when needed. |
| WP-CLI and Developer Tools | SSH terminal with WP-CLI and deployment tools | Scriptable, fast maintenance for developers managing multiple or complex sites, including bulk changes to branding assets like the favicon in WordPress. |
| Professional WordPress Care Plan | External provider, freelancer, or agency | Hands-off maintenance with proactive monitoring, fixes, and expert support, often including help updating your logo and favicon in WordPress. |
Where to Find Your Favicon in the WordPress Dashboard
All of the tools you need to manage the favicon in WordPress live inside the admin dashboard. Depending on your theme and WordPress version, the WordPress favicon controls usually appear in one of three main places.
- Settings » General – the main location for the Site Icon field in modern WordPress versions.
- Appearance » Customize » Site Identity – common for classic themes that still use the Customizer to handle the WordPress favicon.
- Appearance » Editor – used by block themes where the Site Logo block can also act as the favicon in WordPress when you enable Use as site icon.
If none of these screens expose a WordPress favicon option, check your theme’s documentation or any bundled theme options panel. Some premium themes move the favicon in WordPress to a custom settings page to keep everything in one branded interface.
Conclusion You Are Ready to Go
At this point you have seen how to change the favicon in WordPress using General Settings, the classic Customizer, and the block-based Site Editor. A code snippet method for advanced users gives you an extra way to control how the WordPress favicon appears across different devices.
Keeping your favicon file safe alongside your logo assets makes future brand updates much easier. Whenever you redesign your site or adjust your colors, you can quickly repeat these steps and refresh the favicon in WordPress to match.
Further Reading
- How to change font color in WordPress
- How to edit WordPress files
- How to edit WordPress files
- How do you change your WordPress password