How Do You Make a Website with WordPress
A beginner-friendly roadmap from idea to live WordPress website
If you have never built a site before, “How do you make a website with WordPress?” can feel like an overwhelming question. The good news is that you can go from zero to a live, professional-looking website without coding, as long as you follow a clear roadmap.
In this guide, you will plan your website, register a domain, choose hosting, install WordPress, pick a theme, add pages, install a few essential plugins, and finally launch your site. If you are unsure what WordPress actually is, you can start by reviewing what WordPress is so the rest of this tutorial makes more sense.
Because there are already several in-depth build guides on WP Headliner, this article focuses on the “big picture” workflow: a simple, no-code method using a standard shared or managed WordPress host, plus starter templates and a handful of plugins to get you online fast.
Prerequisites
Before you start clicking through settings, make sure you have a few basics ready so you do not get stuck halfway through.
- A website goal: For example, “simple business site,” “portfolio,” or “blog.”
- A domain name idea: Ideally short, memorable, and easy to spell.
- Access to a web host: A shared or managed WordPress hosting account where you can install WordPress.
- 1–3 hours of focused time: You can get a simple site online in an afternoon if you follow the steps.
Step 1: Plan Your WordPress Website
Jumping straight into themes and colors is tempting, but a few minutes of planning will save you hours later. Planning gives your site structure and keeps it focused on your visitors’ needs.
- Define your primary purpose. Do you want leads, online sales, bookings, or just an online brochure?
- Identify your audience. Think about their main questions and what they expect to see on your site.
- List your must-have pages. Common examples: Home, About, Services, Blog, Contact.
- Sketch a simple sitemap. Decide which pages sit in your main menu and what belongs in dropdowns.
Step 2: Choose a Domain Name and Hosting
To make a website with WordPress, you need a place to store it (hosting) and an address people type into their browser (domain name).
- Pick a domain name. Use your brand name if possible. Avoid hyphens and confusing spelling.
- Register the domain. Either buy it from your hosting provider or a reputable domain registrar.
- Select WordPress-friendly hosting. Look for one-click WordPress installs, free SSL certificates, and good support. For more detail on comparing plans, see guides like how to choose the best WordPress hosting.
- Connect your domain to hosting. If the domain is separate from your host, update the domain’s nameservers to point to your hosting company, then wait for DNS to propagate.
Step 3: Install WordPress
Most modern hosts provide a one-click installer so you do not have to upload files manually. This is the fastest way to get WordPress running.
- Log in to your hosting control panel. This might be cPanel or a custom dashboard (depending on your host).
- Find the WordPress installer. Look for icons like “WordPress,” “Softaculous Apps Installer,” or “One-Click Install.”
- Start a new installation. Choose your domain, set your site title (you can change it later), admin username, and a strong password.
- Enable SSL/HTTPS. If your host offers a free SSL certificate, make sure you select
https://for the site URL. - Run the install. Click “Install” or “Finish,” then note the WordPress login URL your host shows (typically
https://yourdomain.com/wp-admin/).
If your host supports WP-CLI (command-line management for WordPress), an advanced alternative is to install via SSH:
# Run these from your site's document root in an SSH terminal
wp core download
wp config create --dbname=your_db --dbuser=your_user --dbpass=your_password
wp core install --url="https://yourdomain.com" --title="My WordPress Site" --admin_user="you" --admin_password="strong_password" --admin_email="you@example.com"
Step 4: Configure Basic WordPress Settings
Once WordPress is installed, it is time to log in to the dashboard and configure the core settings that affect your website’s identity, URLs, and reading experience.
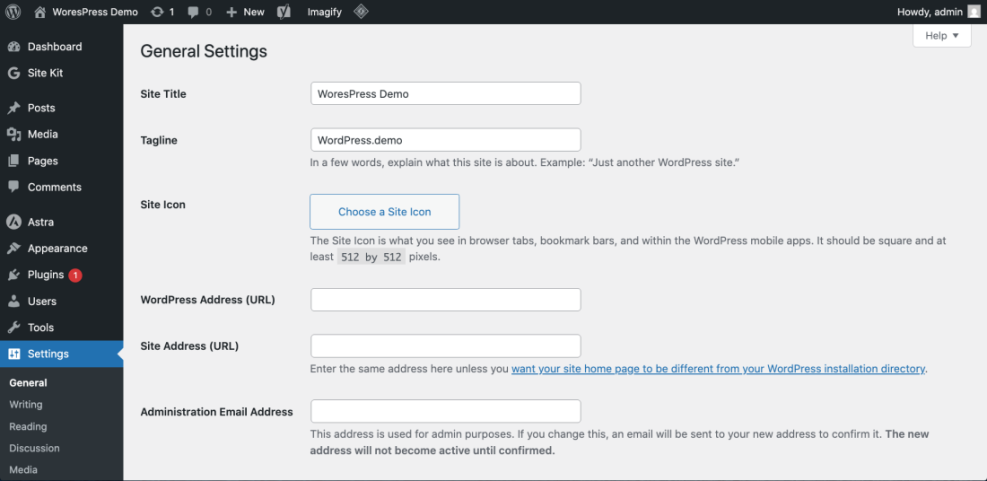
- Log in to WordPress. Visit
/wp-admin/on your domain and enter the admin credentials you created. - Set Site Title and Tagline. Go to Settings > General and enter a clear title (e.g., your brand name) and a short descriptive tagline.
- Check your URL and timezone. In the same screen, confirm the WordPress Address (URL) is using
https://and set your correct timezone and language. - Choose a permalink structure. Go to Settings > Permalinks and select “Post name” for clean, SEO-friendly URLs.
Step 5: Choose and Install a Theme
Your theme controls the design of your WordPress website—colors, typography, headers, and overall layout. The quickest way to make a site look polished is to start from a high-quality theme and import a starter layout.
- Browse themes in the dashboard. Go to Appearance > Themes and click Add New to see free themes from the WordPress directory.
- Filter for modern, responsive themes. Look for good reviews, recent updates, and mobile-friendly demos.
- Preview before activating. Use the live preview to see how a theme might look with your content.
- Activate your chosen theme. Once satisfied, click Activate. Some themes include starter sites you can import from their setup wizard.
For a deeper dive into layout and design choices, you can follow a dedicated guide such as how to design a website with WordPress when you are ready to refine your look and feel.
Step 6: Create Essential Pages and Navigation
With your theme active, your next task is to add the core pages that visitors expect and connect them through a clear navigation menu.
- Create key pages. Go to Pages > Add New and create pages like Home, About, Services, and Contact. Use short paragraphs and headings to structure your content.
- Build your homepage. You can either:
- Use a theme’s homepage template or starter layout, or
- Create a custom page and design it in the Block Editor.
- Set the homepage. Go to Settings > Reading and choose “A static page,” then select your new Home page.
- Create a navigation menu. Go to Appearance > Menus (or Appearance > Editor for block themes), add your key pages, and assign the menu to the primary location.
Step 7: Add Key Plugins for Features
Plugins add extra features to your WordPress website without needing code. Installing only what you need keeps your site fast and easier to maintain.
- Open the Plugins screen. Go to Plugins > Add New.
- Search for essential plugin types. At minimum, consider:
- A backup plugin (to store copies of your site).
- A security plugin (to harden logins and block attacks).
- A caching/performance plugin (to speed up page loads).
- A contact form plugin (for your Contact page).
- An SEO plugin (to manage titles and meta descriptions).
- Install and activate. For each plugin, click Install Now then Activate, and follow any setup wizard provided.
- Remove unused plugins. Delete anything you tested but are not actively using to reduce clutter and risk.
Step 8: Preview, Test, and Launch Your Site
Once your content, theme, and plugins are in place, it is time to test everything and make your site public.
- Preview pages on desktop and mobile. Use your browser’s responsive tools or your phone to check readability and layout.
- Click every menu item and button. Ensure no broken links, missing pages, or placeholder text remain.
- Test forms and email. Submit your contact form and confirm you receive the messages at the right address.
- Confirm HTTPS and padlock. Visit your site and verify that the browser shows a secure padlock icon and no mixed-content warnings.
- Disable any “coming soon” or maintenance mode. If you used a maintenance plugin, turn it off so visitors can access the site.
From Blank Screen to Live WordPress Website
You have now walked through the full journey of making a website with WordPress: planning your structure, setting up a domain and hosting, installing WordPress, choosing a theme, adding core pages, installing essential plugins, and finally launching your site.
From here, you can refine your design, publish regular content, and measure performance over time. The key is to keep things simple at first: focus on clear messaging, fast loading pages, and easy navigation. As your confidence grows, you can build on this solid foundation with more advanced features and optimizations.
Further Reading
- How to Create a Website with WordPress
- Install WordPress Step by Step
- Best Free WordPress Blog Themes
- Beginner WordPress Security Best Practices Guide