Best Free WordPress Plugins for Bloggers
A practical, no-fluff plugin stack to launch and grow your blog

Starting a WordPress blog is easy. Figuring out which plugins you actually need is where most bloggers get stuck. Install too few and you miss important features like SEO, forms, and backups. Install too many and your site slows down, breaks, or even becomes less secure.
In this guide, you’ll build a lean, battle-tested stack of free WordPress plugins that covers SEO, email list growth, social sharing, speed, security, and workflow. You’ll learn what each plugin type does, which features to look for, and how to configure them step by step.
If you’re not sure what plugins are or how they work with WordPress, start by reading this overview of what WordPress plugins are and how they work, then come back to build your ideal blogging setup.
Prerequisites
Before you start installing plugins, make sure your WordPress setup is ready. A few checks now will save you from conflicts, errors, and slowdowns later.
- A self-hosted WordPress.org site (not the free WordPress.com plan).
- Administrator access to your WordPress dashboard.
- Access to your hosting control panel or file manager (for emergencies).
- A recent backup of your site (database and files).
- WordPress core, theme, and existing plugins updated to their latest stable versions.
Step 1: Decide How Many Plugins Your Blog Really Needs
Free plugins are powerful, but every plugin adds code that your server must load. Too many plugins—or overlapping ones—will slow your blog and increase the chance of conflicts.
Instead of grabbing everything that looks interesting, aim for a focused “starter stack” that covers these core areas:
- SEO & metadata: Optimize titles, descriptions, and sitemaps.
- Forms & lead capture: Contact forms and email opt-in forms.
- Social sharing: Easy share buttons for posts and pages.
- Analytics: See which content performs best.
- Performance: Caching and image optimization.
- Security & backups: Protect your site and restore quickly if needed.
- Workflow helpers: Editorial calendar, redirection, link management.
For a typical blogger, 8–12 well-chosen plugins are more than enough. The rest of this tutorial walks you through the best free options in each category and how to set them up.
Step 2: Install a Free SEO Plugin
An SEO plugin is non-negotiable for modern blogging. It helps you control titles, meta descriptions, XML sitemaps, and other on-page SEO basics without touching code.
Two popular free options are:
- Yoast SEO (free): User-friendly analysis of readability and keywords, plus solid default settings.
- Rank Math (free core): Lightweight, modular, and packed with advanced options even in the free version.
To install your chosen SEO plugin:
- In your WordPress dashboard, go to Plugins → Add New.
- Search for “Yoast SEO” or “Rank Math”.
- Click Install Now, then Activate.
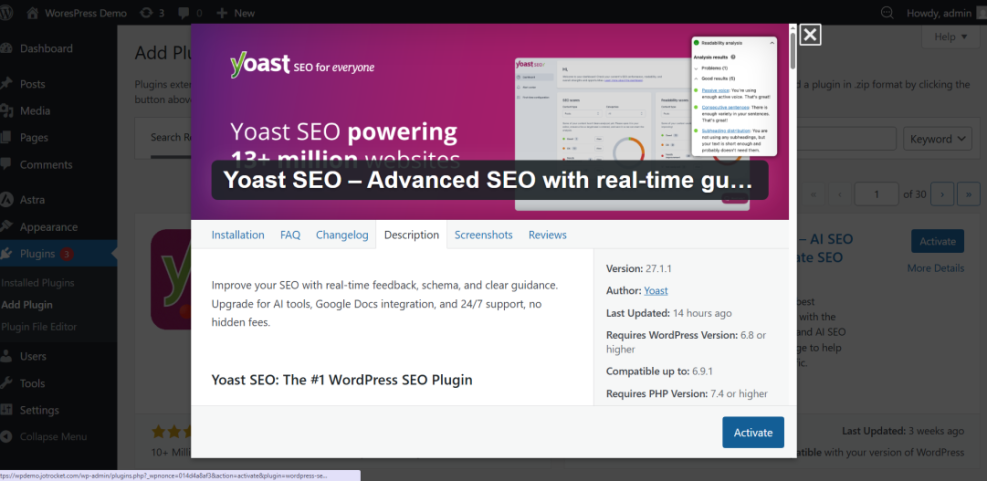
Once activated, run the plugin’s setup wizard. It will ask a few questions about your site type (blog, business, etc.) and configure basic settings for you. After that, edit a post and use the SEO meta box to:
- Write a compelling SEO title and meta description.
- Set a focus keyword to guide your writing.
- Check readability suggestions (subheadings, sentence length, passive voice).
When you’re ready to go deeper with configuration and comparisons, review this guide to the best WordPress SEO plugins and tools.
Step 3: Add a Contact Form Plugin
Every serious blog needs a contact form. It keeps your email private while making it easy for readers, sponsors, and partners to reach you.
Popular free options include:
- WPForms Lite: Drag-and-drop builder that’s very beginner-friendly.
- Contact Form 7: A classic plugin that’s flexible but more technical.
To add a simple contact form with a modern builder like WPForms Lite:
- Go to Plugins → Add New and search for “WPForms Lite”, then install and activate it.
- Navigate to WPForms → Add New.
- Choose a Simple Contact Form template.
- Customize fields (Name, Email, Message), then click Save.
- Create a new page called Contact and add the WPForms block, selecting your new form.
Don’t forget to test the form from a different email address and check spam folder behavior. When you need more advanced comparisons, read this roundup of the best contact form plugins for WordPress.
Step 4: Connect an Email Opt-in Plugin
Growing an email list is one of the most important things you can do as a blogger. An email opt-in plugin connects your blog to your email service (like MailerLite, Sendinblue, or Mailchimp) and lets you display signup forms.
Look for a free plugin that offers:
- Integration with your email service provider.
- Multiple form types (inline, sidebar, popup).
- GDPR-friendly consent checkboxes.
- Basic conversion statistics.
To set up a typical opt-in plugin:
- Install and activate the plugin from Plugins → Add New.
- Connect it to your email provider with an API key (usually found in your email tool under “Integrations” or “API”).
- Create a new form and design the headline, copy, and fields (usually just name and email).
- Display the form in key locations: below posts, in the sidebar, and optionally as an exit intent popup.
Step 5: Add Social Sharing & Engagement Plugins
Social sharing plugins help readers spread your articles on platforms like X (Twitter), Facebook, LinkedIn, and Pinterest. Done right, they can increase your reach without cluttering your design.
When choosing a free social sharing plugin, look for:
- Lightweight code: Avoid heavy plugins with flashy animations that slow pages.
- Control over placement: Above content, below content, or floating sidebar.
- Click-to-tweet boxes: Easy way to share quotes from your post.
- Share count options: Ability to hide counts on new blogs to avoid “social proof” issues.
After installing your chosen plugin:
- Enable sharing icons on single blog posts first (not necessarily on pages or archives).
- Test on mobile to ensure buttons are usable and not blocking content.
- Check that links open the correct social networks with pre-filled titles and URLs.
Step 6: Improve Speed with Caching and Image Optimization Plugins
Speed is critical for user experience and SEO. Even as a new blogger, you should enable caching and basic image optimization early to keep your site fast as it grows.
For caching, popular free options include:
- LiteSpeed Cache: Excellent if your host runs LiteSpeed servers.
- WP Super Cache: Simple, stable, and easy to configure.
- W3 Total Cache: Powerful but more advanced; best for experienced users.
To set up a basic caching plugin like WP Super Cache:
- Install and activate it from Plugins → Add New.
- Go to its settings page (often under Settings → WP Super Cache).
- Switch caching from Off to On and save your changes.
- Clear the cache after major design or plugin changes.
For images, consider an optimization plugin that can:
- Compress images as you upload them.
- Bulk optimize older images.
- Optionally enable lazy loading for below-the-fold images.
Step 7: Protect Your Blog with Security & Backup Plugins
Security and backups are like insurance for your blog. You hope you never need them, but when something goes wrong, they’re priceless.
For security, free plugins typically offer:
- Firewall rules to block malicious traffic.
- Login protection (limit login attempts, reCAPTCHA, or two-factor prompts).
- File change detection and basic malware scans.
For backups, a good free plugin should let you:
- Schedule automatic backups (daily or weekly).
- Download backups to your computer or send them to cloud storage.
- Restore your site from a backup in a few clicks.
To set up a backup plugin:
- Install and activate it from Plugins → Add New.
- Run your first full backup manually and download it.
- Set a schedule (e.g., weekly for low-traffic blogs, daily for high-traffic).
- Test a restore on a staging site if your host offers one.
Step 8: Improve Your Blogging Workflow with Utility Plugins
Once your essentials are in place, you can improve your day-to-day workflow with a few lightweight utilities. These don’t directly affect readers, but they make publishing faster and more organized.
Useful free workflow plugins include:
- Editorial calendar plugins: See your posts on a calendar view, drag and drop to reschedule, and keep a consistent posting rhythm.
- Redirection plugins: Manage 301 redirects when you change URLs or delete posts.
- Link management plugins: Organize affiliate links and track clicks.
To keep your site fast and stable:
- Add workflow plugins last, after SEO, forms, caching, and security.
- Disable any modules you don’t actively use.
- Review your plugins quarterly and remove anything that’s no longer essential.
Build a Lean, Powerful Blogging Stack
You don’t need dozens of plugins to run a successful WordPress blog. A focused set of free tools for SEO, forms, email, social sharing, performance, security, and workflow can take you a very long way.
By following the steps in this guide, you’ve learned how to choose and configure must-have plugins without bloating your site. As your blog grows, you can always upgrade individual plugins to premium versions—but the solid foundation you’ve built here will remain the same.
Review your plugin list regularly, keep everything updated, and remove anything that isn’t pulling its weight. A lean, well-maintained plugin stack is one of the best investments you can make in your blog’s long-term health.
Further Reading
- Beginner Checklist for Optimizing WordPress Blog Posts
- Content Planning Workflow for WordPress Blogs
- WordPress Speed Optimization for New Bloggers
- WordPress Performance Checklist for Bloggers
Frequently Asked Questions
How many free plugins should a typical WordPress blog use?
A free plugin slowed down my site. What should I do?
Are free WordPress plugins safe for my blog?
What should I do if a plugin breaks my site after activation?
wp-content/plugins and rename the plugin’s folder; WordPress will deactivate it automatically. Once you’re back in, update everything and test alternative plugins on a staging site before going live.