Too many WordPress plugins can slow your site, create security risks, and cause confusing conflicts, so this checklist helps you audit WordPress plugins and remove overlaps safely. Instead of guessing which tools to keep, you will follow a clear process to streamline your stack without breaking key features your visitors rely on.
By the end of this walkthrough, you will know exactly which plugins you need, which ones overlap, and how to deactivate and remove the extras without surprises. You will also build a simple reference document so future plugin decisions stay fast and consistent.
What You Need to Start
- Administrator access to your WordPress dashboard.
- A recent full site backup that includes files and database.
- Access to your web hosting panel in case you need to restore quickly.
- A staging or test copy of your site, if your host provides one.
- 15–60 minutes of low-traffic time to run through the checklist.
Step 1: Back up and use staging
Before you change anything in your plugin stack, protect your site with a fresh backup and, ideally, work on a staging copy. This ensures you can roll back instantly if a removed plugin was still powering an important feature.
- Log in to WordPress with an administrator account.
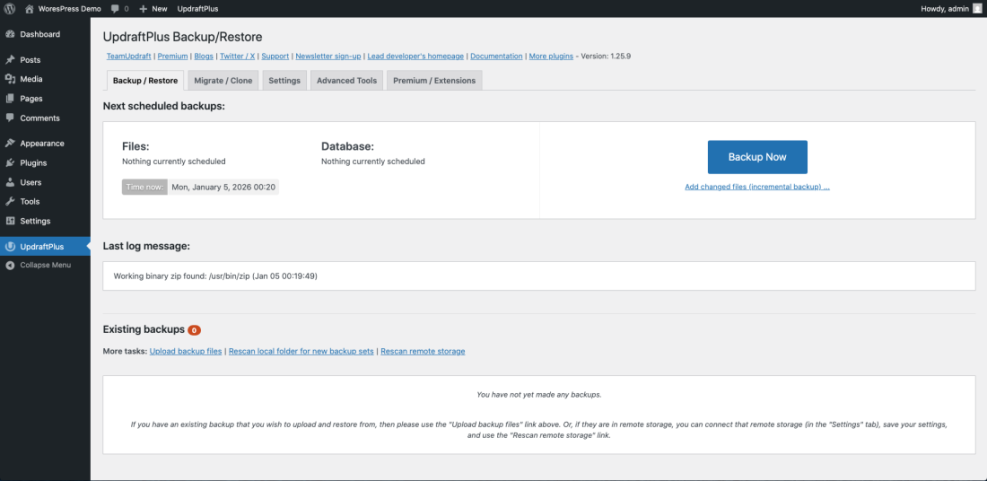
- Open your backup tool from Plugins » Installed Plugins or your hosting panel backup section.
- Run a new full backup that includes both files and database.
- If your host supports staging, create or refresh a staging site from your hosting control panel.
- Confirm where your backup is stored and note the restore method for emergencies.
Navigate to your backup plugin dashboard and confirm the backup shows a new, successful entry with today’s date and time.
For a reusable maintenance routine, you can follow WordPress migration checklist for blogs to keep backups and updates on a simple schedule.
If you are not yet comfortable with test environments, review How to use ai in WordPress before changing live plugins.
How to verify: You should see a fresh backup entry and, if using staging, be able to log into the staging site’s WordPress dashboard.
Step 2: List and label all plugins
A clear inventory makes it easy to spot overlapping plugins and accidental installs. You will list all plugins, record what each does, and flag anything that looks unfamiliar or unused.
- In your dashboard, go to Plugins » Installed Plugins.
- Switch the filter to Active to focus only on plugins currently running.
- Open a spreadsheet or document and create columns for Plugin Name, Type, Main Feature, and Notes.
- For each active plugin, copy the name and short description into your list, then describe in a few words what it does (for example, “SEO,” “forms,” “caching,” “security”).
- Add a note like “Not sure” or “Unused?” for any plugin you do not recognize immediately.
Scroll through the full Installed Plugins screen while building your list so you do not miss network-activated or must-use plugins if you run multisite.
If you have SSH access and are comfortable with the command line, you can also generate a quick list using WP-CLI:
wp plugin list --status=active --format=tableHow to verify: You should have a complete list of all active plugins with at least a short, human-readable note about what each one does.
Step 3: Group plugins by function
Grouping plugins by function is the fastest way to see where overlaps exist. Most conflicts and slowdowns happen when multiple plugins try to handle the same job.
- Look at your inventory and add a Category column if you have not already.
- Assign each plugin a category such as SEO, Caching, Security, Backups, Analytics, Forms, Ecommerce, or Design.
- Highlight any category that contains more than one plugin (for example, three security plugins or two backup tools).
- Mark any plugin whose features are now handled by WordPress core or your managed hosting (for example, built-in image optimization or server-level caching).
Glance over your grouped list and underline rows where you see clear duplication, like several contact form plugins or multiple analytics trackers.
How to verify: You should be able to point to each category and say how many plugins handle that function and which ones look redundant.
Step 4: Find overlapping and redundant plugins
Now you will identify where WordPress plugins overlap by comparing features within each category. Your goal is to pick one primary plugin per function and mark potential removals carefully.
- Within each category, compare plugin descriptions and settings pages to see which features are duplicated (for example, spam protection in multiple form plugins, duplicate SEO titles, or overlapping caching settings).
- Open each plugin’s Settings page in a new tab to confirm what it actually controls on your site.
- Look for older plugins that were replaced by a newer, more complete tool but never fully removed.
- Check your site frontend for widgets, shortcodes, or blocks from each plugin so you know what will disappear if you remove it.
Navigate through key areas like your homepage, blog posts, contact page, and shop pages while noting which plugins obviously power visible features.
For a deeper performance-focused review of overlapping features, you can compare this checklist with How to check if WordPress plugins are up to catch slow or risky plugins.
How to verify: Each potential removal candidate should have a clear note explaining which remaining plugin will cover its features or why those features are no longer needed.
Step 5: Decide what to keep replace or remove
Once you know where overlaps occur, you need a simple decision framework. This stops you from keeping unnecessary plugins just because they were installed long ago.
- For each category, choose one “primary” plugin based on reliability, current features, and active support.
- Check the Last Updated date and Active Installations on the plugin’s page in Plugins » Installed Plugins and on WordPress.org.
- Flag any plugin that has not been updated in the last year, has poor ratings, or conflicts with your primary tool as a removal candidate.
- Look for plugins that only add minor cosmetic tweaks or small conveniences and weigh whether they are worth the extra bloat.
- Record your decision in the Notes column as Keep, Replace, or Remove for each plugin.
Open the plugin’s details panel from the Installed Plugins screen and quickly scan the changelog and compatibility information before making your final decision.
If you find entire plugins that no longer serve a purpose, pair this checklist with Best WordPress seo plugins and tools to remove leftover clutter.
How to verify: Every plugin in your inventory should have a clear action label and justification so you can proceed confidently in the next step.
Step 6: Deactivate test and clean up safely
Now you will actually deactivate and remove overlapping plugins, but you will do it in a controlled way. Start on staging first, then repeat on live once everything is confirmed.
- On your staging site, go to Plugins » Installed Plugins and filter by Active.
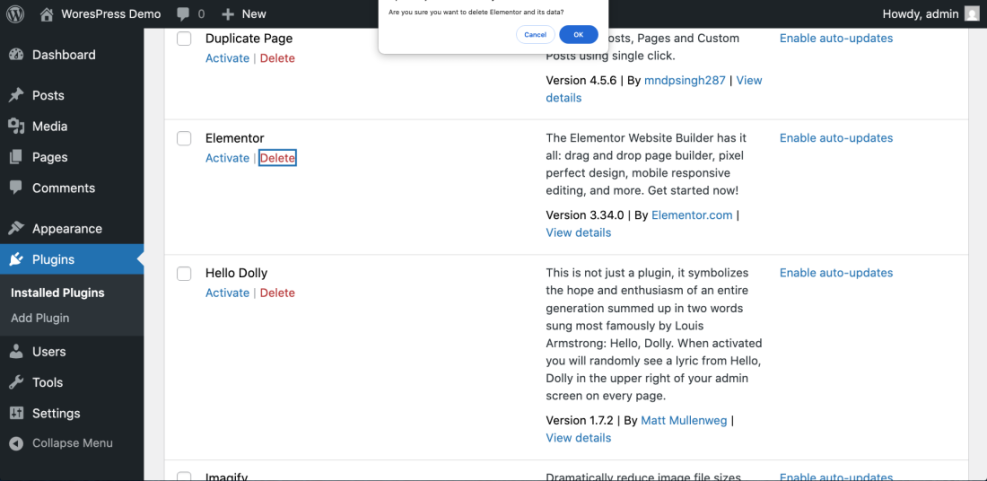
- For each plugin marked Remove, click Deactivate first instead of deleting it immediately.
- Open a new browser tab and test your homepage, key landing pages, contact forms, and any shop or checkout pages.
- If everything works, go back and click Delete on the deactivated plugin.
- Repeat the same deactivate-test-delete cycle on your live site during low-traffic hours once you are satisfied with staging results.
After deactivating plugins, clear any caching from your caching plugin or server-level cache so you see the real, updated frontend.
When you make larger changes or edits around performance and security, it is smart to read Safely Testing Plugins on a Staging Site so you can build a repeatable test routine.
How to verify: Your site should work normally after each batch of removals, with no missing forms, broken layouts, or fatal errors.
Conclusion You Are Ready to Go
You have now followed a full checklist to audit WordPress plugins, identify overlapping tools, and safely remove what you no longer need. Your plugin stack is lighter, easier to maintain, and less likely to cause conflicts or slowdowns.
Keep your inventory document and repeat this audit at least a few times per year or after major redesigns. With a lean, well-documented plugin setup, every new plugin decision becomes faster and safer.
Further Reading
- Beginner WordPress security best practices guide
- WordPress performance tuning beginner guide
- WordPress Backup Strategy That Never Fails
- Monthly Speed Audit Checklist for WordPress Sites
- Common WordPress backup errors and how to fix