If you only need to Export Single Page in WordPress, you do not have to migrate your entire site or rebuild the page from scratch. Instead, you can export just that one page and move it safely to another WordPress install or keep it as a backup.
In this tutorial on how to Export Single Page in WordPress, you will learn how to prepare your site, choose the right export method, use a plugin to export a single page, import it into another site, and even export it with WP-CLI. By the end, you will know exactly how to move one important page without touching the rest of your content.
What You Need Before Exporting a Single Page
- Administrator access to your WordPress dashboard.
- Permission to install and activate plugins on the site (for the plugin method).
- FTP, SSH, or hosting control panel access if you plan to use WP-CLI or phpMyAdmin-style tools.
- Basic familiarity with navigating Pages, Tools, and Plugins in the WordPress admin.
- Optional but recommended: a recent full backup of your WordPress site before exporting or importing content.
Step 1: Choose the Best Way to Export a Single Page
Different situations call for different ways to export a single page in WordPress. Before you actually Export Single Page in WordPress, the table below helps you decide which method fits your needs best.
| Method | Where You Use It | Main Purpose |
|---|---|---|
| Export Single Page with Plugin | WordPress dashboard » Plugins & All Export menu | Beginner friendly way to export one specific page (by title or ID) into a CSV or XML file without touching the rest of your site. |
| Export Single Page with WP-CLI | SSH terminal with WP-CLI installed | Advanced, scriptable export of a single page by ID for developers or power users with server access. |
| Export Page via Tools » Export (All Pages) | WordPress dashboard » Tools » Export | Export all pages (or pages in a date range). Not a true “single page” export, but can work on small sites with only a few pages. |
| Manually Copy & Paste Page | WordPress editor (Block or Classic) on both sites | Quick way to move the main content of a page when you don’t need structured data, custom fields, or page builder settings. |
| Duplicate a Page on Same Site | WordPress dashboard » Pages list with a duplication plugin | Create a copy of a page inside the same site (for new landing pages or tests) without actually exporting or importing. |
Once you know which method fits your situation, follow the detailed steps below to Export Single Page in WordPress without affecting the rest of your content.
Step 2: Export Single Page in WordPress with a Plugin (WP All Export)
When you want to Export Single Page in WordPress directly from the dashboard, a dedicated export plugin is the most user friendly option. In this guide, we will use the free WP All Export plugin from the official WordPress.org repository.
- Log in to your WordPress dashboard by visiting yourdomain.com/wp-admin with an administrator account.
- Confirm which page you want to export by going to Pages » All Pages, searching for the title, and noting the exact title and ID.

- In the left sidebar, go to Plugins » Add New Plugin.
- Use the search field to look for WP All Export. Locate the plugin with the blue icon from Soflyy, then click Install Now and Activate.
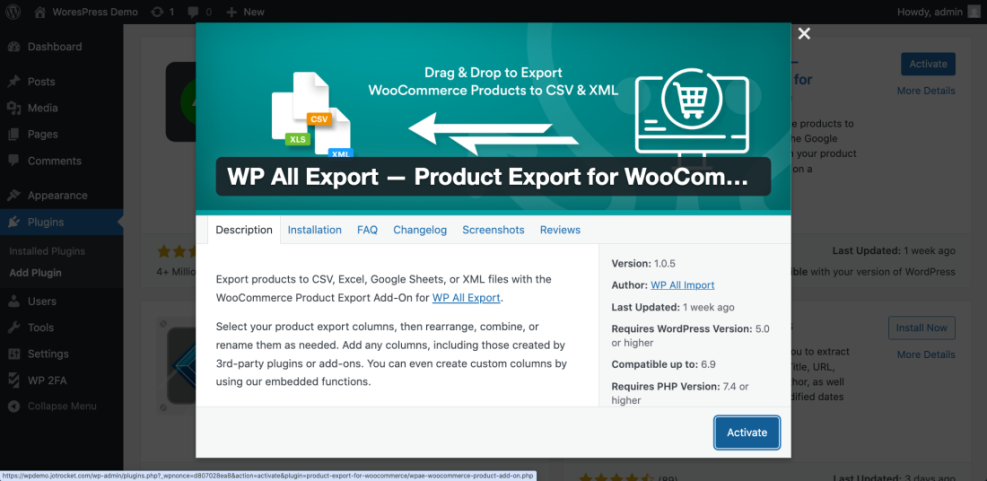
- After activation, you should see a new menu item such as All Export or similar in your WordPress admin sidebar.
- Navigate to All Export » New Export.
- Under “What would you like to export?”, select Specific Post Type and choose Pages from the dropdown.
- Click the Add Filtering Options button and create a filter so that only your single page is exported. For example:
- Title equals Your Exact Page Title, or
- ID equals 123 (your page ID).
- Optionally click Customize Export File to choose which fields you want to include, such as title, content, excerpt, featured image, and custom fields.
- When you are ready, click Continue, then click Confirm & Run Export.
- After the export completes, click the Download Export File button to save the CSV or XML file to your computer.
You can open the exported file in a text editor or spreadsheet to confirm that it includes only one row or one <item> entry corresponding to your chosen page.
Step 3: Import the Exported Page into Another WordPress Site
Exporting the page is only half the process. If your goal is to move that page to another WordPress site, you need to import the export file on the destination site.
- Log in to the destination WordPress site where you want the page to appear.
- Install and activate a compatible import plugin such as WP All Import from Plugins » Add New Plugin.
- In the new site’s admin sidebar, go to All Import » New Import (or the equivalent screen provided by your import plugin).
- Click Upload a file and select the export file (CSV or XML) that you downloaded in the previous step.
- Follow the plugin’s mapping wizard to match fields such as post_title, post_content, and custom fields to the Pages post type.
- Run the import and wait for the confirmation message that the page has been created.
- Go to Pages » All Pages on the destination site and open the new page in the editor to confirm everything imported correctly.
After verifying the page in the editor, view it on the front end and test the URL, images, and links. Update any internal links or menus that still point back to the original site.
Step 4: Export Single Page in WordPress with WP-CLI
If you are comfortable with the command line and have WP-CLI installed on your server, you can Export Single Page in WordPress by its ID without installing any new plugins.
-
- In your dashboard, go to Pages » All Pages.
- Hover over the page title and look at the URL preview in your browser. You will see something like
post=123where 123 is the page ID. Find the numeric ID of the page you want to export:
- Connect to your server using SSH and log in with your hosting account credentials.
- Change directory to the root of your WordPress installation (the same folder that contains wp-config.php).
- Run a WP-CLI export command that targets only that page ID:
wp export --dir=exports --filename_format=single-page.xml --post__in=123Replace 123 with your actual page ID, and adjust the –dir path to any writable directory.
- When the command finishes, use your hosting file manager or SFTP to download the single-page.xml file from the exports directory.
- To import this file into another WordPress site, go to Tools » Import, install the WordPress Importer if necessary, and upload the single-page.xml file.
On the destination site, the importer will create the page using the data from the XML file. You can then edit it as needed and update its permalink, menus, and internal links.
Step 5: Manually Copy a Page Between Sites
If you only care about the visible content and do not need structured data or custom fields, you can manually copy and paste the page. This method works even when you cannot install plugins or access WP-CLI.
- On the original site, open the page you want to move in the editor (Block Editor or Classic Editor).
- Select all the content in the editor. In the Block Editor, you can click the three dot menu and choose Copy all blocks, or press Ctrl + A followed by Ctrl + C (Windows) or Cmd + A followed by Cmd + C (Mac).
- Log in to the destination site and go to Pages » Add New.
- Paste the copied content into the new page’s editor using Ctrl + V or Cmd + V.
- Recreate any featured image, categories, tags, and page template settings manually.
- Publish or update the page and test it on the front end to make sure styling and layout look acceptable.
This manual method is quick, but it will not automatically move files, custom fields, or page builder settings unless they are embedded in the content itself. For complex layouts or dynamic content, use the plugin or WP-CLI export instead.
Step 6: Duplicate a Page on the Same Site Instead of Exporting
Sometimes you don’t actually need to move a page to another site; you only need a copy on the same site. In that case, duplicating is faster than exporting.
- Install a page duplication plugin such as “Duplicate Page” or “Yoast Duplicate Post” from Plugins » Add New Plugin.
- Go to Pages » All Pages and locate the page you want to duplicate.
- Use the plugin’s duplicate option (for example, Duplicate or Clone) that appears under the page title.
- Open the duplicated page, update the title, slug, and content as needed, and click Publish or Update.
Duplicating a page keeps everything on the same site and is useful for new landing pages, A/B testing, or creating reusable templates without the extra step of importing and exporting.
Conclusion Your Single Page Export Is Ready
By now you have seen several practical ways to Export Single Page in WordPress, from a friendly plugin interface to advanced WP-CLI commands, manual copy and paste, and simple duplication on the same site. Whether you are moving one landing page to a new project or keeping a backup of an important sales page, you can do it without migrating the entire site.
Because you also verified your backups, checked the imported page on the destination site, and cleaned up links and menus, you turned a simple export into a smooth mini migration. Keep your export files in a safe place and repeat this process whenever you need to Export Single Page in WordPress between different installs.
Further Reading and Resources
- How to Export a Page in WordPress
- How to duplicate WordPress page
- How to Copy a Page in WordPress
- How to move WordPress site to new host
Single Page Export Frequently Asked Questions
Can I export a single page in WordPress without using any plugin
wp export command with the --post__in parameter and pass the page ID so only that page is exported. As a low tech alternative, you can also copy the page content manually from the editor and paste it into a new page on the destination site, then recreate the featured image and settings. Both methods let you effectively Export Single Page in WordPress without installing a plugin.