
If you want visitors to reach you without exposing your email address, adding a contact form to WordPress is the safest and most professional option. In this tutorial you will use a popular free plugin so you can create a simple, reliable contact form in a few minutes.
By the end, you will have a dedicated contact page, a working form that sends messages to your inbox, basic spam protection, and a repeatable process you can use on any WordPress site you manage.
What You Need to Start
- An existing WordPress site you can log into with an Administrator account.
- Access to the WordPress dashboard at /wp-admin.
- Permission to install plugins on your hosting plan.
- An email inbox where you want to receive new inquiries.
- Optional but recommended a working SMTP setup so WordPress emails are reliably delivered.
Step 1: Plan your contact form goals
Before you install anything, decide what you actually want your contact form to do and which questions you need to ask visitors. A short, focused form converts better and is easier to maintain.
- Write down the information you really need from visitors, such as full name, email address, and their message.
- Decide whether you truly need extra fields such as phone number, subject line, or file uploads. Remove anything that is “nice to have” but not essential.
- Choose who should receive contact form emails, for example a shared support@ or hello@ inbox instead of a personal address.
- Decide where the form will live, typically a dedicated Contact page linked from your main menu and footer.
- Note any legal or compliance needs, such as a checkbox for consent if you store inquiries or add contacts to a mailing list.
Check that you can describe your form in one sentence such as “A simple contact form with name, email, and message that sends to our support inbox.” If you can do that, you are ready to build it.
Types of Contact Forms You Can Add
Before you build, it helps to see how different contact form types support your site. The table below compares common forms you might create in WordPress and how they fit into your overall strategy.
| Form Type | Where It Appears | Main Purpose |
|---|---|---|
| Simple Contact Form | Dedicated contact page | General inquiries such as questions, feedback, and basic support |
| Support Request Form | Help center, support page | Collects detailed info (order number, product, issue) to resolve problems faster |
| Quote or Estimate Form | Service landing pages | Captures project details and budgets so you can send tailored pricing |
| Booking / Inquiry Form | Sales pages, product or service pages | Lets visitors request appointments, demos, or consultations |
For this tutorial you will start with a simple contact form. Later you can duplicate it and adapt it for support, quotes, or bookings as your site grows.
Step 2: Install a contact form plugin
WordPress does not include a built in contact form, so you need a plugin. In this guide you will use the free WPForms Lite plugin because it is beginner friendly and widely supported.
- Log into your WordPress dashboard as an Administrator.
- In the left menu, navigate to Plugins » Add New.
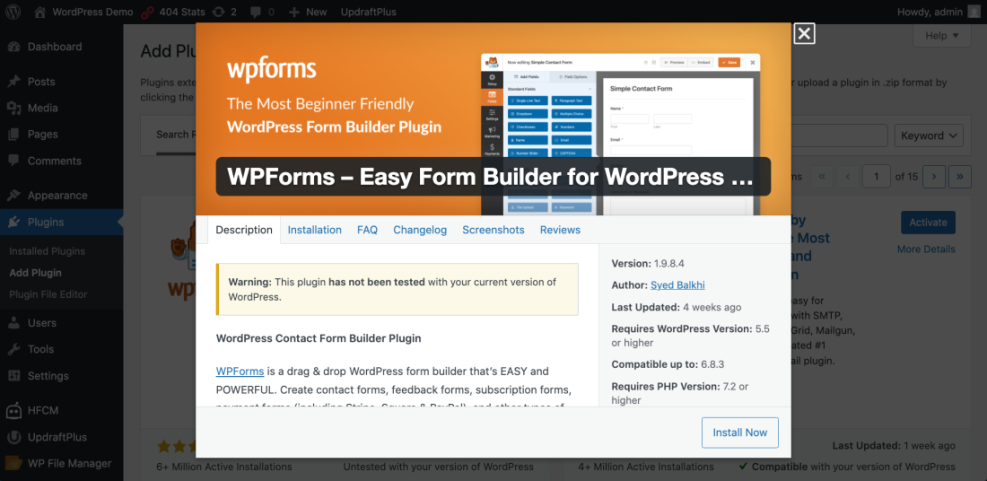
- In the search box on the top right, type WPForms and wait for results to load.
- Find Contact Form by WPForms – Drag & Drop Form Builder for WordPress by WPForms.
- Click Install Now, then click Activate when the button changes.
Navigate to Plugins » Installed Plugins and confirm that WPForms is listed as active.
Once activated, a new WPForms menu will appear in your WordPress sidebar. That is your main entry point for creating and managing forms.
If you want to compare other options before committing, review Best Contact Form Plugins for WordPress for detailed recommendations.
Step 3: Create your first contact form
Now you will create the actual contact form that visitors will fill out. WPForms uses a drag and drop builder, so you can add or remove fields without code.
- In the WordPress dashboard, go to WPForms » Add New.
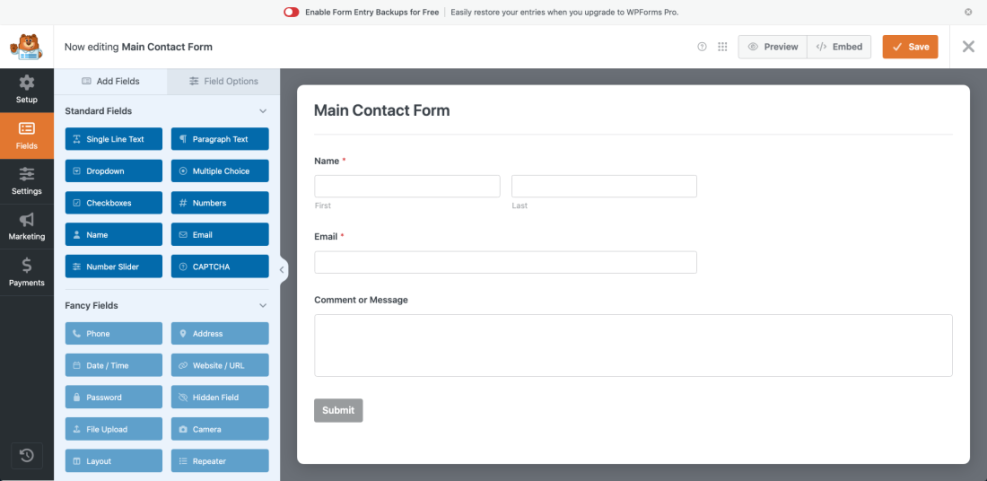
- Enter a name in the Form Name field, such as “Main Contact Form”.
- Under Select a Template, hover over Simple Contact Form and click Use Template.
- Review the default fields in the preview (Name, Email, Comment or Message). Click any field to edit its Label or make it Required.
- To add another field, drag it from the left sidebar into the form preview, then configure it in the panel on the left.
- When you are satisfied, click the orange Save button on the top right.
In the form builder, drag a new field from the left panel into the live form preview to confirm you are comfortable changing the layout.
You can safely adjust your form later. For advanced options like conditional logic or multi step forms, follow the dedicated WPForms Tutorial.
Step 4: Add the contact form to a page
With your form created, the next step is to place it on a public page so visitors can find it. You will use a dedicated Contact page for this.
- In your dashboard, navigate to Pages » Add New, or edit an existing Contact page.
- Enter a clear page title such as “Contact” and add a short introductory paragraph explaining how quickly you respond.
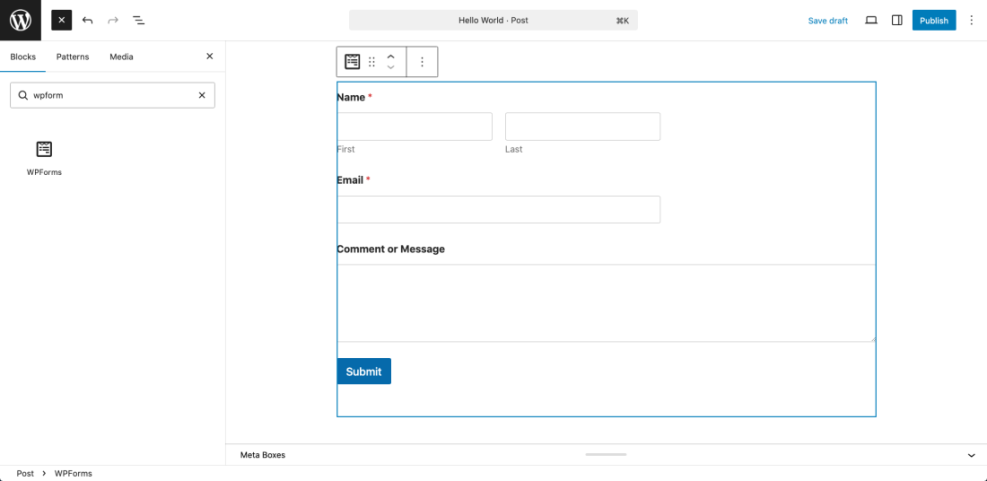
- In the block editor, click the + icon to add a new block, then search for WPForms.
- Click the WPForms block to insert it into the page.
- Use the dropdown in the block settings to choose your “Main Contact Form”.
- Click Save draft or Publish to make the page live.
In the editor, click inside the WPForms block and confirm that the correct form name appears in the dropdown.
If you use the Classic Editor, click the Add Form button above the editor, select your form, and insert the generated shortcode into the content area.
For custom page templates, you can embed the form directly in PHP using a shortcode:
<?php echo do_shortcode( '[wpforms id="123" title="false" description="false"]' ); ?>Replace 123 with your real form ID, which you can find under WPForms » All Forms.
To turn this simple page into a conversion focused contact hub, follow the layout ideas in Best contact form plugins for WordPress.
Step 5: Configure email notifications and confirmations
Getting the form onto a page is only half the job. You must also tell WPForms where to send messages and what visitors should see after they submit.
- Go to WPForms » All Forms and hover over your contact form.
- Click Edit to open the builder, then select Settings from the left sidebar.
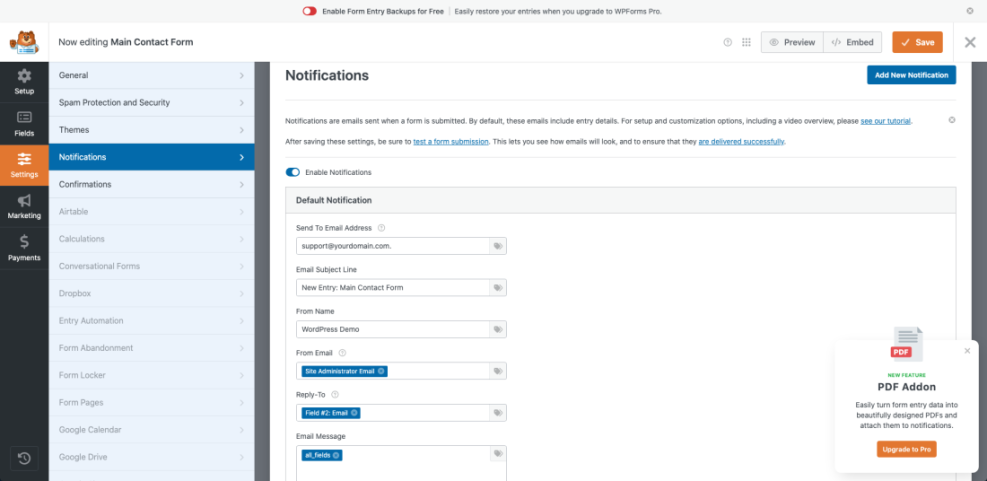
- Click the Notifications tab.
- In Send To Email Address, enter the inbox that should receive inquiries, for example support@yourdomain.com.
- Set From Name and From Email so replies look consistent, such as your site name and a no reply or support address.
- Customize the Email Subject Line and Email Message so it is easy to filter and read new leads.
- Click the Confirmations tab, choose Message or Show Page, and edit the text visitors see after submitting.
- Press Save again in the top right corner.
In the Settings » Notifications screen, confirm that your destination email address is spelled correctly and matches a real inbox you can access.
To set up SMTP in detail, follow the steps in Beginner guide to WordPress speed optimization. If you already use SMTP but messages still fail, troubleshoot with Common WordPress backup errors and how to fix.
Step 6: Protect your form from spam and abuse
Public forms are always a target for bots and spammers. WPForms includes basic spam protection features that you should enable from day one.
- Open your contact form under WPForms » All Forms and click Edit.
- Click Settings in the left sidebar, then choose Spam Protection and Security.
- Ensure Enable anti spam protection is turned on.
- If you want stronger protection, enable Google reCAPTCHA or hCaptcha and follow the prompts to enter your site keys.
- Optionally add a simple Captcha or Question field to discourage automated bots.
- Click Save when you are done.
After enabling spam protection, submit a test entry to make sure legitimate messages still go through without errors.

For higher risk sites or forms that collect sensitive data, review best practices in WordPress seo complete beginners guide and combine plugin protections with overall site hardening.
Step 7: Test and troubleshoot your contact form
Do not consider your contact form finished until you have tested the full journey from the visitor’s browser to your inbox. A broken form is worse than no form at all.
- Open your contact page in a private or incognito browser window to avoid cached results.
- Fill out the form with a realistic test message, using a different email address from your admin account.
- Click the Submit button and confirm that the success message or thank you page appears correctly.
- Check the destination inbox you configured and confirm that the test message arrives within a few minutes.
- If no message arrives, check the spam folder, then verify your SMTP configuration and WPForms notification settings.
- Repeat the test on mobile to make sure the form is easy to complete on smaller screens.
Reload your contact page and ensure the form still displays correctly and without any error notices.
To go further, you can track submissions and leads with Google Analytics by following How to protect your WordPress admin area using. When you are ready to nurture leads automatically, integrate your forms with your CRM using Connect CRM to WordPress Forms.
Conclusion You Are Ready to Go
You have now installed a contact form plugin, built a simple form, published it on a dedicated page, configured email notifications, added spam protection, and tested everything end to end. Visitors can reach you without exposing your email address, and you can safely manage messages from a single inbox.
As your site grows, you can duplicate this form for different departments or services, add conditional fields, and connect your forms to analytics and CRM tools. For most small sites, this basic setup is all you need to start capturing better quality inquiries today.
Further Reading
- How to add a contact form to WordPress
- Best free WordPress blog themes
- How to protect your WordPress admin area using
- WordPress seo complete beginners guide
- Connect CRM to WordPress Forms