
Create a blog on WordPress by setting up hosting, installing WordPress, choosing a theme, and publishing your first post. This tutorial walks you through the full setup step by step, with the exact menus and buttons to click.
By the end, you will know exactly how to create your site structure, configure key settings, and launch your blog with confidence.
What You Need Before You Start a WordPress Blog
- A domain name (yourblog.com).
- A WordPress hosting plan with SSL support.
- Access to your hosting dashboard (often called cPanel or a custom host panel).
- An email address you can use as the WordPress admin account.
Choose WordPress Hosting and Register a Domain
To create a blog on WordPress, your host and domain are the foundation. Picking them first prevents setup headaches later (like moving hosts or changing URLs).
- Purchase a domain from your host or a domain registrar.
- Select a hosting plan that supports WordPress and includes SSL (HTTPS).
- In your host dashboard, connect the domain to your hosting plan.
- Enable SSL for the domain (often labeled Free SSL or Let’s Encrypt).
Verify success: Your domain shows as “connected” (or “active”), and SSL is enabled.
Install WordPress to Start Your Blog
Installing WordPress creates the dashboard where you will manage your site. This is the core step when you create a blog on WordPress.
- Open your hosting dashboard and locate the WordPress or Website tools section.
- Choose Install WordPress (or One-Click Install).
- Select the domain you want to use.
- Set an Admin Username, Admin Password, and Admin Email.
- Finish by clicking Install and wait for the confirmation.
After installation, visit the login URL (usually yourdomain.com/wp-admin) and sign in.
Verify success: You see the WordPress dashboard and the left-hand admin menu.
Set Up WordPress Settings for Your New Blog
These basics affect how your site appears in browsers and search results.
- From the dashboard, open Settings » General.
- Update your Site Title and Tagline.
- Confirm both WordPress Address and Site Address use https://.
- Save your changes.
- Next, head to Settings » Permalinks.
- Choose Post name for clean URLs.
- Save again to apply the permalink structure.
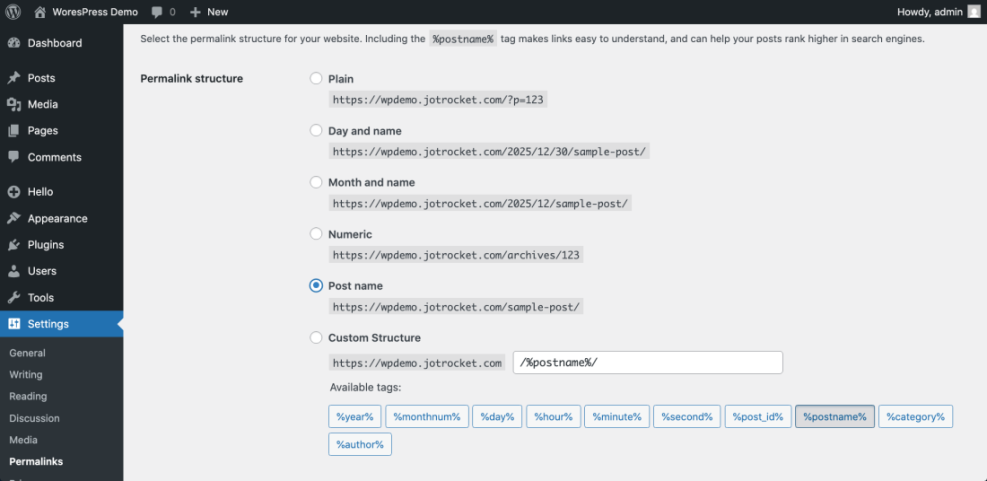
Verify success: Your permalink structure shows /%postname%/ (or similar) and saves without errors.
SEO Options After You Create a Blog on WordPress
Once you create a blog on WordPress, you will want an easy way to manage titles, meta descriptions, and social sharing tags. Here are common approaches.
| Method | Where You Use It | Main Purpose |
|---|---|---|
| SEO Plugin (Yoast, Rank Math) | WordPress dashboard » SEO settings + post editor | Quickly manage title, meta description, and social tags for all content with user-friendly controls. |
| Theme SEO Options | Appearance » Customize or theme options panel | Use built-in theme settings to set basic meta tags without extra plugins (feature varies by theme). |
| Manual Code in Theme | Child theme functions.php or header.php | Add custom meta tag logic using PHP for advanced or lightweight setups. |
| Custom Fields + Code | Custom fields in editor + wp_head hook | Store per-page meta values in fields and output them via a custom function. |
| SEO Plugin Social Settings | SEO plugin » Social / Facebook / Twitter tabs | Fine-tune Open Graph and Twitter Card tags for better social sharing previews. |
Pick a Theme for Your WordPress Blog
Your theme controls your layout, fonts, and overall design.
Choose a fast theme for blogging
- In WordPress, open Appearance » Themes.
- Select Add New to browse options.
- Search for a theme you like using the theme directory.
- Install the theme, then activate it.
Customize your WordPress blog design
- Open Appearance » Customize (or Editor in block themes).
- Upload a logo (optional) and set your site identity.
- Adjust colors and typography to match your brand.
- Save your changes and check the frontend.

Verify success: Your theme shows as Active, and your site frontend reflects the new design.
Create Pages and Menus for Your WordPress Blog
Even a simple blog needs a few pages so visitors know who you are and how to reach you.
- Start by creating pages via Pages » Add New.
- Add the essentials: About, Contact, and Privacy Policy.
- Publish each page once it looks good.
- Then open Appearance » Menus (or Appearance » Editor in block themes).
- Create a primary menu and add your key pages.
- Save the menu so it appears on the site.
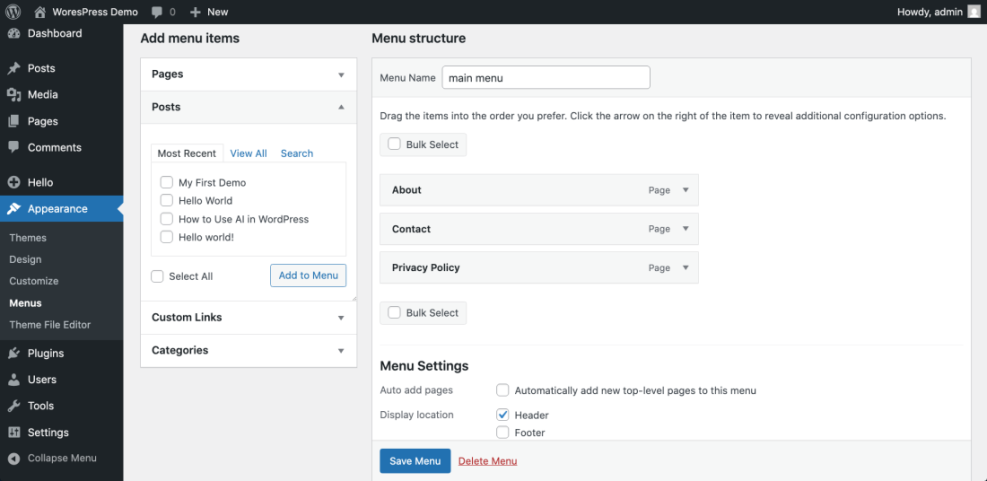
Verify success: Your menu appears in the site header and all links work.
Set a Homepage Layout for Your Blog
Most blogs use a static homepage plus a dedicated posts page so readers can browse your latest articles easily.
- Create a page named Home under Pages.
- Create another page named Blog for your posts archive.
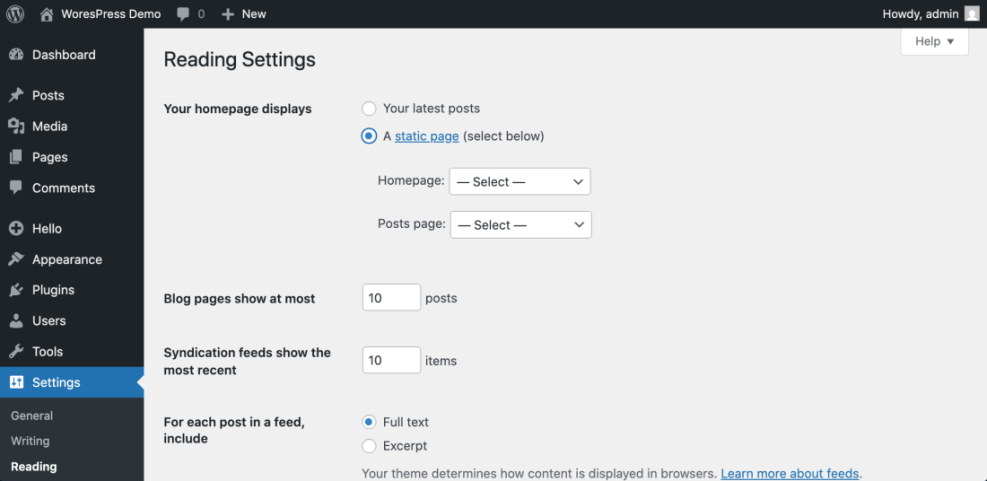
- Next, open Settings » Reading.
- Select A static page under Your homepage displays.
- Set Homepage to Home.
- Set Posts page to Blog.
- Save the reading settings.
- Finally, add starter topics via Posts » Categories (aim for 3–6).
Verify success: Your homepage shows your welcome content, and your Blog page lists posts.
Publish Your First WordPress Blog Post
Publishing one real post helps you confirm your design, categories, and menus work as expected.
Add categories and tags to your WordPress post
- Open Posts » Add New to start writing.
- Add a clear title and draft your content.
- On the right side, choose a Category and add Tags if needed.
Preview, publish, and check the blog post URL
- Preview the post to check the layout on desktop and mobile.
- Publish when you are ready.
- Visit your Blog page to confirm the post appears.

Verify success: Your post loads on the frontend, appears on your Blog page, and the URL looks clean.
Next Steps After You Create a Blog on WordPress
You now know how to create a blog on WordPress from start to finish: domain, hosting, WordPress install, core settings, theme, pages, and your first post. Next, focus on simple improvements like security, backups, and basic SEO so your site is easier to grow.


