How to Create a Blog WordPress
Step-by-step beginner guide to launch your first WordPress blog
Starting a blog can feel overwhelming when you first open WordPress and see all the menus, settings, and options. The good news is that you can create a blog WordPress in a structured, predictable way, even if this is your very first website.
In this guide, you’ll go from having no site at all to a fully working WordPress blog: you’ll choose hosting, install WordPress, configure essential settings, pick a theme (including tips for Jannah users), and publish your first post using the Classic Editor.
We’ll focus on a clean, beginner-friendly workflow that you can complete in an afternoon, with clear checkpoints at every step so you always know what should be working before you move on.
Prerequisites
Before you start clicking around in WordPress, make sure you have a few basics ready so the rest of this tutorial is smooth.
- A domain name you control (for example, yourblog.com).
- A WordPress-friendly hosting account with access to a control panel (cPanel or similar).
- 15–30 minutes of focused time for each step in this guide.
- A rough idea of your blog’s topic (niche) and who you want to write for.
Step 1: Clarify Your Blog Idea and Audience
It’s tempting to skip planning and jump straight into themes and plugins, but a few minutes of clarity will save you hours of redesign later.
Define your blog’s purpose
Start by answering three questions in a simple text file or notebook:
- What will you write about? (For example, travel on a budget, WordPress tutorials, home baking.)
- Who are you writing for? (Beginners, advanced users, local customers, etc.)
- What do you want readers to do? (Join your email list, contact you, buy something, or just learn.)
These answers will influence your site title, tagline, menu structure, and category names inside WordPress.
Create a simple content plan
List 5–10 starter post ideas you’d like to publish in your first month. Aim for specific topics instead of broad ones, such as “How to pick a blogging niche as a student” instead of “Blogging tips.”
Step 2: Choose Hosting and Install WordPress
Your hosting provider is where your blog “lives” on the internet. Good hosting will make your blog load faster and be easier to maintain.
Pick a WordPress-friendly host
Look for hosting that offers:
- One-click WordPress installation.
- Free SSL certificates (HTTPS).
- Automated backups or easy backup tools.
- Support staff familiar with WordPress issues.
If you’re still deciding, read this detailed guide on how to choose the best WordPress hosting to compare options and avoid slow, oversold servers.
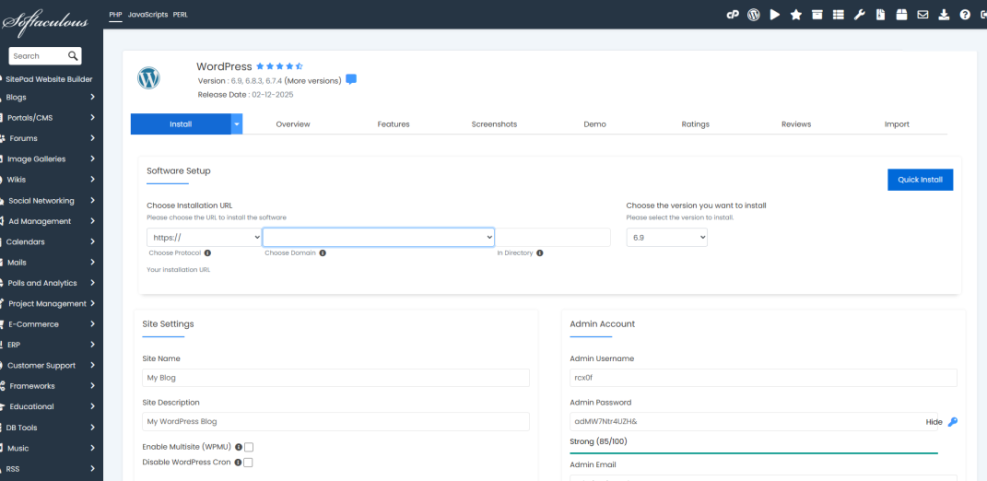
Use your host’s 1-click installer
Most hosts provide a “Softaculous”, “Installatron”, or “WordPress Installer” tool inside your control panel.
- Log in to your hosting control panel (often called cPanel).
- Find the section labeled Website, Apps, or Softaculous Apps Installer.
- Click the WordPress icon.
- Choose your domain (for example, https://yourblog.com).
- Fill in the site name, admin username, admin password, and admin email.
- Click Install and wait for the installer to finish.
When the installer completes, it will show you:
- Your site URL (for example, https://yourblog.com).
- Your WordPress admin URL (often https://yourblog.com/wp-admin/).
Step 3: Log In and Configure Core WordPress Settings
Now that WordPress is installed, it’s time to log in and adjust a few critical settings that affect URLs, time zone, and how your blog appears.
Log in to your WordPress dashboard
- Visit https://yourblog.com/wp-admin/.
- Enter the admin username and password you created during installation.
- Click Log In to open the WordPress Dashboard.
You should see the WordPress Dashboard with menus like Posts, Pages, Appearance, and Plugins on the left.
Set your site title and tagline
- In the left menu, go to Settings > General.
- Set the Site Title (for example, “Student Tech Tips”).
- Set a short, descriptive Tagline (for example, “Simple guides for non-techy students”).
- Check that your WordPress Address (URL) and Site Address (URL) use https:// if SSL is installed.
- Set your Time Zone, Date Format, and Time Format.
- Click Save Changes.
Choose SEO-friendly permalinks
- Go to Settings > Permalinks.
- Select Post name as your permalink structure (for example, https://yourblog.com/my-first-post/).
- Click Save Changes.
Step 4: Pick and Customize Your Blog Theme
Your theme controls how your blog looks. For most beginners, a clean, responsive blog or magazine theme is ideal.
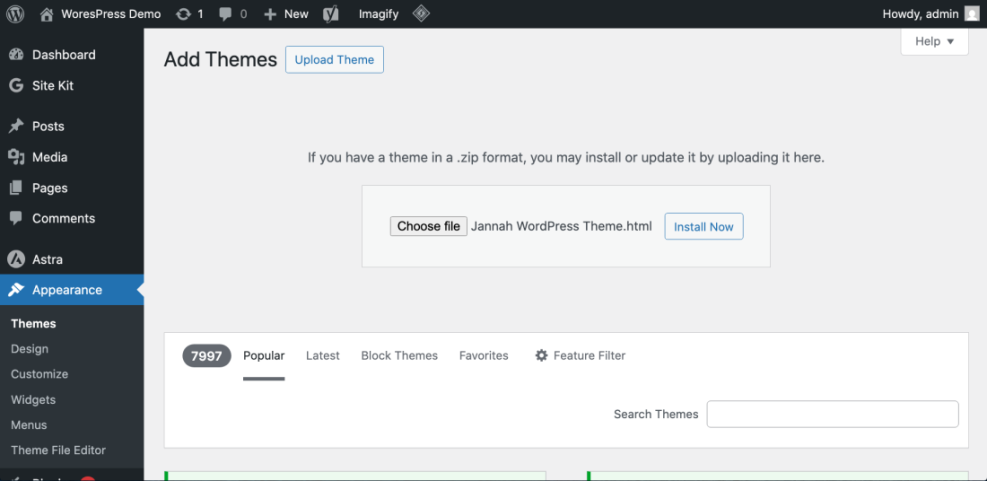
Activate Jannah or another blog theme
- Go to Appearance > Themes.
- If you already installed Jannah, hover over it and click Activate.
- If not, click Add New to browse free themes, or upload a theme ZIP file using the Upload Theme button.
If you’re still exploring theme options, you can review this curated list of the best free WordPress blog themes to find a design that matches your niche.
Customize basic theme settings
Most modern themes, including Jannah, allow you to customize colors, fonts, and layout without touching code.
- Go to Appearance > Customize.
- Adjust the Site Identity (logo, site title, tagline).
- Set your Header layout and main navigation style.
- Configure Blog settings (post layout, sidebar position, featured image display).
- Preview changes and click Publish when satisfied.
Step 5: Create Essential Pages and Your First Blog Post
With your theme in place, it’s time to create the pages and posts that make your site feel complete.
Create core pages
Most new blogs should start with at least these pages:
- Home (can be your latest posts or a custom page).
- About (who you are and what readers can expect).
- Contact (how people can reach you).
- Privacy Policy (especially important if you collect emails or run ads).
- Go to Pages > Add New.
- Give the page a title (for example, “About” or “Contact”).
- Write your content in the editor.
- Click Publish.
Write your first blog post with the Classic Editor
- Go to Posts > Add New.
- Enter a descriptive title (for example, “Welcome to My New WordPress Blog”).
- Write your post content in the Classic Editor content area, using headings (Heading 2, Heading 3) to break up sections.
- On the right, assign the post to a relevant Category (or create a new one).
- Add Tags that summarize the post’s topics.
- Set a Featured Image to give your post a strong visual in lists and social shares.
- Click Preview to review the post, then click Publish.
Step 6: Install Key Plugins for Blogging Success
Plugins extend WordPress with extra features. For a new blog, you only need a small set of well-chosen plugins to cover SEO, backups, security, and contact forms.
Install and activate plugins
- Go to Plugins > Add New.
- Search for a plugin by name (for example, an SEO plugin or backup plugin).
- Click Install Now, then Activate.
For most blogs, consider installing:
- An SEO plugin to manage titles, meta descriptions, and sitemaps.
- A backup plugin to create regular copies of your database and files.
- A security plugin for firewall rules and brute-force protection.
- A contact form plugin to handle inquiries without exposing your email address.
Step 7: Prepare and Launch Your WordPress Blog
Before you share your new blog with the world, run through a short pre-launch checklist to catch common issues.
Set your homepage and menus
- Go to Settings > Reading.
- Decide whether your homepage shows Your latest posts or a static page.
- If you choose a static page, select your Home and Posts pages from the dropdowns.
- Go to Appearance > Menus.
- Create a new menu (for example, “Main Menu”).
- Add your key pages (Home, About, Blog, Contact).
- Assign the menu to the primary location and click Save Menu.
Run a quick technical check
- Visit your homepage and click through to a few posts.
- Test the contact form to make sure messages arrive in your inbox.
- Check your site on mobile to confirm the layout is responsive.
If you want more detailed installation guidance, you can also follow this install WordPress step by step walkthrough for reference.
Bringing Your New WordPress Blog Online with Confidence
You’ve gone from zero to having a working WordPress blog: hosting is set up, WordPress is installed, a theme like Jannah is activated, core settings are in place, and your first post is live. That’s a huge milestone.
From here, your focus should shift from setup to publishing helpful content, improving your design in small, focused iterations, and learning basic SEO and performance habits as you go. With this foundation, you can grow your blog into a traffic-generating asset without constantly fighting technical issues.
Further Reading
- Create a WordPress Blog
- How to Create a Blog on WordPress
- WordPress SEO: Complete Beginner’s Guide
- Editorial Calendar for WordPress Blogs