How to Unpublish a Page in WordPress
How to temporarily remove a WordPress page from public view without breaking your site.
You hit Publish on a page too early, the offer it describes has expired, or you simply want to remove a page from your WordPress site without losing the content. In all of these situations, you need to “unpublish” the page so visitors and search engines can’t see it anymore.
WordPress doesn’t have a literal Unpublish button, but you can safely take a page offline using built-in options like Draft, Private, Password Protected, and Trash. In this guide, you’ll learn exactly how each option works and when to use it so you don’t accidentally break your navigation or hurt your SEO.
If you’re brand new to WordPress and still getting familiar with the admin area, you may want to quickly review what WordPress actually is and how it manages content, then come back to follow the steps below.
Prerequisites
Before you unpublish a page, make sure you have the basics in place so you can work safely and confidently.
- Administrator or Editor access to your WordPress dashboard.
- The URL or title of the page you want to unpublish.
- A clear decision on whether you want to temporarily hide the page or remove it long term.
- Optional: access to your theme menus so you can remove the page from navigation if needed.
Step 1: Understand what “unpublish” means in WordPress
When people say “unpublish” a page, they usually mean “make this no longer publicly visible.” In WordPress, that’s controlled by the page’s status and visibility, not a dedicated Unpublish button.
For pages, the most important states are:
- Published: Live on the site and visible to everyone.
- Draft: Not visible to visitors; only visible in the admin area.
- Pending Review: Waiting for an editor to approve, not public yet.
- Private: Only visible to logged-in users with the right capability (usually Admins and Editors).
- Password Protected: Only visible to users who have the password.
Step 2: Unpublish a page by reverting it to Draft
The most straightforward way to unpublish a page is to change its status from Published back to Draft. This keeps the content safely stored in your dashboard but completely removes it from public view.
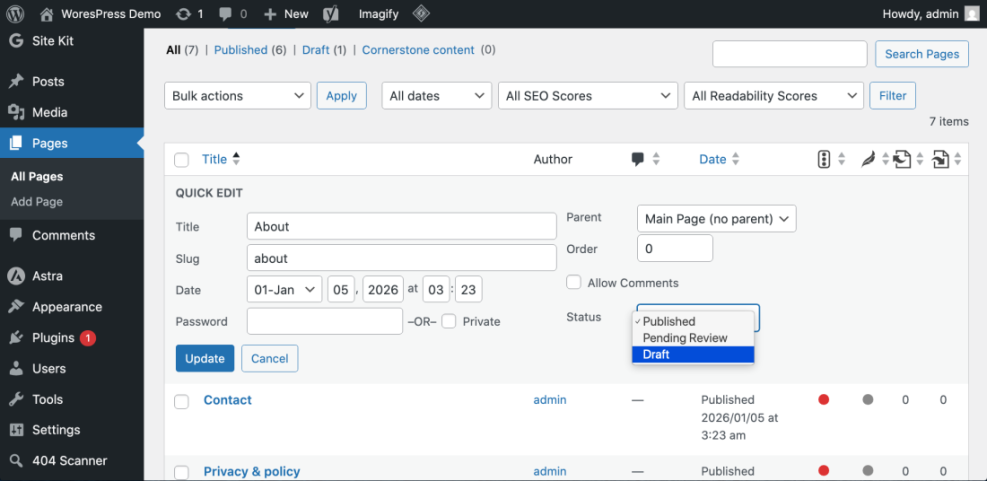
Method 1: Quick Edit from the Pages screen
- Log in to your WordPress dashboard.
- Go to Pages → All Pages.
- Hover over the page you want to unpublish and click Quick Edit.
- Find the Status dropdown and change it from Published to Draft.
- Click Update to save your changes.
Once you do this, the page will no longer be accessible to visitors, even if they know the direct URL. You’ll still see it listed in the Pages screen with the label Draft.
Method 2: Using the editor screen (Block Editor or Classic Editor)
You can also unpublish a page from within the editor itself.
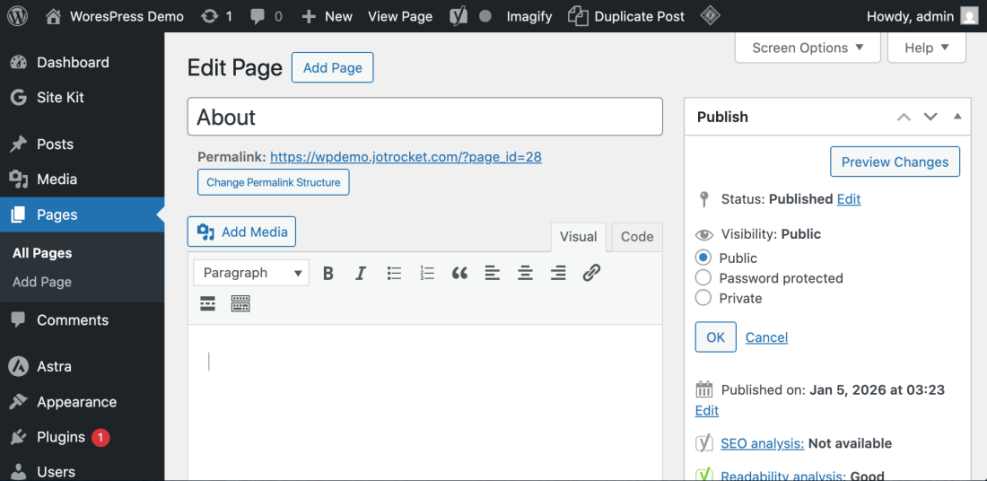
- In Pages → All Pages, click the title of the page you want to unpublish.
- In the Block Editor (Gutenberg), open the right-hand sidebar (gear icon) if it’s hidden, and look for the Status & visibility panel.
- Click the Status control and change it from Published to Draft, then click Save or Update.
- In the Classic Editor, find the Publish meta box on the right, click Edit next to Status, choose Draft, and click OK, then Update.
The page is now unpublished but still editable any time you need it.
Step 3: Make a page Private or Password Protected
Sometimes you don’t want to completely unpublish a page; you just want to restrict who can see it. In that case, Private or Password Protected visibility can be a better fit than Draft.
Set a page to Private
- Open the page in the editor.
- In the Block Editor, go to Status & visibility → Visibility, then choose Private.
- Click Update to save your changes.
- In the Classic Editor, click Edit next to Visibility, select Private, click OK, then Update.
Now only logged-in users with the right capability (usually Admins and Editors) can see that page on the front end.
Password-protect a page
- Open the page in the editor.
- In the visibility settings, choose Password Protected.
- Enter a strong password that you can share with specific people.
- Click Update.
Visitors will see a password form rather than the content. This is useful if you’re running a limited-time promo or client-only content that shouldn’t be fully public.
If your main goal is to keep the page accessible only to certain people or from certain places (like navigation menus), you may prefer to hide a page in WordPress rather than fully unpublish it.
Step 4: Unpublish by moving a page to Trash
When you’re sure a page is no longer needed, moving it to Trash is a clean way to unpublish it. The page is removed from public view, but you still have a restore window before it’s permanently deleted.
Move a page to Trash from the Pages screen
- Go to Pages → All Pages.
- Hover over the page you want to remove.
- Click Trash.
- Use the Trash tab at the top of the Pages screen to see all trashed pages.
Move a page to Trash from the editor
- Open the page in the editor.
- In the Block Editor, click the three-dot menu in the upper right and choose Move to trash.
- In the Classic Editor, click the red Move to Trash link in the Publish box.
Step 5: Clean up menus, internal links, and SEO
Unpublishing a page is only half the job. You also need to make sure your navigation and internal links don’t keep pointing to something that no longer exists.
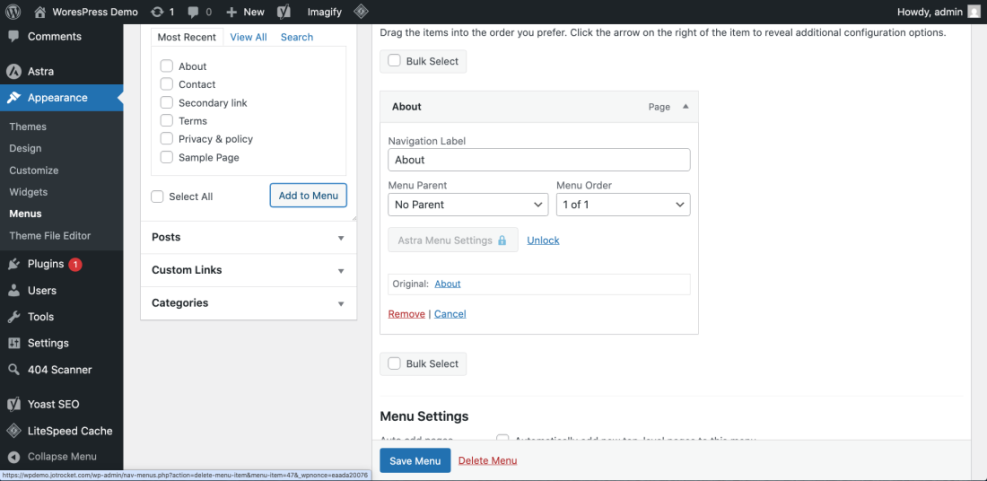
Remove the page from menus
- In your dashboard, go to Appearance → Menus.
- Select the menu that contains the page (often your Primary or Main menu).
- Find the menu item pointing to the page you unpublished.
- Click the arrow to expand it, then click Remove.
- Click Save Menu.
Fix internal links and redirects
- Update any other pages or posts that link to the now-unpublished page so they point to a better alternative.
- If the old page had search traffic, set up a 301 redirect from the old URL to a newer, relevant page (your SEO or redirection plugin can help).
- After unpublishing and redirecting, run a quick crawl or use a plugin to fix broken links in WordPress so you don’t leave visitors hitting dead ends.
Step 6: Re-publish or change visibility later
If you’ve reverted a page to Draft, made it Private, or moved it to Trash by mistake, you can usually bring it back with a few clicks.
Re-publish a Draft or Private page
- Go to Pages → All Pages and filter by Draft or Private.
- Open the page in the editor.
- Set the Status back to Published and set Visibility back to Public.
- Click Publish or Update.
Restore a page from Trash
- Go to Pages → All Pages and click the Trash link at the top.
- Find the page you want to restore.
- Hover over it and click Restore.
- The page will move back to the All list as a Published page (you can edit its status again if needed).
Take Control of Which Pages Stay Live
Unpublishing a WordPress page doesn’t have to be risky or confusing. Once you understand how Draft, Private, Password Protected, and Trash work, you can confidently take pages offline without losing your content.
Use Draft when you want to rework a page later, Private or Password Protected when only select people should see it, and Trash when it’s truly no longer needed. Combine these tools with careful menu cleanup, internal link updates, and redirects, and you’ll keep both visitors and search engines happy.
Further Reading
- How to Publish a WordPress Site
- How to Export a Page in WordPress
- How to Export a Single Page in WordPress
- How to Duplicate a WordPress Page


