What is a WordPress Plugin
A beginner’s guide to how WordPress plugins work and how to use them safely
A WordPress plugin is like an app for your website. Instead of writing custom code, you install a plugin to add features such as contact forms, SEO tools, security layers, or online stores with just a few clicks.
In this guide, you’ll learn what a WordPress plugin is, how it works behind the scenes, and how to install, configure, update, and safely manage plugins without breaking your site. By the end, you’ll know how to use plugins confidently instead of being afraid of them.
If you’re still getting familiar with WordPress itself, you may want to quickly review what WordPress is and how it works, then come back here to focus on plugins specifically.
Prerequisites
You don’t need to be a developer to understand or use plugins, but a few basics will make this guide easier to follow.
- An existing WordPress site (self-hosted WordPress.org, or a WordPress.com plan that supports plugins).
- Administrator access to the WordPress dashboard so you can install, activate, and configure plugins.
- Access to your hosting control panel or file manager (cPanel, Plesk, or FTP) in case you need to disable a problematic plugin manually.
- A recent backup of your site, so you can restore it if something goes wrong during plugin testing.
Step 1: Understand what a WordPress plugin does
At the most basic level, a WordPress plugin is a folder of code that “hooks into” WordPress core to add or modify features. Plugins can be tiny (adding one shortcode) or huge (turning your site into a full eCommerce store).
Plugins are built using PHP, JavaScript, CSS, and other web technologies. They use WordPress hooks (actions and filters) to attach their logic to key events, such as loading a page, saving a post, or processing a form submission. This is what lets plugins extend core functionality without editing WordPress itself.
Common examples of plugin types include:
- SEO plugins for titles, meta descriptions, and sitemaps.
- Security plugins for firewalls, malware scanning, and login protection.
- Performance plugins for caching, image optimization, and database cleanup.
- Marketing and forms plugins for contact forms, popups, email signups, and analytics.
- eCommerce plugins for shopping carts, payments, and digital downloads.
Step 2: Install your first WordPress plugin
The most common way to install a plugin is directly from the WordPress.org plugin directory, inside your dashboard. This is usually the safest and fastest method for beginners.
- Log in to your WordPress admin dashboard.
- In the left-hand menu, go to Plugins > Add New.
- Use the search bar to find a plugin by name or keyword (for example, “contact form” or “SEO”).
- Review the plugin details: active installations, star rating, last updated date, and compatibility with your WordPress version.
- Click Install Now, then click Activate once the installation finishes.
Once activated, the plugin becomes part of your site. It may start working immediately (for example, a security firewall), or it may require configuration (for example, a contact form).
- Some plugins add a new top-level menu in the admin sidebar.
- Others appear under Settings, Tools, or the Appearance menu.
- Many add new blocks, widgets, or options inside the editor.
For a detailed, screenshot-by-screenshot walkthrough, see our guide on installing a plugin in WordPress.
Step 3: Configure plugin settings in the dashboard
After activation, most plugins need a bit of setup so they behave the way you expect. The exact settings depend on the plugin, but the process for finding them is similar.
- Look for the plugin’s name in your left-hand menu, or under Settings, Tools, or Appearance.
- Click into the plugin’s settings page and read any getting-started notes at the top.
- Fill in required fields (for example, API keys, email addresses, or form labels).
- Toggle on or off options that match your goals (for example, enabling image compression or enabling spam protection).
- Click Save Changes when you’re done.
Some plugins also add options inside the post or page editor. For example, an SEO plugin might add a meta box where you can edit the SEO title and description for each post.
Step 4: Keep plugins updated and remove unused ones
Plugins are not “set and forget.” Developers release updates to fix bugs, patch security issues, and keep up with new WordPress core versions. Outdated plugins are one of the most common sources of hacked or broken sites.
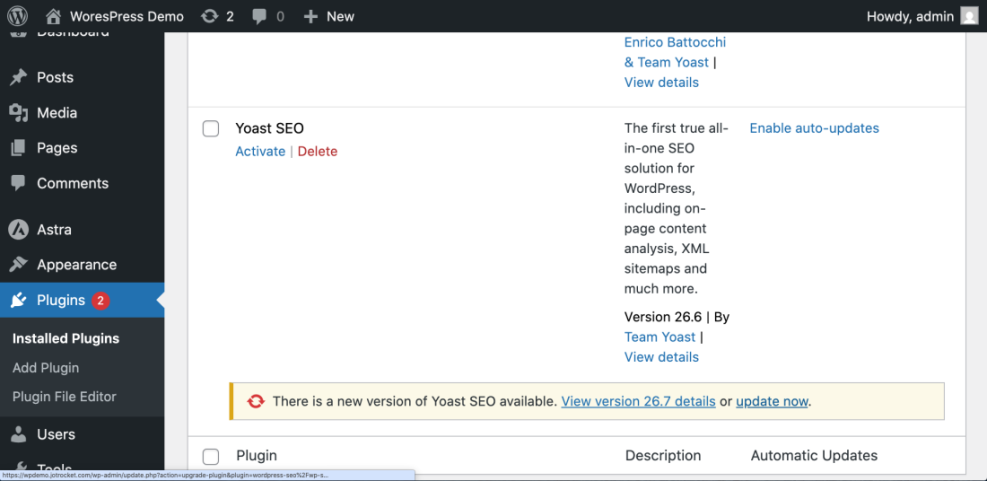
- In your dashboard, go to Dashboard > Updates to see all available plugin updates.
- Alternatively, go to Plugins > Installed Plugins to see which plugins have update notices.
- Update plugins one by one by clicking Update now, or use the bulk actions dropdown to update several at once.
- Visit a few key pages on your site (homepage, a blog post, a contact page) to confirm everything still works.
If you have WP-CLI installed on your server, you can manage plugin updates from the command line as well. Run these commands in your SSH terminal or local WP-CLI environment:
wp plugin list
wp plugin update --all
The first command lists all plugins and their statuses; the second updates every plugin that has an update available.
If you’d like a dedicated checklist just for updates, follow our guide on checking whether your WordPress plugins are up to date.
While you’re on the Installed Plugins screen, also look for plugins you no longer use. Deactivate them, then click Delete to remove them entirely. Deactivated but unused plugins still take up space and can become a security risk if left outdated.
Step 5: Follow best practices for plugin safety and performance
Not all plugins are created equal. Choosing and managing plugins carefully will keep your site fast, secure, and easier to maintain.
- Install only what you need. More plugins mean more code to load and more chances for conflicts. There’s no fixed “safe number,” but every plugin should justify its existence.
- Check plugin quality. Look at ratings, number of active installations, last updated date, and a quick scan of support threads before installing.
- Avoid overlapping functionality. Running two SEO plugins or two caching plugins at the same time can cause conflicts and strange behavior.
- Test on a staging site first. For major plugins (eCommerce, membership, LMS, etc.), try them on a staging copy of your site before adding them to production.
- Remove abandoned plugins. If a plugin hasn’t been updated in years and has open security issues, look for a better-maintained alternative.
Wrap up your WordPress plugin foundations
WordPress plugins are the engine behind most of the features you see on modern WordPress sites. With a basic understanding of what they are and how they extend core WordPress, you can add new capabilities to your site without touching code.
You’ve learned what plugins are, how to install and configure them, how to keep them updated, and how to manage them safely. From here, you can start exploring specific plugins for SEO, security, performance, and marketing, always applying the best practices you’ve just learned.
Further Reading
- What Are WordPress Plugins?
- How to Install WordPress Plugins (Alternative Methods)
- Checklist for Auditing WordPress Plugins and Removing Overlaps
- Best WordPress Security Plugins Compared
- WordPress Security: Complete Overview
Frequently Asked Questions
Do I really need plugins on my WordPress site?
Why can’t I see the Plugins menu in my dashboard?
What should I do if a plugin breaks my site?
wp-content/plugins/; this forces WordPress to deactivate it. Once your site is back up, look for an alternative plugin or contact the plugin developer with details of the error.