How to Use WordPress
A practical beginner’s guide to the WordPress dashboard, posts, pages, and settings
Installing WordPress is only the first step. Many beginners log in for the first time, see a lot of menus and buttons, and immediately wonder, “What do I click now?” This guide will walk you through the everyday tasks you need to feel confident using WordPress.
You’ll learn how to log in, understand the dashboard, create posts and pages, customize your site’s look, install plugins, and adjust the most important settings. By the end, you’ll be able to manage a basic WordPress site without feeling overwhelmed.
If you’re still unsure what WordPress is or how it compares to other website builders, read What’s WordPress? for a high-level overview, then come back here to learn how to actually use it day to day.
Prerequisites
Before you can start using WordPress, you’ll need a few basics in place. This guide assumes you already have WordPress installed on a web host (or your developer/host set it up for you).
- A working WordPress installation on your domain (for example,
https://yoursite.com). - Your WordPress admin login URL (often
/wp-adminor/wp-login.php). - An administrator username and password.
- A modern web browser and a stable internet connection.
- A rough idea of your site’s purpose (blog, business site, online store, etc.).
Step 1: Log In to Your WordPress Site
The first thing you’ll do every time you work on your site is log in to the WordPress admin area (also called the dashboard). Once you know the URL and credentials, this takes only a few seconds.
- Open your browser and go to your login URL, typically
https://yoursite.com/wp-adminorhttps://yoursite.com/wp-login.php. - Enter your Username or Email Address and Password.
- Click Log In.
If the credentials are correct, WordPress will redirect you to the main dashboard screen.
Checkpoint: You should see the WordPress toolbar at the top and a dark sidebar on the left with items like Dashboard, Posts, Media, Pages, Comments, and more. If you see that, you’re inside the admin area.
If you often struggle to find or remember your login URL, bookmark it in your browser and review this in-depth tutorial: how to log in to WordPress admin.
Step 2: Explore the WordPress Dashboard
The dashboard is your control center. Every option you need to manage your site lives in the left-hand admin menu. Spend a few minutes exploring it before changing anything.
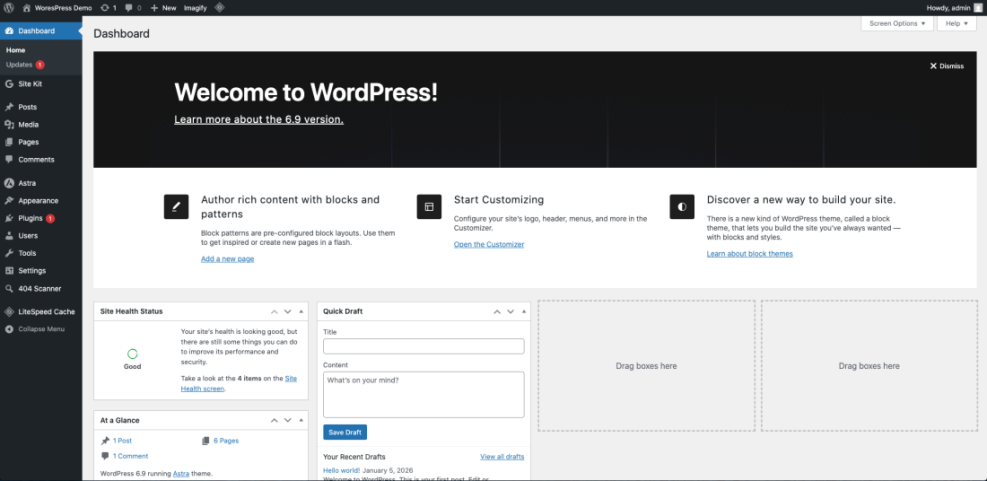
Here are the main areas you’ll see in a typical WordPress dashboard:
- Dashboard: A quick overview of your site (recent activity, basic stats, updates).
- Posts: Blog posts and news articles that appear in chronological order.
- Media: Your image, video, and file library.
- Pages: Static content like About, Contact, and Services.
- Comments: Visitor comments on your posts.
- Appearance: Themes, menus, widgets, and other design settings.
- Plugins: Add-ons that extend WordPress with new features.
- Users: User accounts and roles (Administrator, Editor, Author, etc.).
- Tools: Import/export utilities and other tools.
- Settings: Site-wide options for URL, time zone, reading, permalinks, and more.
Step 3: Create Your First Blog Post
Posts are ideal for time-based content like articles, announcements, and news. Let’s create your first one so you can see how the editor works.
- From the left menu, go to Posts → Add New.
- Enter a descriptive title in the Add title field (for example, “Welcome to Our New Website”).
- In the main editor area, write your content. Use paragraphs, headings, and lists to keep it readable.
- Use the Add Media button or the Image block to insert pictures from your computer or the Media Library.
- On the right side, choose a Category and add Tags to help organize your content.
- Click Preview to see how the post will look on your site.
- When you’re happy with it, click Publish, then confirm if prompted.
Checkpoint: Open your site in a new tab and visit the blog page (often /blog/ or your home page). You should see your new post listed with its title, date, and excerpt.
Step 4: Create Essential Pages
Pages are for evergreen content that doesn’t change often. Most sites need at least an About page and a Contact page. Creating a page feels very similar to creating a post.
- Go to Pages → Add New.
- Enter a title such as “About Us” or “Contact.”
- Add your content in the editor: text, headings, images, and embeds.
- For a contact page, you can add a form using a contact form plugin later.
- Click Publish when you’re ready.
Here are some common pages to create early:
- Home: A simple introduction and key links to important sections.
- About: Who you are, what you do, and why visitors should trust you.
- Contact: How people can reach you (form, email, phone, address).
- Privacy Policy: Required by many laws and ad networks.
Step 5: Customize Your Site Design
Your theme controls the overall look of your site: layout, typography, colors, and many design options. WordPress comes with a default theme, but you can switch to one that fits your brand and then customize it.
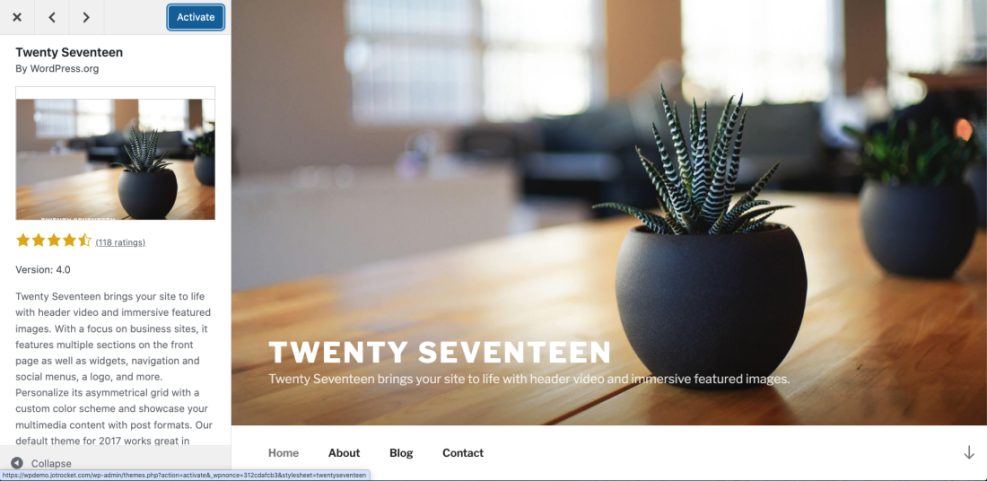
- Go to Appearance → Themes to see the themes you have installed.
- Click Add New to browse free themes from the official WordPress directory.
- Hover over a theme and click Preview to see how it might look on your site.
- Click Install, then Activate to switch to that theme.
To fine-tune your design, use the customizer:
- Go to Appearance → Customize.
- Adjust options such as Site Identity (logo, site title, tagline), colors, header layout, and more.
- Use the live preview on the right to see changes before publishing.
- Click Publish when you’re happy with your changes.
Step 6: Extend WordPress With Plugins
Plugins add new features like contact forms, SEO tools, security, and e-commerce. You can install them directly from your dashboard without touching code.
- Go to Plugins → Add New.
- Use the search box to find a plugin by name or feature (for example, “contact form,” “SEO,” or “cache”).
- Click Install Now on a plugin you trust.
- After installation, click Activate.
Many plugins add new menu items or settings pages. Follow their setup wizards or documentation to configure them properly. For a detailed walkthrough of this process, see how to install WordPress plugins.
Step 7: Configure Key WordPress Settings
WordPress has dozens of settings, but you can start with just a few that have a big impact on how your site works and looks.
- Settings → General: Set your Site Title, Tagline, time zone, and date/time format.
- Settings → Reading: Choose whether your homepage shows your latest posts or a static page, and set how many posts appear on blog pages.
- Settings → Discussion: Control how comments work, whether they require moderation, and how notifications are sent.
- Settings → Permalinks: Change your URL structure. For most sites, Post name is clean and SEO-friendly.
Checkpoint: Visit a post on your site and look at the URL. If you chose Post name, it should look like https://yoursite.com/sample-post/ instead of a long string of numbers.
Step 8: Keep Your WordPress Site Updated and Safe
Using WordPress isn’t just about creating content. You also need simple maintenance habits to keep your site fast, secure, and stable.
- Run updates regularly: In Dashboard → Updates, install new versions of WordPress core, themes, and plugins.
- Remove what you don’t use: Deactivate and delete unused themes and plugins to reduce clutter and security risk.
- Back up your site: Use your host’s tools or a backup plugin to schedule automatic backups.
- Review user accounts: Remove old accounts and limit admin access to people who truly need it.
Next Steps for Growing With WordPress
You’ve learned how to log in, navigate the dashboard, create posts and pages, customize your theme, install plugins, and adjust key settings. Those skills cover nearly everything you’ll do on a daily basis as a WordPress site owner.
From here, you can focus on refining your content, improving performance, and adding features that support your goals—whether that’s blogging, generating leads, or running an online store. As you get more comfortable, explore advanced topics like SEO, speed optimization, and security hardening to keep your site healthy over the long term.
Further Reading
- WordPress Guides & Tutorials Overview
- How to Create a Website With WordPress
- How Easy Is WordPress?
- How to Create a Blog on WordPress
Frequently Asked Questions
How long does it take to get comfortable using WordPress?
I can’t find my WordPress login page. What should I do?
/wp-admin or /wp-login.php to the end of your domain, such as https://yoursite.com/wp-admin. If that doesn’t work, check with your host or developer; they might have changed the login URL for security. Also confirm that your domain is pointing to the right hosting account and that WordPress is installed on that domain. Why don’t I see my changes after editing a page or post?
How can I experiment safely without breaking my live site?
Should I use posts or pages for my content?
lass=”yoast-text-mark” />>Use posts for time-sensitive or regularly updated content (articles, news, blog entries) that you want to appear in your blog feed. Use pages for timeless, static content like About, Contact, and Services that you don’t publish on a schedule. You can mix both: posts for ongoing content marketing, and pages for the key information visitors always need.