How to Configure Caching Plugins in WordPress Safely
A step-by-step guide to enabling WordPress caching without breaking layouts, forms, logins, carts, or admin workflows.
Caching plugins can make a WordPress site feel dramatically faster, but unsafe settings can also break layouts, contact forms, WooCommerce carts, logged-in pages, analytics scripts, or mobile menus. The safest approach is to enable caching in layers, test each change, and avoid turning on every optimization option at once.
In this guide, you will learn how to configure caching plugins in WordPress safely from start to finish. You will prepare a backup, choose the right cache settings, exclude sensitive pages, test the front end, and troubleshoot common problems before visitors notice them.
Before changing performance settings, it is smart to understand the broader speed workflow. If you are new to performance work, review this beginner guide to WordPress speed optimization so caching fits into a complete optimization plan instead of becoming a risky shortcut.
Prerequisites
Before you configure a caching plugin, make sure you have a safe recovery path. Caching changes are usually reversible, but minification, delayed JavaScript, object cache, and CDN settings can cause visible issues if they are applied without testing.
- Administrator access to your WordPress dashboard.
- Access to your hosting control panel or file manager.
- A current site backup, including files and database.
- A staging site if your website receives regular traffic, sales, leads, bookings, or memberships.
- One caching plugin only. Running multiple page caching plugins at the same time can create conflicts.
Start by creating a full backup using your host or backup plugin. If you need a refresher, follow this guide on how to backup a WordPress site before changing cache settings.
Step 1: Choose One Caching Plugin and Disable Overlaps
The first safe configuration step is to avoid duplicate features. Many performance plugins include page cache, browser cache, database cleanup, CSS optimization, JavaScript optimization, lazy loading, CDN rewrites, and preload options. If two plugins handle the same feature, they may fight each other.
Go to Plugins > Installed Plugins and review every active optimization plugin. Keep your preferred caching plugin active, then disable duplicate caching modules in other plugins instead of stacking similar tools.
- Use only one page cache system.
- Use only one minification or asset optimization tool.
- Use only one lazy loading feature.
- Use only one database cleanup tool.
- Use only one CDN rewrite feature.
Checkpoint: Your site should have one primary plugin responsible for caching. Other plugins may remain active, but overlapping speed features should be turned off.
Troubleshooting: If you are unsure whether two tools overlap, temporarily disable the advanced feature in one plugin and keep the simpler setup. Stable performance is better than a slightly faster site that breaks unpredictably.
Step 2: Create a Restore Point Before Enabling Cache
A restore point protects you if cache rules, minified files, or server-level settings create unexpected errors. This is especially important when configuring caching plugins on business sites, WooCommerce stores, membership sites, LMS platforms, and sites with custom themes.
- Go to your backup plugin or hosting backup panel.
- Create a fresh backup of both files and database.
- Confirm the backup completed successfully.
- Download a copy or confirm that off-site storage is enabled.
- Write down the backup timestamp so you know which restore point to use.
Checkpoint: You should see a completed backup available for restore. Do not continue if the backup failed, is still running, or only includes the database.
For safer testing, create a staging copy of your site and test the same cache configuration there first. This is the best option when you are not sure how your theme, builder, forms, and scripts will respond to optimization settings. You can follow this guide to create a WordPress staging site.
Step 3: Enable Page Cache First
Page caching stores generated HTML copies of your pages so WordPress does not have to rebuild every page for every visitor. This is usually the safest and most important caching feature to enable first.
- Go to your caching plugin settings page.
- Find the setting named Page Cache, Cache System, or Enable Caching.
- Turn on page caching.
- Save changes.
- Open your homepage in a private browser window.
- Visit a few important pages, including a blog post, contact page, and landing page.
Checkpoint: Public pages should load normally, and your layout should look the same as before. Menus, sliders, forms, search boxes, and responsive layouts should still work.
Troubleshooting: If a page looks outdated after editing, clear the plugin cache and browser cache. If the plugin has a Clear Cache, Purge Cache, or Delete Cache button, use it after major content, theme, or plugin changes.
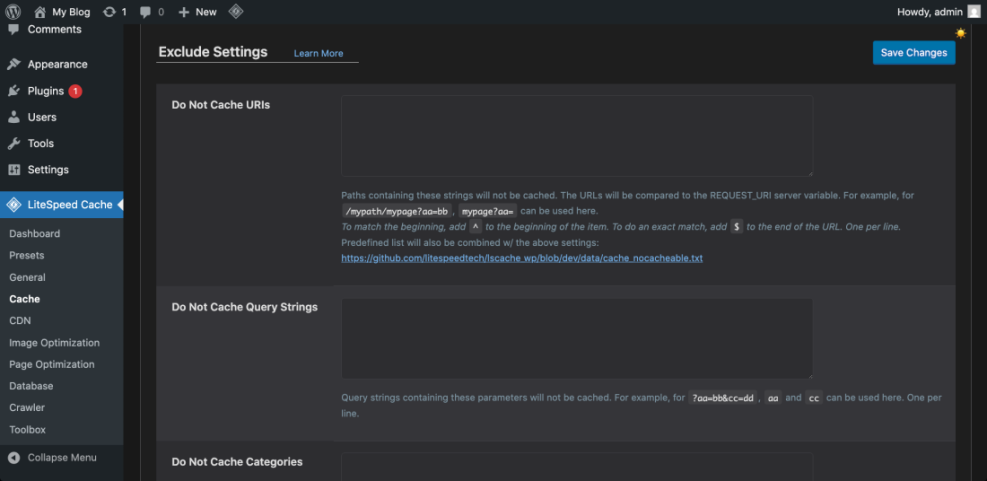
Step 4: Exclude Dynamic and Sensitive Pages
Some pages should not be cached because they show user-specific, session-based, or frequently changing information. This includes login pages, carts, checkout pages, account pages, dashboards, form confirmation pages, and membership content.
In your caching plugin, look for settings such as Never Cache URLs, Excluded Pages, Cache Exclusions, or Advanced Rules. Add one URL pattern per line if your plugin supports path-based exclusions.
/wp-login.php
/wp-admin/
/cart/
/checkout/
/my-account/
/account/
/dashboard/
/membership/
/thank-you/
Use only the paths that match your site. For example, if you do not run WooCommerce, you may not need cart or checkout exclusions. If you use a custom login, client portal, LMS, booking system, or membership plugin, exclude those dynamic areas too.
Checkpoint: Logged-out visitors should see fast cached pages, while logged-in users, customers, and members should still see accurate account-specific content.
Troubleshooting: If users report seeing another user’s information, disable page caching immediately and review exclusions. User-specific pages must never be served from a shared public cache.
Step 5: Enable Browser Caching Carefully
Browser caching tells visitors’ browsers to store static files such as images, CSS, JavaScript, fonts, and icons. This reduces repeat downloads and improves repeat visits without changing your WordPress content.
- Open your caching plugin settings.
- Find Browser Cache, Static File Cache, or Cache Headers.
- Enable browser caching for static assets.
- Save changes.
- Test the site in a private window and on mobile.
Checkpoint: The site should look unchanged. Static files should load normally, and repeat page views may feel faster.
Troubleshooting: If design changes do not appear after editing CSS, clear the cache and use a cache-busting feature if your plugin provides one. Many plugins automatically append version numbers to changed assets, but custom code may need manual cache clearing.
Step 6: Test CSS and JavaScript Optimization Separately
CSS and JavaScript optimization can improve performance, but it is also where many caching problems begin. Minifying, combining, deferring, delaying, or removing unused assets can affect sliders, mobile menus, checkout buttons, analytics, ads, embedded forms, and page builder layouts.
Enable these settings one at a time, not all at once. Start with the lowest-risk options first.
- Enable Minify CSS, save, and test key pages.
- Enable Minify JavaScript, save, and test interactive elements.
- Test Defer JavaScript only after minification is stable.
- Test Delay JavaScript last because it can affect user interaction and tracking scripts.
- Avoid combining CSS or JavaScript unless your plugin recommends it for your hosting environment.
Checkpoint: The site should keep the same design, and all interactive features should work. Test navigation menus, search, forms, popups, accordions, comments, checkout buttons, and tracking scripts.
Troubleshooting: If something breaks, turn off the most recent setting first. If the issue disappears, keep that setting disabled or add the affected script to the plugin’s exclusion list.
Step 7: Configure Cache Preloading Without Overloading Hosting
Cache preloading warms the cache by visiting pages automatically after the cache is cleared. This helps the first real visitor avoid an uncached page load, but aggressive preload settings can stress low-resource hosting.
- Find Preload, Cache Preload, or Sitemap Preload in your caching plugin.
- Enable sitemap-based preloading if available.
- Use a moderate crawl interval or batch size.
- Avoid preloading every URL too frequently on shared hosting.
- Save changes and monitor server response time.
Checkpoint: The cache should rebuild gradually after you clear it. Your hosting account should not show CPU spikes, 503 errors, or timeout warnings.
Troubleshooting: If your host becomes slow after enabling preload, reduce the preload speed, increase the interval, or disable preload until you can test a smaller batch size.
Step 8: Use Object Cache Only When Your Hosting Supports It
Object caching stores database query results so WordPress can reuse them faster. It can help dynamic sites, WooCommerce stores, membership sites, and busy blogs, but it usually requires server support such as Redis or Memcached.
Do not enable object cache just because the option exists. First, confirm that your host supports it and that the required server service is active.
- Use object cache when your host provides Redis or Memcached support.
- Avoid enabling object cache if the plugin shows connection errors.
- Do not install multiple object cache drop-ins at the same time.
- Clear object cache after major plugin, theme, or database changes.
Checkpoint: Your caching plugin should show a connected or active object cache status. If it shows failed, disconnected, or unavailable, disable the object cache feature.
Troubleshooting: If the WordPress admin becomes slow or inconsistent after enabling object cache, disable it, clear all caches, and ask your host whether Redis or Memcached is configured correctly.
Step 9: Test the Site Like a Visitor
After configuring caching plugins, do not rely only on a speed score. You need to confirm that real visitor actions still work. Test from a private browser window, a mobile device, and a logged-in admin session.
- Open the homepage in a private window.
- Open a blog post and a static page.
- Submit a contact form test.
- Click mobile navigation menus.
- Test search, comments, filters, popups, and embedded forms.
- If you run WooCommerce, add a product to cart and reach checkout.
- Log in as an administrator and confirm the dashboard is not cached.
Checkpoint: Visitors should see the latest public content, forms should submit correctly, and logged-in areas should remain dynamic.
If you need to reset the cache during testing, follow this guide on how to clear cache in WordPress so you can remove old cached files without guessing.
Step 10: Fix Common Caching Plugin Problems
Most caching issues are caused by one recent setting. When troubleshooting, reverse changes in the order you enabled them. Avoid uninstalling plugins immediately unless the site is inaccessible.
Broken Layout After Enabling Cache
Clear all caches first. If the layout remains broken, disable CSS minification, CSS combination, remove unused CSS, or critical CSS features. Then test again in a private browser window.
Mobile Menu Stops Working
Disable JavaScript delay or defer settings temporarily. If the menu works again, exclude your theme menu script from delay or keep the setting off.
Contact Form Does Not Submit
Exclude the contact page from page cache and disable JavaScript delay for form scripts. Also confirm that spam protection scripts, captcha scripts, and AJAX requests are not delayed too aggressively.
WooCommerce Cart Shows Wrong Items
Immediately exclude cart, checkout, and account pages. Then clear page cache, object cache, browser cache, and CDN cache if active.
Admin Bar or Logged-In Content Appears for Visitors
Disable page caching until you confirm that logged-in users and admin pages are excluded. This is a serious cache configuration problem and should be fixed before caching is re-enabled.
Step 11: Maintain Caching Plugins Settings After Updates
Caching configuration is not a one-time task. Theme updates, plugin updates, WordPress core updates, hosting changes, and CDN changes can all affect how cached files behave.
- Clear all caches after major updates.
- Retest key pages after updating your theme or page builder.
- Review exclusions when adding WooCommerce, memberships, LMS, bookings, or custom dashboards.
- Check performance reports monthly instead of changing settings daily.
- Document which settings are enabled so you can restore the setup later.
Checkpoint: Your caching plugin should remain stable after updates, and you should know which settings are safe for your specific site.
Troubleshooting: If a problem appears immediately after an update, clear cache first, then disable only the newest or riskiest optimization setting. This helps you solve the problem without losing your entire configuration.
Build a Faster WordPress Site Without Risky Caching Plugins Settings
Configuring caching plugins safely is about control. Start with a backup, avoid overlapping plugins, enable page cache first, exclude dynamic pages, test CSS and JavaScript optimization separately, and verify the site like a real visitor.
The safest setup is not always the most aggressive setup. A stable caching configuration that keeps forms, carts, menus, dashboards, and logged-in experiences working is better than a fragile speed score that breaks business-critical features.
Further Reading
- Best WordPress Caching Plugins
- Complete WordPress Caching Setup Guide
- WordPress CDN Blog Setup
- Beginner Guide to WordPress Speed and Core Web Vitals