How to Use SEO Plugins With Blog Editorial Calendars
Build a repeatable WordPress workflow that connects keyword research, on-page SEO checks, publishing deadlines, and post-launch optimization.

An editorial calendar keeps your blog schedule organized, but it does not automatically make each post search-friendly. SEO plugins fill that gap by turning keyword targets, titles, meta descriptions, schema, readability checks, internal links, and indexing settings into repeatable tasks.
In this guide, you will learn how to connect your WordPress SEO plugin workflow with your blog calendar so every article moves through the same planning, drafting, optimization, publishing, and updating process. This is especially useful if you already follow a content planning workflow for WordPress blogs and want stronger SEO quality control before posts go live.
By the end, you will have a practical system your writers, editors, and site owners can use without guessing what “SEO-ready” means for each scheduled article.
Prerequisites
Before you build the workflow, make sure your WordPress site has the basic tools and access needed to manage SEO tasks properly.
- An active WordPress admin account with permission to edit posts and plugin settings.
- An SEO plugin such as Yoast SEO, Rank Math, All in One SEO, or a similar plugin.
- A blog editorial calendar, either inside WordPress, in a spreadsheet, or in a project management tool.
- A list of target keywords, content topics, and publishing dates.
- Access to Google Search Console or analytics data for post-launch review.
Step 1: Set Up Your SEO Plugin Before Planning the Calendar
Your SEO plugin should be configured before you assign deadlines. Otherwise, editors may plan content without knowing which metadata, schema, sitemap, and indexing settings are required for publication.
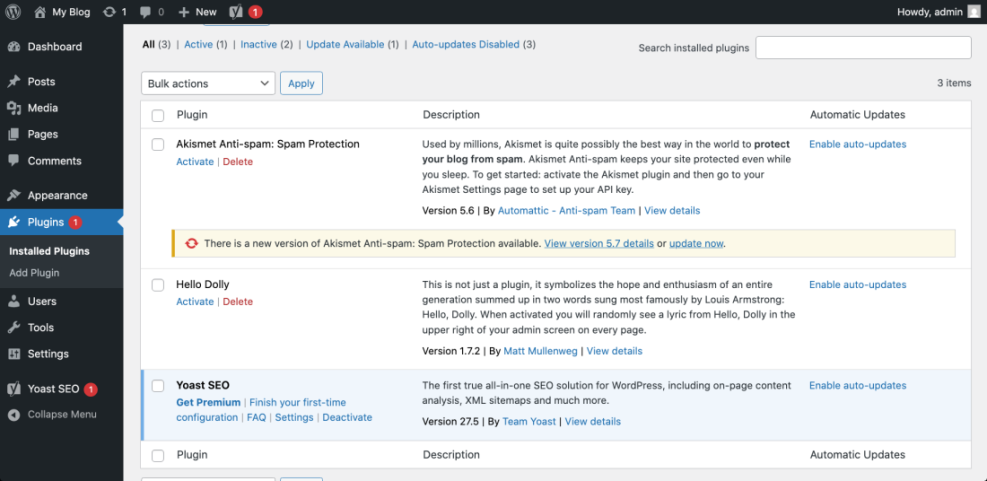
In WordPress, go to Plugins > Installed Plugins and confirm that your SEO plugin is active. Then open the plugin settings from the left admin menu and review the main configuration areas.
- Check that XML sitemaps are enabled.
- Confirm that posts are set to appear in search results.
- Review default title and meta description templates.
- Enable schema options if your plugin supports them.
- Connect Google Search Console or webmaster verification if available.
If you are still choosing a tool, review this comparison of WordPress SEO plugins and tools before standardizing your editorial workflow.
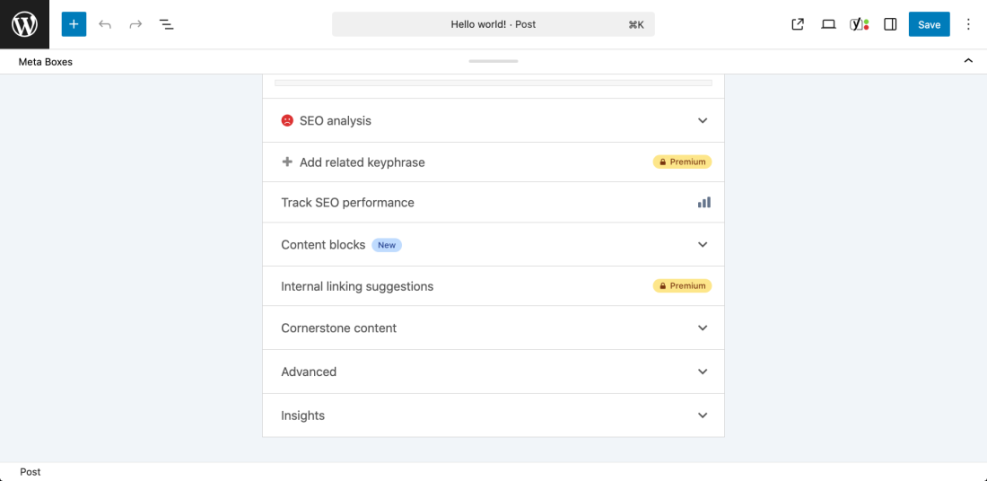
Checkpoint: Your SEO plugin should appear in the WordPress admin menu, and each post editor screen should show an SEO panel or sidebar.
Troubleshooting: If the SEO panel does not appear, check whether it is hidden in the Block Editor preferences, disabled for the post type, or blocked by another plugin conflict.
Step 2: Add SEO Fields to Your Editorial Calendar
Your calendar should track more than titles and due dates. Add SEO-specific columns so every article has a clear optimization target before writing starts.
Use these columns in your spreadsheet, project board, or editorial plugin:
- Primary keyword: The main search phrase the article targets.
- Search intent: Informational, commercial, local, navigational, or transactional.
- Content type: Tutorial, checklist, comparison, review, case study, or glossary article.
- SEO title status: Drafted, reviewed, approved, or needs revision.
- Meta description status: Drafted, reviewed, approved, or needs revision.
- Internal links needed: Existing pages the article should link to.
- Schema type: Article, FAQ, HowTo, Product, LocalBusiness, or another relevant type.
- Optimization owner: The person responsible for final SEO checks.
- Refresh date: The future date when the post should be reviewed again.
Checkpoint: Each scheduled article should have a keyword, intent, owner, and SEO review status before it reaches the draft stage.
Troubleshooting: If your team keeps skipping SEO fields, make them required before a post can move from “Planned” to “Drafting.”
Step 3: Assign Keywords Before Drafting the Post
SEO plugins work best when the writer knows the primary keyword before drafting. This prevents the common mistake of writing the article first and forcing a keyword into the content later.
For each calendar entry, choose one primary keyword and two or three related phrases. Add them to the calendar card or row before the writer begins.
- Open the calendar item for the upcoming post.
- Add the primary keyword in the keyword field.
- Add the search intent so the writer knows what the reader expects.
- Add competing or related article notes if your team tracks them.
- Assign the article to a writer only after the keyword and intent are approved.
For WordPress-specific planning, you can use a structured blog post optimization checklist to keep keyword placement, headings, images, and metadata consistent.
Checkpoint: The writer should be able to explain the article’s keyword, audience, and purpose before opening the WordPress editor.
Step 4: Use the SEO Plugin While Drafting, Not Only at the End
Many teams treat SEO plugins as final checklists, but they are more useful during drafting. Writers can use the plugin feedback to shape headings, introductions, image alt text, and content structure while the article is still flexible.
In WordPress, open Posts > Add New or edit the scheduled draft. Enter the primary keyword in the SEO plugin’s focus keyword field, then draft the article with that target in mind.
- Add the working title in the post title field.
- Enter the focus keyword in the SEO plugin panel.
- Write a clear introduction that confirms the topic quickly.
- Use descriptive headings that support the keyword and user intent.
- Add image alt text where images explain the topic.
- Review the plugin’s readability and SEO suggestions as you write.
Checkpoint: The draft should have a clear title, logical headings, a focus keyword, and no obvious missing SEO fields before it goes to editing.
Troubleshooting: If the plugin shows a low score even though the article is useful, review the specific recommendations instead of chasing a perfect score. Some plugin checks are mechanical and may not understand nuance, brand voice, or advanced content formats.
Step 5: Schedule Metadata Review Before the Publish Date
SEO titles and meta descriptions should not be rushed on publishing day. Add a dedicated metadata review stage to your calendar so editors can improve click-through potential before the article goes live.
Use the SEO plugin snippet editor or preview panel to write and review the search appearance. Keep the title specific, include the main keyword naturally, and make the description useful enough to earn the click.
- SEO title: Include the main keyword and a clear benefit.
- Meta description: Summarize the article and explain what the reader will learn.
- Slug: Keep it short, readable, and aligned with the article topic.
- Social title and description: Customize these if your plugin supports social previews.
Checkpoint: The calendar item should move to “SEO Review Complete” only after the title, meta description, slug, and social preview are checked.
Troubleshooting: If the SEO title is too long, remove filler words before removing the keyword or the main benefit. If the meta description is too generic, add a concrete outcome the reader will get from the article.
Step 6: Add Internal Linking Tasks to the Calendar
Internal links help readers discover related content and help search engines understand your site structure. Instead of adding links randomly, make internal linking a calendar task for every post.
Create two checklist items for each article: one for links from the new post to existing content, and one for links from older posts back to the new article after publication.
- Before publishing, add links from the draft to relevant existing articles.
- After publishing, search your site for older articles that should link to the new post.
- Update those older articles with natural, descriptive anchor text.
- Record the completed links in your calendar or SEO tracking sheet.
Checkpoint: Each new article should have relevant internal links before launch and at least one older post updated after launch when possible.
Troubleshooting: If you cannot find a relevant internal link, do not force one. Mark the article as a future hub opportunity and add related supporting content to the calendar.
Step 7: Match Schema and Indexing Settings to the Article Type
Some SEO plugins let you choose schema types and indexing rules at the post level. Your editorial calendar should identify these requirements early, especially for tutorials, reviews, FAQs, local pages, and product-related content.
In the post editor, open the SEO plugin’s schema or advanced settings. Choose the most accurate schema type available and confirm that the article is indexable unless there is a clear reason to exclude it.
- Use Article or BlogPosting schema for standard blog posts.
- Use FAQ options only when the visible page contains real FAQ content.
- Use HowTo options only when the page contains step-by-step instructions and your plugin supports valid output.
- Set posts to index and follow unless the content should intentionally stay out of search results.
Checkpoint: The selected schema should match the visible content, and the post should not be accidentally marked noindex.
Troubleshooting: If schema settings are missing, check whether your plugin includes them in the free version, whether another schema plugin controls markup, or whether schema is disabled globally.
Step 8: Create a Pre-Publish SEO Checklist
The final calendar stage should confirm that the post is ready for readers and search engines. This checklist protects your team from publishing drafts with missing metadata, weak links, empty alt text, or incorrect indexing settings.
Add this checklist to your editorial calendar template:
- Primary keyword added to the SEO plugin.
- SEO title reviewed and within the recommended length.
- Meta description written and reviewed.
- Slug checked for clarity and simplicity.
- Headings reviewed for structure and search intent.
- Internal links added naturally.
- Image alt text added where appropriate.
- Schema type checked.
- Indexing setting confirmed.
- Preview tested on desktop and mobile.
Checkpoint: The post should only move to “Scheduled” or “Published” after every required SEO item is complete.
Troubleshooting: If a post is urgent but not optimized, schedule it as a draft review instead of publishing immediately. Rushed publishing often creates cleanup work later.
Step 9: Schedule SEO Refreshes After Publication
SEO work does not end when a post is published. Your editorial calendar should include review dates for updating rankings, refreshing examples, improving internal links, and rewriting metadata when performance is weak.
Set a review reminder 30 to 90 days after publication for important posts. For evergreen content, schedule recurring reviews every 6 to 12 months depending on how quickly the topic changes.
- Open your analytics or Google Search Console data.
- Check impressions, clicks, click-through rate, and average position.
- Look for queries that are close to ranking but not fully addressed.
- Update the post with better sections, clearer headings, or stronger examples.
- Revise the SEO title or meta description if impressions are high but clicks are low.
- Record the update date in your calendar.
Checkpoint: Your editorial calendar should show both original publish dates and future SEO refresh dates.
Troubleshooting: If rankings drop after an update, compare the previous version with the new version. You may have removed useful sections, changed intent, weakened internal links, or altered the title too aggressively.
Step 10: Build a Repeatable Team Workflow
The best SEO plugin setup will fail if no one owns the process. Assign clear responsibilities so writers, editors, SEO reviewers, and publishers know exactly when to use the plugin and what “done” means.
A simple workflow can look like this:
- Planner: Adds topic, keyword, intent, and target publish date.
- Writer: Drafts the post using the focus keyword and content brief.
- Editor: Reviews structure, clarity, headings, and reader value.
- SEO reviewer: Checks metadata, links, schema, indexing, and plugin feedback.
- Publisher: Schedules the post and confirms the final preview.
- Optimizer: Reviews performance after publication and schedules updates.
Checkpoint: Every calendar status should have one owner, one expected outcome, and one clear next step.
Troubleshooting: If posts stall between editing and publishing, your SEO review stage may be too vague. Replace “optimize post” with specific tasks such as “write meta description,” “add three internal links,” and “confirm index setting.”
Turn Your Editorial Calendar Into an SEO Workflow
Using SEO plugins with a blog editorial calendar gives your team a reliable system instead of a last-minute checklist. The calendar controls timing and ownership, while the SEO plugin controls optimization quality at the post level.
Start by adding keyword, metadata, internal linking, schema, and refresh fields to your calendar. Then make SEO review a required stage before publication so every WordPress post has a clear path from idea to optimized article.
Once the workflow is in place, your blog becomes easier to manage, easier to improve, and more consistent for both readers and search engines.
Further Reading
- Editorial Calendar for WordPress
- Content Briefs for WordPress Writing
- Internal Linking Strategies for WordPress
- Yoast SEO Setup Guide
Frequently Asked Questions
Should I use an SEO plugin checklist for every blog post?
Why does my SEO plugin show a bad score even when the article is useful?
What should I do if a scheduled post has no keyword yet?
Can SEO plugin settings harm my site if used incorrectly?
How long does this workflow add to the publishing process?